Wednesday, June 27, 2007

performance note for VMs: they love fast drives

Because virtual machines are essentially big files, you will benefit if the disks they are stored on are fast. So, if you stripe a couple SATA or SAS drives, this should really help speed things up. Enterprise users will obviously have access to better firepower (RAID 1+0, RAID 5, etc), but I'm framing this in the context of the tech dabbler just getting his feet wet with the technology.

I bring this issue up because I put an old, circa 1999 20GB spare drive in my XP workstation and used that drive as the conversion destination of my local XP Professional Workstation to vm. After the conversion, which was successful, I started the vm and the performance was horrible! It was almost like the vm hung or was frozen. In truth, the vm was just extremely slow because the IDE drive was circa 1999 and had little buffer for the 8GB+ vm. I didn't immediately know what was happening, so I used XP's Performance Monitor to view average disk queue length.


Average disk queue length is a rough measure of disk performance, but it is a useful gauge of i/o problems. For me, I find that values of over 20 indicate performance issues. Your mileage may vary.

One note: if you don't like the default scale of 100:1 on the Performance Monitor chart, you can change that default scale by:
1) right-clicking on the statistic in the legend of the chart
2) select Properties
3) click the Data tab
4) choose another scale under the Default Scale dropdown menu

UPDATE 7/6/2007: I've expanded my discussion of performance monitoring VMware Server here:
/2007/07/measuring-performance-while-using.html

Also, I noticed my performance seems to suffer if you use the "Split Disk Into 2GB files" option. As well, I selected "Allocate all disk space now" for better performance.

In regards to this option, I found a bug in the VMware Converter gui. When I initially went to configure the conversion of the local machine, I was not able to deselect the "Split disk into 2GB files" option for the destination drive (a second local hard disk) that I wanted to use.


The checkbox was greyed out and unselectable. Trying to fix the problem, I returned to the destination dialog box, changed my destination drive to a network share and the option suddenly became available. On a hunch, I then went back to the destination location window, changed the destination drive to the original local drive and the "Split disk into 2GB files" option was now available.

I don't know why the option was made unavailable at first, but I was glad to be able to route around the error.

how to get operating system version in Linux/Solaris

A quicky because my brain wasn't working well yesterday. Here are two quick ways to get the operating system version on a Linux box or a Solaris box:

1) sar
Take the top of the output using "sar ¦ head". The output looks like this:
cricketbox cricket >sar ¦ head

SunOS njunpcrkt00 5.8 Generic_108528-29 sun4u 06/27/07

00:01:00 %usr %sys %wio %idle
00:06:00 0 1 1 98
00:11:00 1 2 2 95
00:16:00 1 2 7 90


2) uname -a
cricketbox cricket >uname -a
SunOS njunpcrkt00 5.8 Generic_108528-29 sun4u sparc SUNW,Sun-Fire-280R


On a Linux box like the Fedora Core 6 box below, uname may only print the kernel version:
[user@computer ~]# uname -a
Linux computer.test.com 2.6.18-1.2798.fc6 #1 SMP Mon Oct 16 14:37:32 EDT 2006 i686 i686 i386 GNU/Linux

Here's a related article on how to find the BIOS version of your hardware:
http://www.techanswerguy.com/2007/07/finding-out-bios-version-in-linux.html

Have a good day.

Friday, June 22, 2007

from IIS, convert an SSL cert to PEM format

As we were moving our SSL termination from the web servers to an F5 3400 load balancing switch, I needed to convert our SSL certificate to PEM format. This is a subject that has been the source of much frustration and I thought I'd clarify the process for individuals suffering the same fate as I using step by step instructions.

Update 2010/04/06
On Windows 2003, you can only export the private key via the Certificate Manager Snap-In, not the IIS MMC.
*** end update ***

Requirements
In order to do the conversion, you'll need access to your IIS box with an SSL certificate installed and OpenSSL. I run OpenSSL using cygwin (http://www.cygwin.com/), a set of Unix tools for NT.

Overview
1. Export the certificate from IIS
2. Convert the PKCS#12 certificate
3. Verify the certificate
4. Move the sections in the certificate into the correct order
5. Final test

Detailed Steps

Export the certificate from IIS
1. Open the Internet Information Services (IIS) Manager administration tool.
2. Expand the Web Sites node and locate the SSL-enabled Web site.
3. Right-click this Web site and click Properties.
4. Click the Directory Security tab and in the Secure Communications section of the window, select the View Certificate box.
5. Click the Details tab and click Copy to File


6. Click Next on the Welcome to the Certificate Export Wizard page.


7. Select Yes, export the private key and click Next:


Note: The private key MUST be exported for SSL to work. If the option to export the private key is unavailable, see Microsoft article 232154 – IIS: Export Private Key Option is Grayed When Exporting a Server Certificate.

8. Ensure that the Personal Information Exchange –PKCS #12 radio button is selected and select ONLY the Include all certificates in the certification path if possible check box. Click Next:


9. Enter a password and click Next:


10. Enter a file name and location and click Next. Give the file an extension of .PFX:


11. Click Finish:


Convert the PKCS#12 certificate
1. Move the exported .PFX certificate file to a location from where it may be converted with OpenSSL
2. Convert it with openssl
# openssl.exe pkcs12 -in exportPKCS12.pfx -out cert.pem -nodes

bash-3.00$ openssl.exe pkcs12 -in exportPKCS12.pfx -out cert.pem -nodes
Enter Import Password:
MAC verified OK


Verify the certificate
1. Ensure that the converted certificate is in correct x509 format. Do this by verifying that the following command produces no errors:
# openssl x509 -in cert.pem -text

bash-3.00$ openssl x509 -in cert.pem -text
Certificate:
Data:
Version: 3 (0x2)
Serial Number:
74:e0:f4:04:1d:af:04:43:aa:89:27:69:ab:74:f9:55
Signature Algorithm: sha1WithRSAEncryption
Issuer: O=VeriSign Trust Network, OU=VeriSign, Inc., OU=VeriSign International Server CA - Class 3, OU=www.veris
ign.com/CPS Incorp.by Ref. LIABILITY LTD.(c)97 VeriSign
Validity
Not Before: Aug 16 00:00:00 2005 GMT
Not After : Aug 26 23:59:59 2007 GMT
Subject: C=US, ST=New York, L=New York, O=Test, OU=IT eServicesTerms of use at www.verisign.com/rpa (c
)00, OU=Terms of use at www.verisign.com/rpa (c)00, CN=www.test.com
Subject Public Key Info:
Public Key Algorithm: rsaEncryption
RSA Public Key: (1024 bit)
Modulus (1024 bit):
00:cb:70:5f:ce:ee:d6:8c:5f:13:7a:06:df:51:56:
7d:d9:50:11:dc:69:d7:5d:d8:90:f7:9f:47:df:8d:
cc:56:ae:af:e0:c5:b5:5e:40:a8:8c:5d:03:a8:5e:
49:1c:13:42:2e:bd:d5:29:5e:16:49:18:9b:a3:84:
32:d8:f9:8e:84:2d:14:27:a6:80:b5:19:03:93:39:
44:9f:4f:b8:c5:49:42:9a:ef:0c:9a:cf:05:9e:6f:
02:d7:fb:0b:04:d5:1d:f8:fa:3b:29:d8:ed:bb:fd:
9b:ae:fc:27:1d:d3:ed:d6:86:8a:fb:f0:a3:61:85:
13:a0:84:1c:8a:12:64:0e:17
Exponent: 65537 (0x10001)
X509v3 extensions:
X509v3 Basic Constraints:
CA:FALSE
X509v3 Key Usage:
Digital Signature, Key Encipherment
X509v3 CRL Distribution Points:
URI:http://crl.verisign.com/Class3InternationalServer.crl

X509v3 Certificate Policies:
Policy: 2.16.840.1.113733.1.7.23.3
CPS: https://www.verisign.com/rpa

X509v3 Extended Key Usage:
Netscape Server Gated Crypto, Microsoft Server Gated Crypto, TLS Web Server Authentication, TLS Web Clie
nt Authentication
Authority Information Access:
OCSP - URI:http://ocsp.verisign.com

1.3.6.1.5.5.7.1.12:
0_.].[0Y0W0U..image/gif0!0.0...+..............k...j.H.,{..0%.#http://logo.verisign.com/vslogo.gif
Signature Algorithm: sha1WithRSAEncryption
88:ff:10:98:c4:90:62:c2:77:61:33:5e:ba:fa:5f:ca:7e:2d:
7c:1e:b7:64:7c:b8:df:33:4b:92:8a:0a:29:85:b8:9c:c5:93:
db:b2:f0:fc:77:b4:50:db:ec:db:df:c2:36:b9:b6:9e:7c:12:
c4:8d:83:02:43:f1:fc:6a:94:f9:d9:75:e5:66:70:04:74:04:
89:f9:15:8f:1f:45:36:51:b7:a9:7f:7d:94:a9:10:e3:51:c5:
b0:1c:b6:d4:23:cb:66:1d:c0:b0:0d:72:69:dd:49:9d:a8:e4:
33:12:70:8a:b7:84:85:a5:3a:5c:7f:c9:d1:e7:e2:b4:31:57:
ff:e4
-----BEGIN CERTIFICATE-----
MIIErTCCBBagAwIBAgIQdOD0BB2vBEOqiSdpq3T5VTANBgkqhkiG9w0BAQUFADCB
ujEfMB0GA1UEChMwVmVyaVNpZ24gVHJ1c3QgTmV0d29yazEXMBUGA1UECxMOVmVy
aVNpZ24sIEluYy4xfzAxBgNVBAsTKlZlcmlTaWduIEludGVybmF0aW9uYWwgU2Vy
dmVyIENBIC0gQ2xhcsMgMzFJMEcGA1UECxNAd3d3LnZlcmlzaWduLmNvbS9DUFMg
SW5jb3JwLmJ5IFJlZi4gTElBQklMSVRZIExURC4oYyk5NyBWZXJpU2lnbjAeFw0w
NTA4MTYwMDAwMDBaFw0wNzA4MjYyMzU5NTlaMIHlMQswCQYDVQQGEwJVUzETMBEG
A1UECBMKTmV3IEplcnNleTEOMAwGA1UEBxQFVW5pb24xGDAWBgNVBAoUD0JlZCBC
YXRoIEJleW9uZDE/MD0GA1UECxQ2SVQgZVNlcnZpY2VzVGVybXMgb2YgdXNlIGF0
IHd3dy52ZXJpc2lnbi5jb20vcnBhIChjKTAwMTMwMQYDVQQLFCpUZXJtcyBvZiB1
c2UgYXQgd3d3LnZlcmlzaWduLmNvbS9ycGEgKGMpMDAxITAfBgNVBAMUGHd3dy5i
ZWRiYXRoYW5kYmV5b25kLmNvbTCBnzANBgkqhkiG9w0BAQEFAAOBjQAwgYkCgYEA
y3Bfzu7WjF8TegbfUVZ92VAR3GnXXdiQ959H343MVq6v4MW1XkCojF0DqF5JHBNC
Lr3VKV4WSRibo4Qy2PmOhC0UJ6aAtRkDkzlEn0+4xUlCmu8Mms8Fnm8C1/sLBNUd
+Po7Kdjtu/2brvwnHdPt1oaK+/CjYYUToIQcihJkDhcCAwEAAaOCAYUwggGBMAkG
A1UdEwQCMAAwCwYDVR0PBAQDAgWgMEYGA1UdHwQ/MD0wO6A5oDeGNWh0dHA6Ly9j
cmwudmVyaXNpZ24uY29tL0NsYXNzM0ludGVybmF0aW9uYWxTZXJ2ZXIuY3JsMEQG
A1UdIAQ9MDswOQYLYIZIAYb4RQEHFwMwKjAoBggrBgEFBQcCARYcaHR0cHM6Ly93
d3cudmVyaXNpZ24uY29tL3JwYTA0BgNVHSUELTArBglghkgBhvhCBAEGCisGAQQB
gjcKAwMGCCsGAQUFBwMBBggrBgEFBQcDAjA0BggrBgEFBQcBAQQoMCYwJAYIKwYB
BQUHMAGGGGh0dHA6Ly9vY3NwLnZlcmlzaWduLmNvbTBtBggrBgEFBQcBDARhMF+h
XaBbMFkwVzBVFglpbWFnZS9naWYwITAfxAcGBSsOAwIaBBSP5dMahqyNjmvDz4Bq
1EgYLHsZLjAlFiNodHRwOi8vbG9nby52ZXJpc2lnbi5jb20vdnNsb2dvLmdpZjAN
BgkqhkiG9w0BAQUFAAOBgQCI/xzYxJBiwndhM166+l/Kfi18HrdkfLjfM0uSigop
hbicxZPbsvD8d7RQ2+zb38I2ubaefBLEjYMCQ/H8apT52XXlZnAEdASJ+RWPH0U2
Ubepf32UqRDjUcWwHLbUI8tmHcCwDXJp3UmdqOQzEnCKt4SFpTpcf8nR5+K0MVf/
5A==
-----END CERTIFICATE-----


2. Now that we've verified that the certificate is in correct x509 format, check that the certificate file contains a private key:
# cat cert.pem

Look at the output (example shown below) and check for a section that looks similar to this:
-----BEGIN RSA PRIVATE KEY-----
XaBbMFkwVzBVFglpbWFnZS9naWYwITAfxAcGBSsOAwIaBBSP5dMahqyNjmvDz4Bq
1EgYLHsZLjAlFiNodHRwOi8vbG9nby52ZXJpc2lnbi5jb20vdnNsb2dvLmdpZjAN
BgkqhkiG9w0BAQUFAAOBgQCI/xzYxJBiwndhM166+l/Kfi18HrdkfLjfM0uSigop
hbicxZPbsvD8d7RQ2+zb38I2ubaefBLEjYMCQ/H8apT52XXlZnAEdASJ+RWPH0U2
-----END RSA PRIVATE KEY-----

Move the sections in the certificate into the correct order

For some reason, OpenSSL converts the PFX to PEM where the sections of the certificate are in the wrong order. The key sections (shown below) must be in the following order:
a. Private key
b. Intermediate certificate
c. Server certificate

As the PEM is a text file, use your favorite editor (vi or emacs or any editor that does not add or remove line feeds) to reorder the sections as noted above.

Key sections within the certificate

The following is the RSA PRIVATE KEY section:
Bag Attributes
1.3.6.1.4.1.311.17.2:
localKeyID: 01 00 00 00
Microsoft CSP Name: Microsoft RSA SChannel Cryptographic Provider
friendlyName: 4b9cef4cc8c9b849ff5c662fd3e0ef7e_76267e3e-6183-4d45-886e-6e067297b38f
Key Attributes
X509v3 Key Usage: 10
-----BEGIN RSA PRIVATE KEY-----
Proc-Type: 4,ENCRYPTED
DEK-Info: QWS-EDE3-CCC,43E7ACA5F4423968
pZJ2SfsSVqMbRRf6ug37Clua5gY0Wld4frPIxFXyJquUHr31dilW5ta3hbIaQ+Rg
... (random characters)
v8dMugeRplkaH2Uwt/mWBk4t71Yv7GeHmcmjafK8H8iW80ooPO3D/ENV8X4U/tlh
5eU6ky3WYZ1BTy6thxxLlwAullynVXZEflNLxq1oX+ZYl6djgjE3qg==
-----END RSA PRIVATE KEY-----

The following is the SERVER CERTIFICATE section:

Bag Attributes
localKeyID: 01 00 00 00
friendlyName: Test Certificate
subject=/C=AU/ST=NSW/L=test/O=Furnishing/OU=Support/CN=test.retail.home
issuer=/DC=ranch/DC=retail/CN=home
-----BEGIN CERTIFICATE-----
MIIFiTCCBHGgAwIBAgIKCGryDgAHzANBgkqhkiG9w0BAQUFADA8MRMwEQYK
... (random characters)
5pLDWYVHhLkA1pSxvFjNJHRSIydWHc5ltGyKqIUcBezVaXyel94pNSUYx07NpPV/
MY2ovQyQZM8gGe3+lGFum0VHbv/y/gB9HhFesog=
-----END CERTIFICATE-----

The following is the INTERMEDIATE CA CERTIFICATE section:

Bag Attributes:
subject=/DC=ranch/DC=retail/CN=home
issuer=/DC=ranch/DC=retail/CN=home
-----BEGIN CERTIFICATE-----
MIIESDCCAzCgAwIBAgIQah20fCRYTY9LRXYMIRaKGjANBgkqhkiG9w0BAQUFADA8
... (random characters)
Nt0nksawDnbKo86rQcNnY5xUs7c7pj2zxj/IOsgNHUp5W6dDI9pQoqFFaDk=
-----END CERTIFICATE-----


Further Intermediate CA certificates may follow depending on the certification path of the exported certificate.

Example of key sections of PEM in wrong order:


Example of key sections of PEM in correct order:


Final test procedure
Use OpenSSL’s verify command to verify that the certificate is properly formed:
# openssl verify cert.pem

bash-3.00$ openssl verify cert.pem
cert2.pem: OK


That's it folks!

Troubleshooting
When I did not move the server certificate portion of the PEM file to the bottom of the PEM file, I received the error:
error 20 at 0 depth lookup:unable to get local issuer certificate

As WordPad does not add control characters to the document, I used WordPad to move the server certificate portion of the PEM file to the bottom. After doing this, I then received the success message:

bash-2.02$ openssl verify certorder.pem
certorder.pem: OK

Thursday, June 07, 2007

VMware Player install on Linux (Fedora Core 6)

As I happen to live in all three worlds (Mac, Linux and Windows), I occasionally need to run XP programs. I thought it would be an even better idea to be able to run XP programs while in Linux, so I recently converted my XP OS to a virtual machine using VMware Converter. If you wish to convert your 2000/XP system to a vm, here is one way to do that:
http://www.techanswerguy.com/2007/06/converting-physical-server-using-vmware.html

Once I had a working virtual copy of my XP system, I then installed VMware Player on my Fedora Core 6 system.

Here are the steps to do that:

1) Get the RPM download from VMware:
http://www.vmware.com/download/player

2) Install the RPM:
[root@computer ~]# rpm -ivh VMware-player-2.0.0-45731.i386.rpm
Preparing... ########################################### [100%]
1:VMwarePlayer ########################################### [100%]

3) Configure VMware Player:
[root@computer ~]# /usr/bin/vmware-config.pl
Making sure services for VMware Player are stopped.

Stopping VMware services:
Virtual machine monitor [ OK ]

Configuring fallback GTK+ 2.4 libraries.

In which directory do you want to install the theme icons?
[/usr/share/icons]

What directory contains your desktop menu entry files? These files have a
.desktop file extension. [/usr/share/applications]

In which directory do you want to install the application's icon?
[/usr/share/pixmaps]

Trying to find a suitable vmmon module for your running kernel.

None of the pre-built vmmon modules for VMware Player is suitable for your
running kernel. Do you want this program to try to build the vmmon module for
your system
(you need to have a C compiler installed on your system)? [yes]

Using compiler "/usr/bin/gcc". Use environment variable CC to override.

What is the location of the directory of C header files that match your running kernel? [/lib/modules/2.6.18-1.2798.fc6/build/include]

Extracting the sources of the vmmon module.

Building the vmmon module.

Using 2.6.x kernel build system.
make: Entering directory `/tmp/vmware-config0/vmmon-only'
make -C /lib/modules/2.6.18-1.2798.fc6/build/include/.. SUBDIRS=$PWD SRCROOT=$PWD/. modules
make[1]: Entering directory `/usr/src/kernels/2.6.18-1.2798.fc6-i686'
CC [M] /tmp/vmware-config0/vmmon-only/linux/driver.o
CC [M] /tmp/vmware-config0/vmmon-only/linux/hostif.o
CC [M] /tmp/vmware-config0/vmmon-only/common/comport.o
CC [M] /tmp/vmware-config0/vmmon-only/common/cpuid.o
CC [M] /tmp/vmware-config0/vmmon-only/common/hash.o
CC [M] /tmp/vmware-config0/vmmon-only/common/memtrack.o
CC [M] /tmp/vmware-config0/vmmon-only/common/phystrack.o
CC [M] /tmp/vmware-config0/vmmon-only/common/task.o
CC [M] /tmp/vmware-config0/vmmon-only/common/vmciContext.o
CC [M] /tmp/vmware-config0/vmmon-only/common/vmciDatagram.o
CC [M] /tmp/vmware-config0/vmmon-only/common/vmciDriver.o
CC [M] /tmp/vmware-config0/vmmon-only/common/vmciDs.o
CC [M] /tmp/vmware-config0/vmmon-only/common/vmciGroup.o
CC [M] /tmp/vmware-config0/vmmon-only/common/vmciHashtable.o
CC [M] /tmp/vmware-config0/vmmon-only/common/vmciProcess.o
CC [M] /tmp/vmware-config0/vmmon-only/common/vmciResource.o
CC [M] /tmp/vmware-config0/vmmon-only/common/vmciSharedMem.o
CC [M] /tmp/vmware-config0/vmmon-only/common/vmx86.o
CC [M] /tmp/vmware-config0/vmmon-only/vmcore/moduleloop.o
LD [M] /tmp/vmware-config0/vmmon-only/vmmon.o
Building modules, stage 2.
MODPOST
CC /tmp/vmware-config0/vmmon-only/vmmon.mod.o
LD [M] /tmp/vmware-config0/vmmon-only/vmmon.ko
make[1]: Leaving directory `/usr/src/kernels/2.6.18-1.2798.fc6-i686'
cp -f vmmon.ko ./../vmmon.o
make: Leaving directory `/tmp/vmware-config0/vmmon-only'
The module loads perfectly in the running kernel.

Extracting the sources of the vmblock module.

Building the vmblock module.

Using 2.6.x kernel build system.
make: Entering directory `/tmp/vmware-config0/vmblock-only'
make -C /lib/modules/2.6.18-1.2798.fc6/build/include/.. SUBDIRS=$PWD SRCROOT=$PWD/. modules
make[1]: Entering directory `/usr/src/kernels/2.6.18-1.2798.fc6-i686'
CC [M] /tmp/vmware-config0/vmblock-only/linux/block.o
CC [M] /tmp/vmware-config0/vmblock-only/linux/control.o
CC [M] /tmp/vmware-config0/vmblock-only/linux/dbllnklst.o
CC [M] /tmp/vmware-config0/vmblock-only/linux/dentry.o
CC [M] /tmp/vmware-config0/vmblock-only/linux/file.o
CC [M] /tmp/vmware-config0/vmblock-only/linux/filesystem.o
CC [M] /tmp/vmware-config0/vmblock-only/linux/inode.o
CC [M] /tmp/vmware-config0/vmblock-only/linux/module.o
CC [M] /tmp/vmware-config0/vmblock-only/linux/stubs.o
CC [M] /tmp/vmware-config0/vmblock-only/linux/super.o
LD [M] /tmp/vmware-config0/vmblock-only/vmblock.o
Building modules, stage 2.
MODPOST
CC /tmp/vmware-config0/vmblock-only/vmblock.mod.o
LD [M] /tmp/vmware-config0/vmblock-only/vmblock.ko
make[1]: Leaving directory `/usr/src/kernels/2.6.18-1.2798.fc6-i686'
cp -f vmblock.ko ./../vmblock.o
make: Leaving directory `/tmp/vmware-config0/vmblock-only'
The module loads perfectly in the running kernel.

Do you want networking for your virtual machines? (yes/no/help) [yes]

Configuring a bridged network for vmnet0.

The following bridged networks have been defined:

. vmnet0 is bridged to eth0

All your ethernet interfaces are already bridged.

Do you want to be able to use NAT networking in your virtual machines? (yes/no)
[yes] yes

Do you want to be able to use host-only networking in your virtual machines?
[no]

Extracting the sources of the vmnet module.

Building the vmnet module.

Using 2.6.x kernel build system.
make: Entering directory `/tmp/vmware-config0/vmnet-only'
make -C /lib/modules/2.6.18-1.2798.fc6/build/include/.. SUBDIRS=$PWD SRCROOT=$PWD/. modules
make[1]: Entering directory `/usr/src/kernels/2.6.18-1.2798.fc6-i686'
CC [M] /tmp/vmware-config0/vmnet-only/driver.o
CC [M] /tmp/vmware-config0/vmnet-only/hub.o
CC [M] /tmp/vmware-config0/vmnet-only/userif.o
CC [M] /tmp/vmware-config0/vmnet-only/netif.o
CC [M] /tmp/vmware-config0/vmnet-only/bridge.o
CC [M] /tmp/vmware-config0/vmnet-only/filter.o
CC [M] /tmp/vmware-config0/vmnet-only/procfs.o
CC [M] /tmp/vmware-config0/vmnet-only/smac_compat.o
SHIPPED /tmp/vmware-config0/vmnet-only/smac_linux.x386.o
LD [M] /tmp/vmware-config0/vmnet-only/vmnet.o
Building modules, stage 2.
MODPOST
WARNING: could not find /tmp/vmware-config0/vmnet-only/.smac_linux.x386.o.cmd for /tmp/vmware-config0/vmnet-only/smac_linux.x386.o
CC /tmp/vmware-config0/vmnet-only/vmnet.mod.o
LD [M] /tmp/vmware-config0/vmnet-only/vmnet.ko
make[1]: Leaving directory `/usr/src/kernels/2.6.18-1.2798.fc6-i686'
cp -f vmnet.ko ./../vmnet.o
make: Leaving directory `/tmp/vmware-config0/vmnet-only'
The module loads perfectly in the running kernel.

Starting VMware services:
Virtual machine monitor [ OK ]
Blocking file system: [ OK ]
Virtual ethernet [ OK ]
Bridged networking on /dev/vmnet0 [ OK ]
Host network detection [ OK ]

The configuration of VMware Player 2.0.0 build-45731 for Linux for this running
kernel completed successfully.

Enjoy,

--the VMware team

You can now run VMware Player by invoking the following command:
"/usr/bin/vmplayer".


4) Run VMware Player:
You can now run VMware Player by invoking the following command:
"/usr/bin/vmplayer":

[root@computer ~]# /usr/bin/vmplayer
Ah, the lovely splash screen!


5) Open an existing virtual machine:


6) Find your existing virtual machine's .vmx file:


Your existing virtual machine will start:


Don't forget..you cannot start virtual machines within a virtual machine!

Enjoy!

Wednesday, June 06, 2007

VMware Player: no sound / "bad directsound driver"

After I converted my Windows 2000 Professional machine over to a virtual machine, I was disappointed to find that VMware Server doesn't support sound. Here's non-official confirmation of that:
http://kontrawize.blogs.com/kontrawize/2006/03/vmware_server_v_2.html

UPDATE 7/6/2007: I have gotten sound to work using both a Windows 2000 Advanced Server and an XP guest system in VMware Server. You will need to apply the tweak below to enable sound.

Therefore, I downloaded VMware Player, simply to play sound from my VM. Upon installing Player, I saw this error when I tried to initialize my audio application:
"Bad DirectSound Driver"

Apparently, VMware Player sets its config file for the virtual machine to use Sound Blaster emulation. When in truth, the emulation should be Creative AudioPCI (ES1371,ES1373).

So if you have working sound on your host system, but not on the vm running in VMware Player, here are the configuration lines in your VMs .vmx file you need to have in order to enable sound in the virtual machine running in VMware Player:
sound.present = "TRUE"
sound.virtualDev = "es1371"
sound.filename = "-1"
sound.autodetect = "TRUE"

Just make sure to edit/add the lines while your virtual machine is powered off.

It would be nice if VMware could somehow do a pass-through to the actual hardware device installed on the host so that you could do nice things like get low latency for recording software applications like Cubase or Reason.

I will ask the gurus..
UPDATE: Pass through to the real sound card not possible with Workstation or Player. Sound only works as emulated.

VMware Player is a bit of a kids toy, as there is not much to configure and the CD/Floppy/Network/Sound devices are all toggles at the top of the Player window:


Kinda weak. But hey, its free and it works.

Kontrawize also has their own opinions of the differences between VMware Server and Workstation here:
http://kontrawize.blogs.com/kontrawize/2006/03/vmware_server_v.html

Ah, the silliness continues..

converting a physical server using VMware Converter

This morning, I spent some time converting a physical server to a virtual machine using VMware Converter. Here's a good starter page of info to work from, the VMware Converter FAQ, if you do not know the capabilities of VMware Converter:
http://www.vmware.com/products/converter/faqs.html

One detractor from the Converter is that you cannot convert a physical Linux machine to a VMware VM. Oh well.

In this case, however, the physical server was a Windows 2000 Professional machine and is home to my digital audio workstation. This box has a myriad of applications on it, from Cool Edit to Cakewalk and Cubase to Rebirth and Reason. I was planning on building out a newer, more powerful server using the case that the Win2K Professional is in and I don't want to take time and effort to reinstall those applications on my XP box. Also, I don't want to slow the XP box down with a crapload of new applications gobbing up the registry, so it makes sense that I convert my 2000 box to a virtual machine. Also, once virtualized, I will then be able to use the audio workstation in either of my primary environments, XP or Fedora.

VMware Converter is installed on my XP Professional machine. So here is the plan:
-Start VMware Converter on XP
- Convert a physical computer, my Windows 2000 digital audio workstation, to a virtual machine
- Create a Windows share on my XP machine and use the share as the destination for the conversion

The process was relatively pain-free and quick. Here's what I did.
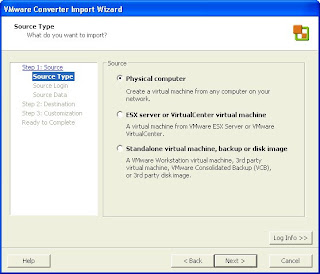
1) on XP, I started VMware Converter. There is a splash screen and then I was given a choice of source computer for the conversion. I chose "Physical Computer:"


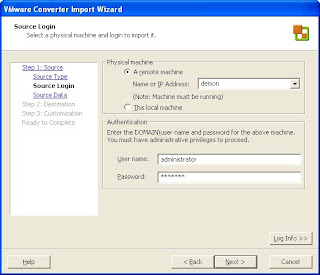
2) Converter asks for the name or IP of the remote machine and my authentication credentials:


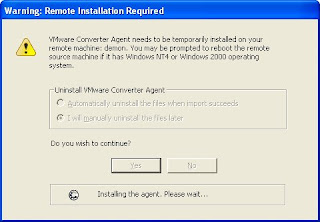
3) Once logged in, Converter asks to temporarily install Converter Agent on the source machine. I chose to manually uninstall the files later if anything went wrong during the conversion process:


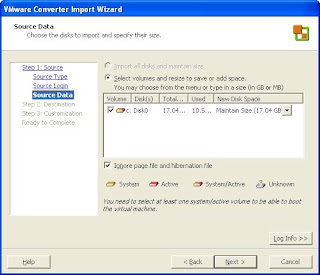
4) Converter then shows the system or active drives on the OS to convert. My setup of one active system drive is the simplest scenario:


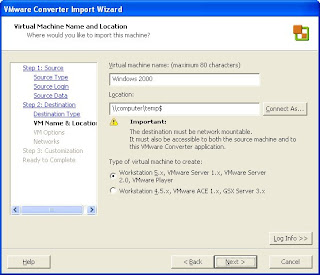
5) Converter asked me for a vm name and a location (ie, a network share) to write the destination vm to:


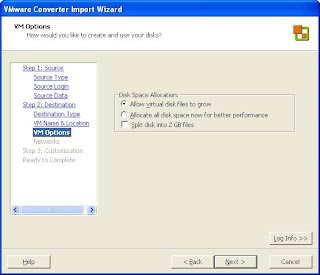
6) Next, I could specify a dynamic virtual disk or a fixed allocation for better performance. In order to save space on my main system, I chose dynamic ("Allow virtual disk files to grow"):


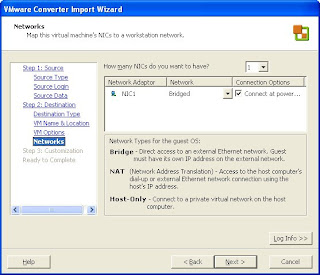
7) Converter asks what type of networking I'd like. Bridged is the default and I accept it:


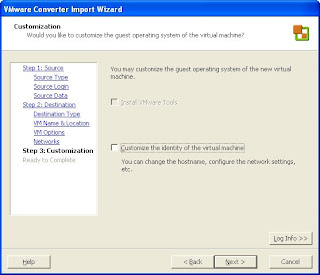
8) I chose no network or hostname customizations:


9) At this point, Converter displays a summary screen and is ready for me to start the import.


10) One small snag: since I just installed the Converter Agent on the source machine, Converter needs to reboot the source machine to make the Agent active. I click "Yes:"


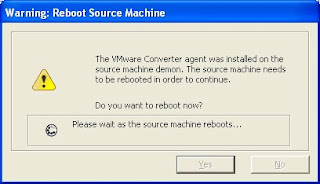
11) Unfortunately, after the reboot of the source server, the install hangs and does not progress. Figuring that it might be related to the recent Converter Agent install, I stopped the import. I recreated the conversion steps above (steps 1-10). After rebuilding the import project, the conversion started up again successfully and I saw the Progress column "% Done" increment higher:


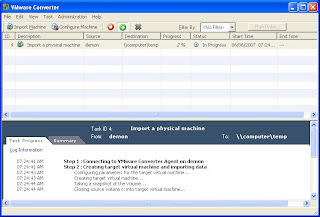
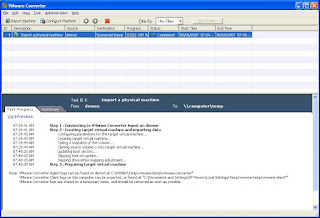
12) Happily, the conversion works!


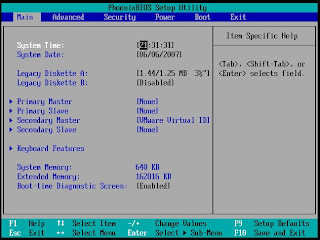
Now, after I powered up my new Windows 2000 virtual machine running under VMware Server on my XP box, I see that the underlying motherboard, cdrom and various system devices change. Uh oh!

Be aware of this if you migrate a physical computer to a virtual machine! Virtual machines under VMware are based on the Intel 440BX motherboards and Phoenix BIOS 4.0 Release 6.0:


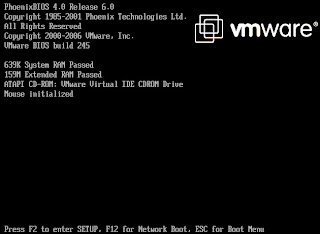
You'll also see VMware BIOS build 245 if you enable the Boot-Time Diagnostic Screen:


In order to be prepared for automatic system reconfiguration that Windows will do when it sees its new "motherboard", the best idea for you is to have an I386 on your hard drive or a CD with all your system drivers ready to go after the conversion. That way, the process will be pretty painless, outside of reconfiguring your display settings!

Even with the snag, this process took about an hour and a half from start to finish. Now I have my darling digital audio workstation forever enshrined as a virtual machine usable in either of my XP or Fedora environments. Sweet!

UPDATE: VMware server doesn't support sound, but VMware Player does support it. Also, VMware Player sets its config file for the virtual machine to use Sound Blaster emulation. In truth, the emulation should be Creative AudioPCI (ES1371,ES1373). Therefore, if you have working sound on your host system, but not on the vm running in VMware Player, you need to change your virtual machine's .vmx file to enable sound:
sound.present = "TRUE"
sound.virtualDev = "es1371"
sound.filename = "-1"
sound.autodetect = "TRUE"

Just make sure to edit/add the lines while your virtual machine is powered off. It would be nice if VMware could somehow do a pass-through to the actual hardware device installed on the host. Unfortunately, this is currently not possible. So I cannot take advantage of my M-Audio Delta 66 card. BOO HOO! :(

I've detailed this sound driver problem in this post:
/2007/06/vmware-player-no-sound-bad-directsound.html

I hope this is a nice primer for those wishing to undertake the process of converting a physical machine to a virtual one.

Here's a related article on VM performance

Good luck!

testing the Sun X4600M2 and ESX Server 3.0, part I

Outside of a few obstacles, we had a useful and interesting session testing a Sun X4600M2. The plan was to use three virtual machines on ESX Server 3.0 to simulate our eCommerce infrastructure:
- one Win2K3, IIS 6.0 web server running our website application
- one RHEL 3.0 AS running Oracle 10G
- one Win2K server running MS Web Stress Application Tool (MS WSAT) to generate HTTP traffic load against the Win2K3 web server

The X4600M2 we tested was an eight, dual-core 2.4Ghz Opteron RevE cpus connected to a Sun 5310 fiber storage array. The 4600 ran VMware ESX 3.0 server on top of a customized version of Linux built for VMware. I provided the vendor with the three preconfigured virtual machines. The vms were zipped on dual layer DVDs and took a while to copy and unzip, roughly an hour each. Also, the virtual machines were built on an Intel box and as such, needed to be converted specifically to the AMD Opteron architecture of the ESX server (the 4600). This was news to us and took about twenty minutes to convert the 8GB Windows vms and about an hour to convert the 33GB database file.

We started all three vms, did some Windows configuration and verified connectivity between the servers. TNSnames and an ODBC driver needed setup on the web server. The first large hurdle we encountered was that unlike our test system, the RHEL3 vm was not able to find its IP address via DHCP. After trying a few things, we assigned the address statically and the server then became available on the network. Once all three boxes were talking, we then verified that the website could pull data from the database. We did this; however, we saw that the database sequences were not created when we added an item to our cart. I got on the phone with our programmers and after about 45 minutes, resolved the problem using a public synonym. After this problem was solved, we spent a half an hour using the WSAT's recorder function to navigate the website and create the test cases. We were then able to start testing.

As our vendor did not have an Enterprise license for the ESX Server installation, we were limited to assigning up to four cpus per vm. So we assigned each vm the maximum available:
- Oracle vm: four cpus
- IIS vm: four cpus
- MS WSAT vm: four cpus

Since one CPU on the 4600 is dedicated to VMware overhead, this left three CPUs unused in the 4600.

We used MS WSAT to apply load to the Web server instance, slowly increasing load from one session to ten to one hundred virtual users in order to verify that:
1) the stress tool was working correctly,
2) the website was responding appropriately, and
3) we could see data via the VMware Virtual Infrastructure Client management app

We verified that these conditions were met.

It was interesting to view the VMware instrumentation. The VMware Infrastructure management app is a lot like Performance Monitor in Windows. You can view CPU/disk/memory and network stats. We toggled between the three vms and checked out performance stats for each. The most stressed vm was the IIS webserver, as it was serving data to the testing client (the Win2K server running MS WSAT), as well as pulling content from the database.

One interesting metric we saw in the management interface was called Megahertz Used, which is basically the percent of the total megahertz available to a vm. For example, if a vm has one 2.4Ghz cpu dedicated to it and that cpu is 10% busy, you're using 240Mhz of the available CPU power. On our Win2K3 web server vm, we had four cpus available at 2.4Ghz each. This gave us a total of about 10,000 megahertz available to the vm. When we increased the load to the Win2K3 web server, we saw that the webserver was using about 80-90% total CPU available or about 8,800Mhz of CPU. This load was more or less equally divided by the four CPUs assigned to the VM:
cpu0: 2300 mhz used
cpu1: 2200 mhz used
cpu2: 2200 mhz used
cpu3: 2100 mhz used

Utilizing the megahertz available to a vm, VMware is able to balances load to cpus within a vm as well as balance load between vms. ESX server 3.0 can dynamically provision new vms by analyzing this statistic.

Another interesting thing we did was to clone our testing server, the Win2K server with MS WSAT installed on it. As the clone is essentially a file copy, the process is i/o intensive and took about 10 minutes for the 8GB vm. With a configuration tweak and a quick start of the server, the cloned testing server was up and applying load against the website in 15 minutes total from start of clone to finish. Nice!

While testing, we found that the MS stress tool applies load, but has a nagging inability to capture enough information about a users' session so that an order can be completed through the test website. Also, the stress tool seems to quiesce after about 7-10 minutes. This may have been due to some caching on the database and web server layers, but is more likely due to a limitation with MS WSAT. So we are looking to replace this testing tool with one that doesn't have these limitations and can do interesting things like parameterize order and sku numbers in the requested URL. Compuware QALoad is a top candidate and one we're already licensed to have. We are currently researching tools for round 2 and hopefully, we'll have a substitute in the next couple of weeks.

In order to get a more full day of testing on the 4600, we will schedule a second visit to our vendor, with the caveat that I will bring a fully configured database, unzipped on an external USB drive in order to expedite the setup. Also, I hope to persuade the vendor to get an Enterprise license for ESX Server, so that we can assign more than four CPUs to an individual vm. Finally, at the end of the day, I will try to provide some screen shots or scripts of the evaluation session for the blog.

More to come..keep you posted!

Sunday, June 03, 2007

beginner's guide to LVM

After about three weeks of working with it, I have my Fedora Core 6 system very well configured now. There are about 122 software updates waiting in the wings for Core 6, but I haven't wanted to do any updates to it in case the updates break something. So I want to do a backup of the system first. Unfortunately, by default, the standard Core 6 install creates logical volumes for /root and swap instead of good old ext2 or ext3. Argh. So I've had to dust off my poor LVM skills.

A fanastic beginner's guide for LVM is this article by Falko Timme:
http://www.howtoforge.com/linux_lvm

Note that if you do download the Debian Etch virtual machine for this tutorial, you will have to change the default keyboard layout. I believe Falko is German, so the keyboard was very strange. Hunting and pecking, I did find my way to the dash, which had moved to where the ? and / is. So to change your keyboard to your country of origin and layout, you'll need to run through the following command in an SSH window or at the prompt of the virtual machine:
dpkg-reconfigure console-data

Next, I'm going to investigate Falko's second article on how to backup and restore LVMs here:
http://www.howtoforge.com/linux_lvm_snapshots

cheers.

VNC for OS X : Chicken of the VNC

A nice utility I've found to logon to my Fedora box from my MacBook Pro is Chicken of the VNC. Install is simple via DMG file. Here's what the config screen looks like:


Pretty easy! Here are some simple instructions if the graphic doesn't do it for you:
http://www.cs.vassar.edu/SysNews/vnc/osx.html

One tricky part is Full Screen toggle. This is done via CTRL-COMMAND-OPTION-~ (the tilde key).

Have fun!
'sodo

Thursday, May 17, 2007

Site Server Posting Acceptor error messages

It is definetly old school, but we still use the Site Server Posting Acceptor utility for a small cadre of developers. Here's a list of the common errors and their resolutions:

Client Side Errors
Error: Object doesn't support this property or method: "IFUp1.CreateTempBinding'

Cause: Registry key disables ActiveX Utility.
Resolution: Delete this registry key and reboot
HKEY_LOCAL_MACHINE\SOFTWARE\Microsoft\Internet Explorer\ActiveX Compatibility\{886E7BF0-C867-11CF-B1AE-00AA00A3F2C3}

Server Side Errors
Error: The parameter is incorrect

Cause: The browser has not read the META tag (POSTINFO) information.
Resolution: This is usually done via a META tag of the default document of the website. For example, you can place this META tag in the HEAD element of index.html:
<meta name="postinfo" content="/scripts/postinfo.asp">

Note: if it is not in /scripts, you may need to change the directory reference to where postinfo.asp lives.

Error: The Web server you selected does not indicate support for the service provider you selected

Cause: Your browser does not have a reference to postinfo.asp.
Resolution: This is usually done via a META tag of the default document of the website. For example, you can place this META tag in the HEAD element of index.html:
<meta name="postinfo" content="/scripts/postinfo.asp">

Note: if it is not in /scripts, you may need to change the directory reference to where postinfo.asp lives.


Error: The Web server returned the following error: You do not have write access to destination URL "http://destinationURL"

Cause: The destination virtual directory (ie, the directory on the web server where you want to upload the file to) does not have the appropriate write permissions in IIS.
Resolution: Check the IIS MMC for IIS write permissions.


Error: The Web server either is not responding or returned an unrecognized response.

Cause: The Execute Permissions setting of the Scripts virtual directory in IIS is not set to Scripts and Executables.
Resolution: In the IIS MMC, set the Execute Permissions of the Scripts virtual directory to Scripts and Executables.


Error: The Web server returned the following error: Cannot move file "somefile.extension" to its final destination. Further processing is stopped.

Cause: NT permissions are denying write access to the file.
Resolution: Logon to the server and change the file or directory permissions to allow write access to the file.
Cause: The read-only attribute of the file is set.
Resolution: In Windows Explorer, right-click on the file or directory and deselect the read-only property.
Cause: Allow anonymous is set to NO in \Microsoft Site Server\SiteServer\Publishing\pasetup.inc
Resolution: Set Allow anonymous to YES in \Microsoft Site Server\SiteServer\Publishing\pasetup.inc


Error: The requested header was not found


Cause: A personal firewall, Symantec firewall or other Firewall client interferes with the functioning of the Site Server upload utility.
Resolution: Disable any and all software firewalls.

If all else fails, here is a great doc on Content Replication Service errors:
http://www.ci.loveland.co.us/siteserver/docs/crs_opsguide_cess.htm

Have a good day!
'sodo

Wednesday, May 16, 2007

installing VMware VirtualCenter Management Server on XP Pro

Well, I tried installing an evaluation version of VirtualCenter Management Server on XP today, so I suspect someone else will. Hence, this blog entry. Though not recommended, I tried installing VMware's VirtualCenter 2.0 Management Server on my XP Professional box. Be aware that if you do this install, two caveats apply:

1) if you have IIS running, disable it!
Because VirtualCenter is going to ask you to use standard web ports 80/443, you'll need to disable IIS or direct either IIS or the VirtualCenter MS install to use ports other than 80 and 443.

As a side note, IIS on XP has a port 443 configured; however, you cannot delete this port from being used. I do not know what this port is used for, because it is not bound to anything I can see in the IIS MMC. I suspect it is due to some limitation with IIS on XP, the latest crippled software available on a "Professional" level OS from Microsoft, reminiscent of the sad NT 4.0 Personal Web Server. I also tried to delete the port using MetaEdit, the IIS MetaBase editor, but that just broke the website entirely, forcing me to do a reinstall of IIS. MetaEdit is a very nice little utility and is available here for free from Microsoft:
http://support.microsoft.com/kb/q232068/

If you are ever in doubt about what ports a particular process is using, another Mark Russinovich gem is TCPView:
http://www.microsoft.com/technet/sysinternals/Networking/TcpView.mspx

Here's what TCPView looks like:


My my! Look at all those VMware related processes running on my XP machine!

2) Disable Internet Connection Firewall (ICF)/ Internet Connection Sharing (ICS) Services

So, the second thing you'll need to do if you want the VC installer to run properly is to disable this combined service. According to the description in the Services administrative widget, "Internet Connection Firewall (ICF)/ Internet Connection Sharing (ICS) Services "provides network address translation, addressing, name resolution and/or intrusion prevention services for a home or small office network." That's quite a laundry list of activities for one service, no? Well, during the installation of VirtualCenter, the installation bombed out with the following cryptic message dialog box:
Error 25002. Setup failed to configure the Windows firewall

Following a couple of those dialog boxes appearing, the final error message you will see is:
The VMware License Server installer returned error code 1603.

The errors also had a note about referencing the installation log here:
c:\documents and settings\\localsettings\temp\vminst.log

Digging through this file, I found the last telltale lines:
vmls: 05/16/07 16:15:48 Found "C:\WINDOWS\System32\netsh.exe"
vmls: 05/16/07 16:15:48 Attempting to launch "C:\WINDOWS\System32\netsh.exe firewall set allowedprogram program="C:\Program Files\VMware\VMware License Server\lmgrd.exe" name="VMware License Server Manager" scope=ALL mode=ENABLE"
vmls: 05/16/07 16:15:50 Process returned 1
vmls: 05/16/07 16:15:50 ERROR: Failed to configure Windows firewall for lmgrd.exe.
vmls: 05/16/07 16:15:50 Posting error message 25002


Well now, what the heck is netsh.exe? Here's a clue:
http://support.microsoft.com/kb/242468

In short though, here's a laundry list of things this little utility can do for us:
• Configure interfaces.
• Configure routing protocols.
• Configure filters.
• Configure routes.
• Configure remote access behavior for Windows-based remote access routers that are running the Routing and Remote Access Server (RRAS) Service.
• Display the configuration of a currently running router on any computer.
• Use the scripting feature to run a collection of commands in batch mode against a specified router

Gadzooks! It's another all-in-one utility from Microsoft! They keep coming, don't they? Back to the errors in the VC install log file. Well, I misread the log file message that stated "Failed to configure Windows firewall for lmgrd.exe" thinking that it meant that netsh.exe was the Windows firewall. In point of fact, the Windows firewall was the previously mentioned ICF/ICS Service. But I realized this only after I tried to rename the executable.

My logic was that if the installer didn't find netsh.exe, it would just proceed on its merry way and get me further along to my goal, a successful install. So I renamed netsh.exe to netsh.bak. Well, lo and behold when I renamed netsh.exe to netsh.bak, a new netsh.exe took its place not four seconds later! Microsoft operating systems are acting more like viruses every day! I was then intrigued as to what program was recreating netsh.exe, so I started sifting through the Administrative -> Services widget for a likely culprit.

Looking through the list of services, I quickly stumbled upon ICF/ICS, as it was one of the first in the alphabetically ordered list of services. This made me recall the log entry and I finally put two-and-two together to realize that it was ICF / ICS that was the Windows firewall, not netsh.exe. So, finding that combined service gave me great pleasure and I quickly stopped the service, disabled it and was able to successfully finish the VC install.

Post Mortem
In point of fact, I never did find the service responsible for restarting netsh.exe. Hmmm..maybe a future post.

Blundering his way deductively through the world of computing, the TechAnswerGuy.

Monday, May 14, 2007

Interpreting Dr.Watson (DrWtsn32.log) crash dump file

As this is a subject that appears quite often in the world of Windows YouNameTheVersion Servers, I felt it important enough to devote a blog entry to mention it. In the below article, Microsoft does a good job of explaining the basics of the mystical science of Windows crash dump file interpretation:
http://support.microsoft.com/kb/q246084/

As well, Windows Networking.com has a great repository of information about Dr Watson here:
http://www.windowsnetworking.com/kbase/WindowsTips/WindowsNT/RegistryTips/Utilities/DrWatson.html

VPN client error 51: unable to communicate with the VPN subsystem

Over the weekend, we had some problems at work, so I thought I'd use my MacBook Pro Intel Core 2 Duo to login to our corporate network and verify the status of the servers I support. Unfortunately, loading the Cisco VPN client gave me a nasty error when it started up:
Error 51: Unable to communicate with the VPN subsystem

According to this article and a number of others I read on the net:
https://kb.berkeley.edu/jivekb/entry.jspa?entryID=538

a security update for the Macs may have broken Cisco VPN client versions 4.8 or earlier. However, VPN client version 4.9 or above works, as I have since installed the later version and do not experience this problem:


Yay! Hope this helps..

Sunday, May 13, 2007

Mac RDP / killing a process under Mac OSX

It seems that RDP for Mac has a tendency to hang if you Apple-Quit out of the program. Since I'm relatively new to my MacBook Pro 17", I was rebooting in order to free up RDP for another session.

Tired of my own laziness, I decided to do things the right way and find out how to Force Quit an application in OS X. I'd love to take credit for such a well-written document, but the folks at Ohio State beat me to it and put together a great little page describing how to kill a process under Mac OSX. I couldn't have done it better:
http://8help.osu.edu/1253.html

Be aware that after killing RDP using Force Quit, it does take a couple of tries in order to login again to the remote server. Also, you'll experience less RDP hangs if you gracefully logout of your Windows session by using Start -> Disconnect, rather than bluntly Apple-Quit'ting out of RDP. Word to the wise..go gently into that good night.

Also, you can only run ONE RDP session on your MacBook Pro at a time, so its use is limited if you need to login to many servers. One idea to get around this limitation is from your Mac, login to one jump server that will allow you to get to all other boxes you need to support. This way, you can have your Mac Cake and eat it too!

Finally, if you've left a session open and another RDP session is started from another server going to the same remote host that your Mac previously had control over, RDP on the Mac tends to hang. Obviously, this necessitates a Force Quit again.

Friday, May 11, 2007

removing unnecessary startup programs in 2003/XP

Or better yet: "How to find and destroy rogue processes"

One thing that that makes me angry is when unnecessary processes take up too much memory or kernel space. This especially infuriates me when the lack of memory or kernel space ends up bringing my web server down! So this morning, I had this situation happen on my recently reimaged XP notebook, a Dell Latitude 600C. This is a work laptop and as such, is locked down by my security department. I always like when security locks things down, so then I can find ways around the lockdown! :)

In this case, IIS crashed because of there were too many programs using kernel memory. How do I know this? Well, after the crash, I inspected the event logs. In the system event log, I found the following error:
"Symantec antivirus auto protect could not scan file c:\windows\system32\xxx.dll for viruses due to low kernel stack"

A quick search on Google provided a few URLs that gave me hints as to what was going on:
http://service1.symantec.com/SUPPORT/ent-security.nsf/pfdocs/2002071208532048?Open&docid=2002071208532048&nsf=ent-security.nsf&view=docid
http://techrepublic.com.com/5208-11192-0.html?forumID=52&threadID=162216

As usual, I decided to take the low road and resolve my problem in the quickest way possible. The resolution was to disable the myriad of useless programs that execute when my system starts up. These include:
ctfmon.exe:
http://support.microsoft.com/kb/282599
igfxtray.exe
http://www.liutilities.com/products/wintaskspro/processlibrary/igfxtray/
hkcmd.exe
http://www.neuber.com/taskmanager/process/hkcmd.exe.html
pctspkr.exe
http://www.neuber.com/taskmanager/process/pctspk.exe.html

Also, I chose to disable a few unnecessary media and pdf programs that started on bootup.
iTunesHelper/qttask/Acrobat Assistant

So how did I find out what was running and how do disable them from starting up? I used Mark Russinovich's great Process Explorer program
http://www.microsoft.com/technet/sysinternals/utilities/ProcessExplorer.mspx

Microsoft has bought him out and rightly so, because this guy REALLY knows the Windows OS inside and out. He's made his expertise available through a number of very useful programs available here:
http://www.microsoft.com/technet/sysinternals/default.mspx

My first task was to identify the programs that were hogging up memory unnecessarily. I downloaded and installed Proc Explorer from the link above and ran it. Running the program gives you a screen like this:


If you roll down to the bottom of the Process Explorer display, you'll see a bunch of processes hanging off of the "explorer.exe" process. Under that main branch, you'll see a ton of running processes, some of which you may recognize if you've ever looked at the running processes using Task Manager. I looked at this list of running processes and decided which ones that I could safely disable. A number of them were just helper apps, like the above mentioned media player related utilities. I also noted other helper apps that I didn't need:
trackpad (SynTPLpr.exe/SynTPEnh.exe/point32.exe)
fax (faxctrl.exe)
graphics card (igfxtray.exe)
keyboard (hkcmd.exe)
modem (pctspk.exe)

I just hate all that crap getting loaded and wasting memory.

One great thing about Process Explorer is that you can kill rogue processes right then and there within the program. Just identify the process that you'd like to kill in the list, right-click and select Kill or Kill Process Tree if the rogue process has spawned a number of child processes:


To round out the discussion on Process Explorer, PE includes an information-rich task manager system information window you can access via the menu or just by pressing CTRL-I. It has more information that the graphic Task Manager than Microsoft gives you and shows you real time updates of top processes while the graphs scroll by:


So how did I actually disable these programs from executing on start up? For that, msconfig is your nearest and dearest friend, especially if your XP Taskbar has been locked down by Security! MSconfig is a program provided by Microsoft that allows you to disable startup programs and generally wreak havoc on your system, so be damn careful when you use it. To start MSconfig, click Start -> Run -> type in "msconfig" and press enter. You should see a screen like this:


Click the Startup tab. You'll see a bunch of startup items listed, the command that started them and the registry location of where they are set to run. MSconfig makes it easy for you to disable these programs by simply unchecking the programs you don't want to run on Startup. Here is the list after I was done deselecting the unnecessary programs on my machine:


After you deselect these memory hogs, go ahead and click OK. You'll then get a message to reboot now or later. If you are overzealous and have clicked too many startup items off, your PC may not come up correctly. So be careful to not go too crazy and remove everything from automatically starting up. Of course, an ounce of prevention is worth a pound of cure. And if you do screw something up, you'll probably learn something in the process of fixing it. So there is a reason that things happen the way they do.

Go ahead and reboot. Hopefully, when the system restarts, you'll have a bit more free memory and probably a faster machine if you've killed processes that were hogging your CPU. Good luck!

PS - If you want to do things the good old fashioned way (ie, edit the registry!), edit this key in regedit:
My Computer -> HKEY_LOCAL_MACHINE -> Software -> Microsoft -> Windows -> CurrentVersion -> Run

PPS - Of course, you'll need to click Start -> Run -> "regedit" and hit enter to get into regedit first!

PPPS - Here's the great Mark Russinovich on a bug hunt using Process Explorer. Learn from the master!

Sunday, May 06, 2007

installing PHP - the easy way!

So I'm reading Head Rush Ajax (Head First) from O'Reilly and its a great book so far. I've only gotten through the information-rich first chapter, but it has a new, graphical style that contributes well to learning rapidly. I'll post a full review after I've read a few more chapters.

The examples in the first chapter depend on the installation of PHP, and since I had just spent four hours reading and doing the exercises (shoot me, I'm SLOW!), I definetly wasn't into expending any further energy of a prolonged PHP and Apache install on my Linux box. So I took the low road and installed Easy PHP on my Windows XP box using the executable from here:
http://www.easyphp.org

Since I already had IIS running on port 80, I changed the default Apache port to 82. You'll need to do that in httpd.conf and restart. Even though IIS is running on a different port, the Apache start utility does not like it when there is another web server on port 80, so make sure you have the IIS web server or IIS admin process shutdown before you restart Apache.

Once I restarted Apache, I could then restart IIS with no problem. I then copied the first chapter of Head Rush Ajax (Head First) to \Program Files\EasyPHP1-8\www\ then accessed the web server locally (from the browser on the web server itself) at http://localhost:82/boards/boards.html.

My updated code came up and worked first time out! Yeehoo!

viewing and editing HTML source code in Mac TextEdit

Its been a loooong time since I've edited HTML on a Mac and I heard BBEdit is a great program. Unfortunately, it's $150, so I think I'll stick with TextEdit on the Mac. Using TextEdit though has an initial first hurdle to avoid. The idiotic default of TextEdit is to open up HTML files as rich text. Displayed as rich text, you can't see the HTML code in the file! Why would I want to display rich text by default in a text editor? The logic escapes me. Maybe Apple's developers will amend this in the next version of the software, as well as another pet peeve of mine I mention below.

First though, in order to get around the silly "rich text" default setting, when you open your HTML file, select File -> Open and be sure to select "Ignore rich text commands" as below:


You'll then see all the HTML in your file. Note: be sure to save your HTML from Safari as Format -> Page Source instead of Format -> Web Archive. Web Archive won't open properly in TextEdit.

To set this permanently in TextEdit, go to Preferences -> Open and Save -> select "Ignore rich commands in HTML files" as below:


While I'm ranting, another pet peeve of mine is Grab's inability to save to a browser-readable image format like JPEG or PNG. To capture images from a Mac for this blog, I'm forced to use Grab to save a screen capture of a window to a TIFF file and then open up Preview to convert the TIFF to PNG. This is stupid.

6/30/2007 Update: Ok. My apologies Apple Developers. I'm stupid. I did not see this feature in Preview:
/2007/06/screen-or-window-capture-in-mac-osx.html

Done ranting.
Feel free to drop me a line or ask me a question.