I got tired of constantly using my MacBook Pro's trackpad and decided to start memorizing keyboard shortcuts. Of course, I didn't know what some of the symbols on the shortcut map meant, so I needed to learn those first! :)
Here is the keyboard symbol chart (symbols for special keys). This chart is available in the Mac's Help screen under "keyboard":
Here is a list of the key shortcuts for navigating the Mac OSX window environment. This chart is available under System Preferences -> Keyboard & Mouse -> Keyboard Shortcuts:
Here are some Finder keyboard shortcuts as well:
Enjoy!
Sunday, July 29, 2007
MacBook Pro keyboard shortcuts and symbol chart
Labels:
keyboard layout,
keyboard shortcuts,
mac,
macbook pro,
osx
If you appreciated this answer..consider buying me a beer via PayPal!
I'm easy..$1 Draft would be great! THANKS!
Friday, July 27, 2007
quick start guide to gnuplot: plotting web connections
Early this morning, I was a Total Beginner to gnuplot (http://www.gnuplot.info/), but now I am happy to tell you that I have advanced to the state of simple Beginner. As shown on the home page link above, you can plot pretty much any data set with gnuplot and do it quite prettily. But gnuplot is not the easiest program to get started with and the documentation is pretty cryptic, so I thought I'd share with you what I learned about it via a specific task.
The Task
I wanted to plot the minute by minute HTTP connection data from a web caching server. The connection counts are generated by the output of "netstat -na grep ESTABLISHED" and stored in a simple text file. There is a bit more to that script, but for now, I will limit this discussion to how to get a simple chart out of gnuplot.
A word about caching web servers. As implied by the word "cache", a caching web server stores copies of web pages from an origin web server in order to alleviate the load off that origin server. Upon the first request for a web page, the caching server requests the page from the origin web server and stores that page in memory or on disk. The cache can then fulfill any subsequent client requests for the same page, thus taking the hit and alleviating the load of the request off of the origin server.
Since a caching server functions as an intermediary (proxy) server, I am interested in plotting both the connections from the client browser to the caching server, as well as the connections from the caching server to the origin web server on the backend.
The content of the text file looks like this:
20070727151200 215 210 5
20070727151259 191 186 5
20070727151401 207 201 6
20070727151500 186 180 6
20070727151600 165 156 9
20070727151700 167 161 6
20070727151801 182 174 8
20070727151900 197 190 7
20070727152001 197 191 6
20070727152100 187 181 6
* The first column is date/time stamp.
* The second column is total HTTP connections.
* The third column is HTTP connections from the client browser to the cache.
* The last column is HTTP connections back to the origin server.
As you can see from this small amount of data, it looks like the cache handles roughly 97% of the requests for the web site and 3% are directed back to the origin servers.
So let's make a nice graph of this data, dammit!
Install gnuplot
If you're on Fedora, "yum install gnuplot" will do the trick. On Debian, "apt-get install gnuplot gnuplot-doc" should do it for you. Otherwise, download the source from http://www.gnuplot.info/ and you'll be off and running.
You can run gnuplot interactively or via command shell. For the purpose of this discussion, I will discuss the interactive interface for gnuplot. Once the software is installed, type "gnuplot" to start the program:
If you type "help" at the prompt, you'll get a list of help topics available:
To get information about a particular topic, simply type "help <topicname>" like so:
You can press the return key for more text and if you're at a "Subtopic of.." menu, you can get a list of available options by typing a question mark, like so:
My First Plot!
The easiest thing I did is try a test plot of some data. I typed the following:
gnuplot> plot 'webconn.txt'
This gave me a rather ugly plot of the first column of data using red crosshairs for every observation:
I learned a bit about customizing my plots from here:
http://www.duke.edu/~hpgavin/gnuplot.html
And here:
http://www.gnuplot.info/docs_4.0/gpcard.pdf
Let's Get Fancy
I didn't like the red crosshairs, so I found an option to change the graph to a line graph:
gnuplot> plot 'webconn.txt' with lines
And then a more advanced graph specifying the exact columns for use (the x and y axes) with the "using" parameter. I also threw in the axis title for good measure:
gnuplot> plot 'webconn.txt' using 1:3 title "HTTP_WEB" with lines
And finally, multiple data columns:
gnuplot> plot 'webconn.txt' using 1:3 title "HTTP_WEB" with lines,'webconn.txt' using 1:4 title "HTTP_OWS" with lines
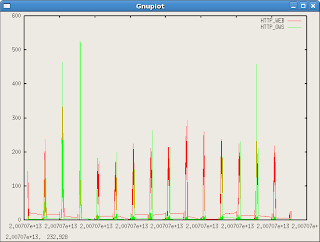
You can also shorten the syntax of the command by typing "u" for "using", "w" for "with", "t" for "title" and "l" for lines, like so:
gnuplot> plot 'webconn.txt' u 1:3 t "HTTP_WEB" w l,'webconn.txt' u 1:4 t "HTTP_OWS" w l
The Plot Thickens
Oooh. Getting somewhat cryptic now, eh? But something is wrong with the data in the graph. Why does it have these strange lines every so often?
After digging through my data, I saw that these ugly, flat lines occurred at each change in the day. Oh! gnuplot is interpreting the date/time string as a number! At the change of the day, the hour jumps from 200707212359 to 200707220000. Numerically, this is a jump of 7641 (220000-212359). I needed to make gnuplot think my xaxis is a date format. I found the solution with a combination of the following commands:
set xdata time - this sets the data format of the xaxis to a time format
set timefmt "%Y%m%d%H%M%S" - this sets the time format to match the timestamp in my data file
Once I set these two parameters, I got quite a lovely graph using the last command:
gnuplot> plot 'webconn.txt' u 1:3 t "HTTP_WEB" w l,'webconn.txt' u 1:4 t "HTTP_OWS" w l
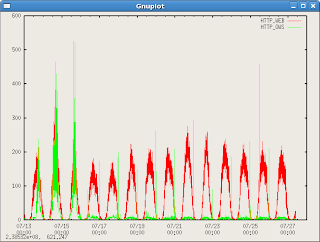
Finally, I wanted to zoom into a specific day. There was another nice command I found:
set xrange ["200707250000":"200707260000"]
This made searching on a specific day very easy!
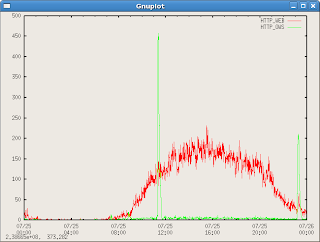
I hope you enjoyed this short tutorial. I will endeavour to add more information as I learn more about this exciting tool.
Reference
Great examples herein
Cheers!
The Task
I wanted to plot the minute by minute HTTP connection data from a web caching server. The connection counts are generated by the output of "netstat -na grep ESTABLISHED" and stored in a simple text file. There is a bit more to that script, but for now, I will limit this discussion to how to get a simple chart out of gnuplot.
A word about caching web servers. As implied by the word "cache", a caching web server stores copies of web pages from an origin web server in order to alleviate the load off that origin server. Upon the first request for a web page, the caching server requests the page from the origin web server and stores that page in memory or on disk. The cache can then fulfill any subsequent client requests for the same page, thus taking the hit and alleviating the load of the request off of the origin server.
Since a caching server functions as an intermediary (proxy) server, I am interested in plotting both the connections from the client browser to the caching server, as well as the connections from the caching server to the origin web server on the backend.
The content of the text file looks like this:
20070727151200 215 210 5
20070727151259 191 186 5
20070727151401 207 201 6
20070727151500 186 180 6
20070727151600 165 156 9
20070727151700 167 161 6
20070727151801 182 174 8
20070727151900 197 190 7
20070727152001 197 191 6
20070727152100 187 181 6
* The first column is date/time stamp.
* The second column is total HTTP connections.
* The third column is HTTP connections from the client browser to the cache.
* The last column is HTTP connections back to the origin server.
As you can see from this small amount of data, it looks like the cache handles roughly 97% of the requests for the web site and 3% are directed back to the origin servers.
So let's make a nice graph of this data, dammit!
Install gnuplot
If you're on Fedora, "yum install gnuplot" will do the trick. On Debian, "apt-get install gnuplot gnuplot-doc" should do it for you. Otherwise, download the source from http://www.gnuplot.info/ and you'll be off and running.
You can run gnuplot interactively or via command shell. For the purpose of this discussion, I will discuss the interactive interface for gnuplot. Once the software is installed, type "gnuplot" to start the program:
[root@computer ~]# gnuplotGetting Help
gnuplot>
If you type "help" at the prompt, you'll get a list of help topics available:
Help topics available:
batch/interactive bugs commands comments
coordinates copyright environment expressions
glossary graphical help-desk introduction
line-editing mouse new-features old_bugs
plotting set show startup
substitution syntax time/date
To get information about a particular topic, simply type "help <topicname>" like so:
Help topic: plotting
There are three `gnuplot` commands which actually create a plot: `plot`,
`splot` and `replot`. `plot` generates 2-d plots, `splot` generates 3-d
plots (actually 2-d projections, of course), and `replot` appends its
...
You can press the return key for more text and if you're at a "Subtopic of.." menu, you can get a list of available options by typing a question mark, like so:
Subtopic of plotting: ?
Subtopics available for plotting:
styles
My First Plot!
The easiest thing I did is try a test plot of some data. I typed the following:
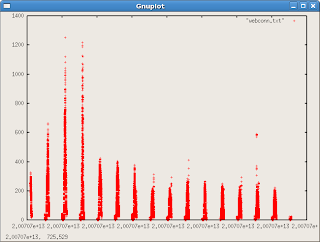
gnuplot> plot 'webconn.txt'
This gave me a rather ugly plot of the first column of data using red crosshairs for every observation:
I learned a bit about customizing my plots from here:
http://www.duke.edu/~hpgavin/gnuplot.html
And here:
http://www.gnuplot.info/docs_4.0/gpcard.pdf
Let's Get Fancy
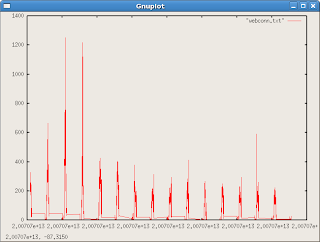
I didn't like the red crosshairs, so I found an option to change the graph to a line graph:
gnuplot> plot 'webconn.txt' with lines
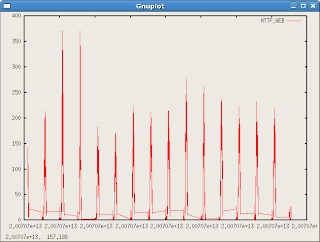
And then a more advanced graph specifying the exact columns for use (the x and y axes) with the "using" parameter. I also threw in the axis title for good measure:
gnuplot> plot 'webconn.txt' using 1:3 title "HTTP_WEB" with lines
And finally, multiple data columns:
gnuplot> plot 'webconn.txt' using 1:3 title "HTTP_WEB" with lines,'webconn.txt' using 1:4 title "HTTP_OWS" with lines
You can also shorten the syntax of the command by typing "u" for "using", "w" for "with", "t" for "title" and "l" for lines, like so:
gnuplot> plot 'webconn.txt' u 1:3 t "HTTP_WEB" w l,'webconn.txt' u 1:4 t "HTTP_OWS" w l
The Plot Thickens
Oooh. Getting somewhat cryptic now, eh? But something is wrong with the data in the graph. Why does it have these strange lines every so often?
After digging through my data, I saw that these ugly, flat lines occurred at each change in the day. Oh! gnuplot is interpreting the date/time string as a number! At the change of the day, the hour jumps from 200707212359 to 200707220000. Numerically, this is a jump of 7641 (220000-212359). I needed to make gnuplot think my xaxis is a date format. I found the solution with a combination of the following commands:
set xdata time - this sets the data format of the xaxis to a time format
set timefmt "%Y%m%d%H%M%S" - this sets the time format to match the timestamp in my data file
Once I set these two parameters, I got quite a lovely graph using the last command:
gnuplot> plot 'webconn.txt' u 1:3 t "HTTP_WEB" w l,'webconn.txt' u 1:4 t "HTTP_OWS" w l
Finally, I wanted to zoom into a specific day. There was another nice command I found:
set xrange ["200707250000":"200707260000"]
This made searching on a specific day very easy!
I hope you enjoyed this short tutorial. I will endeavour to add more information as I learn more about this exciting tool.
Reference
Great examples herein
Cheers!
Cacasodo
Labels:
caching server,
gnuplot,
web connections
If you appreciated this answer..consider buying me a beer via PayPal!
I'm easy..$1 Draft would be great! THANKS!
Thursday, July 26, 2007
interpreting dig output, getting the TTL for your domain
When you need to lookup more information about a domain name than just its IP address, dig is your friend. Specifically, I needed to lookup the time-to-live for my domain, techanswerguy.com.
In DNS, a domain name will be cached for a specified amount of time. This is the domain's time-to-live or TTL. Usually, TTLs for domain names are set between 5 minutes and twenty-four hours. In practice, you are being a good net citizen if you set the TTL of your domain for as long as possible. In this way, you reduce the load on upstream DNS servers by reducing the number of DNS refreshes made for your domain.
Executing dig for techanswerguy.com, I found a load of information:
[root@computer]$ dig www.techanswerguy.com
; <<>> DiG 9.2.2 <<>> www.techanswerguy.com
;; global options: printcmd
;; Got answer:
;; ->>HEADER<<- opcode: QUERY, status: NOERROR, id: 41554
;; flags: qr rd ra; QUERY: 1, ANSWER: 3, AUTHORITY: 7, ADDITIONAL: 7
;; QUESTION SECTION:
;www.techanswerguy.com. IN A
;; ANSWER SECTION:
www.techanswerguy.com. 7200 IN CNAME GHS.GOOGLE.com.
GHS.GOOGLE.com. 48322 IN CNAME ghs.l.GOOGLE.com.
ghs.l.GOOGLE.com. 300 IN A 64.233.179.121
;; Query time: 19 msec
;; SERVER: 63.40.12.3#53(63.40.12.3)
;; WHEN: Thu Jul 26 11:20:54 2007
;; MSG SIZE rcvd: 324
The time-to-live for my domain is listed in the first line of output under the ANSWER SECTION:
www.techanswerguy.com. 7200 IN CNAME GHS.GOOGLE.com.
The second column shows that the time-to-live for my domain is 7200 seconds, or 120 minutes (7200sec/60sec per min) or two hours (7200sec/60sec per min/60sec per hour).
Hooray!
Rather than reinvent the wheel, I will defer to Paul Heinlein's excellent discussion of Domain Information Groper, the dig command available here:
http://www.madboa.com/geek/dig/
Have a ball with DIG!
If you appreciated this answer..consider buying me a beer via PayPal!
I'm easy..$1 Draft would be great! THANKS!
Wednesday, July 25, 2007
using NetQoS to diagnose network congestion
We use a backend connection from our corporate offices to our hosting provider. On Monday towards the end of the day, I noticed a big slowdown in our RDP (Remote Desktop) connectivity to our Windows servers at the hosting provider. Monday is normally a very busy day for network traffic in the office as well as our main website. So I wondered where the traffic was coming from. Luckily, our network engineers had recently purchased a suite of network management tools from NetQoS (http://www.netqos.com/).
The engineers setup NetQoS monitors on the backend pipe to allow us to see the traffic going through our T1 speed, Frame Relay connection. The nice thing about NetQoS is the ability to break down the traffic going back and forth through the pipe by protocol and port. In the below graph labeled "Stacked Protocol Trend In" for this past Monday, you'll see a green blob after 15:00.
"Trend In" is data inbound to the monitored router. In our case, inbound is into our corporate network. "Trend Out" is data going outbound from the monitored router. In like fashion, outbound is out to our managed hosting provider.
As indicated by the key on the right side of the diagram, this is a spike in SSH (port 22) traffic:
Interesting! The funny thing is that a similar network performance degradation happened the previous week. I changed the date range for the NetQoS reports and saw an even larger, longer lasting spike in SSH traffic:
OK. So it seems we have a problem, but what is the cause?
We typically use SSH to monitor various Unix servers in the environment. One of the administrators has a bunch of X sessions that display performance statistics from a number of servers at the hosting facility. This X session traffic is done over SSH port. He told me that while the high SSH traffic issue was happening, one of his X session graphs was not refreshing properly. I suspected that since he was the main administrator of the servers and that he had about twelve X sessions open, that there is a bug in the X session software that was making one or more of his monitoring sessions create this spike in traffic.
At this point, he still has his X sessions open, but we will wait until the next spike in SSH traffic to try to determine if it is this admins' X sessions that are the culprit. At that time, we will probably shut down his sessions to see if that fixes the problem. I will update the blog next week to let you know how it goes.
Anyway, I'm glad that NetQoS helped us troubleshoot the problem. It gives us some good insight into network traffic by TCP/IP application.
UPDATE: another great tool to diagnose your local computer's network traffic is IPTraf (http://iptraf.seul.org/). I will review this software which runs under Linux and give a basic description of how to use it in an upcoming post.
cheers!
If you appreciated this answer..consider buying me a beer via PayPal!
I'm easy..$1 Draft would be great! THANKS!
Tuesday, July 24, 2007
Red Hat Enterprise Documentation
Because navigating the RedHat site is laborious, here is a direct link to the documentation for RedHat Enterprise Linux:
https://www.redhat.com/docs/manuals/enterprise/
Also, here is the link to the older, RHEL3 documentation:
https://www.redhat.com/docs/manuals/enterprise/RHEL-3-Manual
enjoy.
https://www.redhat.com/docs/manuals/enterprise/
Also, here is the link to the older, RHEL3 documentation:
https://www.redhat.com/docs/manuals/enterprise/RHEL-3-Manual
enjoy.
Labels:
documentation,
rhel,
rhel3
If you appreciated this answer..consider buying me a beer via PayPal!
I'm easy..$1 Draft would be great! THANKS!
Thursday, July 19, 2007
why doesn't my shell script run under cron?
OK! Today's lesson is that using absolute paths to point to executables and the PATH statement in bash shell scripts are VERY important in allowing your shell script to run properly in cron!
Absolute Paths
For example, here is the start of a typical script that shuts down a service:
#!/bin/bash
echo "Stopping web server.."
service httpd stop
Well, the bad part of this script is that is does not reference the full, absolute path to the service command. To fix this, make sure the full path is identified as in the sample code below:
#!/bin/bash
echo "Stopping web server.."
/sbin/service httpd stop
PATH Statement
If you start a Cygwin bash script using an NT command script like so:
PATH=c:\winnt\system32;c:\cygwin\bin;
SET CYGWIN=ntsec
cd \scheduledTasks\500errors
bash -v "500errors.sh" 2>&1 log.txt
Your PATH statement may interfere with the running of your bash script. In my case, you can see I list c:\winnt\system32 first in my PATH. When the above script encountered a "sort" statement, the "sort" command that was used was the Windows sort command and NOT the Cygwin "sort". So, I got strange errors when I ran the script.
To reiterate, depending on the order of the directories in your PATH, sometimes a Windows executable will be chosen before the Cygwin executable. The "sort" and "head" commands are famous for doing this. So make sure the Cygwin bin directory is the first one listed in your PATH, like in the corrected version listed below:
PATH=c:\cygwin\bin;c:\winnt\system32;
SET CYGWIN=ntsec
cd \scheduledTasks\500errors
bash -v "500errors.sh" 2>&1 log.txt
Troubleshooting
When in doubt, do the following:
1) first, execute the bash script as your local user
2) if this works and you are starting the bash script from an NT script, execute the NT command or bat script to see if the script completes successfully
3) use Cygwin's own cron to kickoff the script. But that has issues of its own:
/2008/01/setting-up-cron-in-cygwin-on-xp.html
In cases where the Cygwin bash script is not working:
1) turn up debugging by using the -v switch to bash:
bash -v "script.sh"
2) write standard error and standard output to a file:
bash -v "script.sh" 2>&1 log.txt
3) compare environments
- run the command "env > myenv.log" from the shell where the program works and then execute "env > scriptenv.log" from the script. Then compare the two output files using diff:
diff myenv.log scriptenv.log
Other Good Troubleshooting Ideas
Here is some excellent advice from the Spike Source bloggers:
http://blog.spikesource.com/crontab.htm
Hopefully, some of these suggestions may answer the exasperated cry, "Why doesn't my shell script run?!"
'sodo
If you appreciated this answer..consider buying me a beer via PayPal!
I'm easy..$1 Draft would be great! THANKS!
Wednesday, July 18, 2007
Mount is denied because NTFS is marked to be in use
This is an interesting tidbit. I was trying to pull some data off an older, ntfs-formatted IDE hard drive (an 80GB Western Digital WD800, circa 2003), so I connected it up to my Adaptec external USB enclosure. I am running Fedora Core 6 and have installed ntfs-3g (http://ntfs-3g.org) in order to access my ntfs partitions.
When I plugged in the USB and turned it on, it was read fine by the system (see post: /2007/07/failed-external-usb-ide-drive-as.html). But here's the message I received when I mounted the external drive as a file system:
[root@computer]# mount -t ntfs /dev/sdc1 /mnt/external/
$LogFile indicates unclean shutdown (0, 0)
Failed to mount '/dev/sdc1': Operation not supported
Mount is denied because NTFS is marked to be in use. Choose one action:
Choice 1: If you have Windows then disconnect the external devices by
clicking on the 'Safely Remove Hardware' icon in the Windows
taskbar then shutdown Windows cleanly.
Choice 2: If you don't have Windows then you can use the 'force' option for your own responsibility. For example type on the command line:
mount -t ntfs-3g /dev/sdc1 /mnt/external/ -o force
Or add the option to the relevant row in the /etc/fstab file:
/dev/sdc1 /mnt/external/ ntfs-3g defaults,force 0 0
Ever the swashbuckler, I went ahead and forced a mount:
[root@computer]# mount -t ntfs-3g /dev/sdc1 /mnt/external/ -o force
$LogFile indicates unclean shutdown (0, 0)
WARNING: Forced mount, reset $LogFile.
OK. So, I got a bit of a hand-slap there, with the "unclean shutdown." Even though I did receive this warning, I was able to access the files on the drive and copy off the couple hundred megs of audio files I needed. Hooray!
Update 7/22/07: After accessing the files on the drive, I reinstalled the drive as the primary system drive of my older XP system. The disk booted fine and it continues to serve as my backup PC.
As an aside, I also got this warning:
WARNING: Deficient Linux kernel detected. Some driver features are
not available (swap file on NTFS, boot from NTFS by LILO), and
unmount is not safe unless it's made sure the ntfs-3g process
naturally terminates after calling 'umount'. If you wish this
message to disappear then you should upgrade to at least kernel
version 2.6.20, or request help from your distribution to fix
the kernel problem. The below web page has more information:
http://ntfs-3g.org/support.html#fuse26
If you read the message, it seems to me that my kernel does not the have at least two features:
I run a releatively recent, fairly non-customized standard kernel for Core 6:
Linux computer 2.6.19-1.2911.fc6
so be aware that you may get a similar message if you have a standard kernel. You may need to recompile your kernel if you want these messages to go away. I have a post on how to do that here:
/2006/10/great-compile-instructions-for-fc4.html
FYI from your host,
The Tech Answer Guy.
When I plugged in the USB and turned it on, it was read fine by the system (see post: /2007/07/failed-external-usb-ide-drive-as.html). But here's the message I received when I mounted the external drive as a file system:
[root@computer]# mount -t ntfs /dev/sdc1 /mnt/external/
$LogFile indicates unclean shutdown (0, 0)
Failed to mount '/dev/sdc1': Operation not supported
Mount is denied because NTFS is marked to be in use. Choose one action:
Choice 1: If you have Windows then disconnect the external devices by
clicking on the 'Safely Remove Hardware' icon in the Windows
taskbar then shutdown Windows cleanly.
Choice 2: If you don't have Windows then you can use the 'force' option for your own responsibility. For example type on the command line:
mount -t ntfs-3g /dev/sdc1 /mnt/external/ -o force
Or add the option to the relevant row in the /etc/fstab file:
/dev/sdc1 /mnt/external/ ntfs-3g defaults,force 0 0
Ever the swashbuckler, I went ahead and forced a mount:
[root@computer]# mount -t ntfs-3g /dev/sdc1 /mnt/external/ -o force
$LogFile indicates unclean shutdown (0, 0)
WARNING: Forced mount, reset $LogFile.
OK. So, I got a bit of a hand-slap there, with the "unclean shutdown." Even though I did receive this warning, I was able to access the files on the drive and copy off the couple hundred megs of audio files I needed. Hooray!
Update 7/22/07: After accessing the files on the drive, I reinstalled the drive as the primary system drive of my older XP system. The disk booted fine and it continues to serve as my backup PC.
As an aside, I also got this warning:
WARNING: Deficient Linux kernel detected. Some driver features are
not available (swap file on NTFS, boot from NTFS by LILO), and
unmount is not safe unless it's made sure the ntfs-3g process
naturally terminates after calling 'umount'. If you wish this
message to disappear then you should upgrade to at least kernel
version 2.6.20, or request help from your distribution to fix
the kernel problem. The below web page has more information:
http://ntfs-3g.org/support.html#fuse26
If you read the message, it seems to me that my kernel does not the have at least two features:
- swap file on NTFS
- boot from NTFS by LILO
I run a releatively recent, fairly non-customized standard kernel for Core 6:
Linux computer 2.6.19-1.2911.fc6
so be aware that you may get a similar message if you have a standard kernel. You may need to recompile your kernel if you want these messages to go away. I have a post on how to do that here:
/2006/10/great-compile-instructions-for-fc4.html
FYI from your host,
The Tech Answer Guy.
If you appreciated this answer..consider buying me a beer via PayPal!
I'm easy..$1 Draft would be great! THANKS!
failed external USB IDE drive as represented in dmesg
Oh boy. It is never good when you see a message like this in dmesg:
scsi 15:0:0:0: scsi: Device offlined - not ready after error recovery
Here's the whole shebang after plugging in my defunct, broken and otherwise not working NTFS-formatted, Seagate 80GB hard drive that sits in an Adaptec ACS-100 External USB drive case:
usb 5-3: new high speed USB device using ehci_hcd and address 30
usb 5-3: configuration #1 chosen from 1 choice
scsi15 : SCSI emulation for USB Mass Storage devices
usb-storage: device found at 30
usb-storage: waiting for device to settle before scanning
usb 5-3: USB disconnect, address 30
scsi 15:0:0:0: scsi: Device offlined - not ready after error recovery
usb-storage: device scan complete
So just in case you need to know, this is the type of message you'll get in Fedora if your hard drive crashes.
As comparison, here is the output of dmesg when the drive is successfully recognized by the system:
usb-storage: device found at 32
usb-storage: waiting for device to settle before scanning
scsi 16:0:0:0: Direct-Access WDC WD80 0BB-75CAA0 0811 PQ: 0 ANSI: 0
SCSI device sdc: 156250000 512-byte hdwr sectors (80000 MB)
sdc: test WP failed, assume Write Enabled
sdc: assuming drive cache: write through
SCSI device sdc: 156250000 512-byte hdwr sectors (80000 MB)
sdc: test WP failed, assume Write Enabled
sdc: assuming drive cache: write through
sdc: sdc1
sd 16:0:0:0: Attached scsi disk sdc
sd 16:0:0:0: Attached scsi generic sg0 type 0
usb-storage: device scan complete
Boo hoo! I will go home and cry. Wait..I'm already there. I'll start crying now then.
scsi 15:0:0:0: scsi: Device offlined - not ready after error recovery
Here's the whole shebang after plugging in my defunct, broken and otherwise not working NTFS-formatted, Seagate 80GB hard drive that sits in an Adaptec ACS-100 External USB drive case:
usb 5-3: new high speed USB device using ehci_hcd and address 30
usb 5-3: configuration #1 chosen from 1 choice
scsi15 : SCSI emulation for USB Mass Storage devices
usb-storage: device found at 30
usb-storage: waiting for device to settle before scanning
usb 5-3: USB disconnect, address 30
scsi 15:0:0:0: scsi: Device offlined - not ready after error recovery
usb-storage: device scan complete
So just in case you need to know, this is the type of message you'll get in Fedora if your hard drive crashes.
As comparison, here is the output of dmesg when the drive is successfully recognized by the system:
usb-storage: device found at 32
usb-storage: waiting for device to settle before scanning
scsi 16:0:0:0: Direct-Access WDC WD80 0BB-75CAA0 0811 PQ: 0 ANSI: 0
SCSI device sdc: 156250000 512-byte hdwr sectors (80000 MB)
sdc: test WP failed, assume Write Enabled
sdc: assuming drive cache: write through
SCSI device sdc: 156250000 512-byte hdwr sectors (80000 MB)
sdc: test WP failed, assume Write Enabled
sdc: assuming drive cache: write through
sdc: sdc1
sd 16:0:0:0: Attached scsi disk sdc
sd 16:0:0:0: Attached scsi generic sg0 type 0
usb-storage: device scan complete
Boo hoo! I will go home and cry. Wait..I'm already there. I'll start crying now then.
Labels:
dmesg,
fedora,
hard drive failure,
usb external drive
If you appreciated this answer..consider buying me a beer via PayPal!
I'm easy..$1 Draft would be great! THANKS!
Friday, July 13, 2007
Event ID: 36870, Schannel error
This was a very nasty error that I found in the System Event logs of my Windows 2000 webserver while upgrading a Digital ID for Secure Email certificate.
Event Type:
ErrorEvent Source: Schannel
Event Category: None
Event ID: 36870
Date: 7/11/2007
Time: 1:50:10 PM
User: N/A
Computer:
Description: A fatal error occurred when attempting to access the SSL client credential private key. The error code returned from the cryptographic module is 0xffffffff.
Strange thing was that it happened only on a few of the Windows 2000 servers in our web farm.
To explain, we use a browser certificate to encrypt a small subset of transactions on our website. Verisign calls this a "Digital ID for Secure Email." During our yearly update of the certificate, we encountered the Schannel error shown above. Customers on our website would then a failure when they hit a webserver showing evidence of the problem. Again, not all webservers showed the problem, only a subset.
After four hours of troubleshooting and googling, I stumbled upon a post that suggested to look at the permissions on the following directory:
C:\Documents and Settings\All Users\Application Data\Microsoft\Crypto\RSA\MachineKeys
Somehow, when the certificate got updated earlier that morning, the administrator and Everyone user had lost ALL their privileges to Read, Write or Modify files in that directory. Because this was a Severity One condition for our web application, I decided to take the easy road and give Administrator and Everyone Read/Read&Execute/List/Write permissions on that directory.
This solved the problem and allowed the customers to complete the transaction; however, it didn't tell us the cause of why installing the new certificate changed the permissions on the MachineKeys directory. I am still researching this. If I find out why this happened, I will update this post.
Labels:
digital id for secure email,
error,
schannel,
windows 2000
If you appreciated this answer..consider buying me a beer via PayPal!
I'm easy..$1 Draft would be great! THANKS!
Thursday, July 12, 2007
warning, got bogus tcp line in RHEL AS3
I have been plagued with this error while I use netstat on my RedHat Enterprise Linux, Advanced Server 3.0 box for a couple years now and never had the time to track it down. So I finally decided to investigate. It looks to be a bug on some RedHat systems: http://kbase.redhat.com/faq/FAQ_45_6180.shtm
The messages mean that "there are two identical recorded TCP connections. This can happen if a connection is rapidly closing and re-connecting on the same address/port tuple."
This seems to fit the behaviour of my webserver, as it is typically serving hundreds of connections at a time. But RedHat points to two specific parameters in /etc/sysctl.conf that are set to 1 instead of zero:
sysctl net.ipv4.tcp_tw_recycle
sysctl net.ipv4.tcp_tw_reuse
Of course, this was not true in my case. I believe however, that RedHat's general statement above about connections rapidly closing and reconnecting seems to be the cause.
To help you identify you particular problem, here are some other useful discussions of the same problem:
http://www.morgan-systems.com/tools/Dev_Netstat.asp
http://track.sipfoundry.org/browse/XPB-371
Labels:
bogus tcp line,
error,
redhat enterprise linux,
rhel3
If you appreciated this answer..consider buying me a beer via PayPal!
I'm easy..$1 Draft would be great! THANKS!
Wednesday, July 11, 2007
changing the default port of vnc server in Fedora
Another quicky:
To change the default port of vnc server running under Fedora Core, edit /usr/bin/vncserver. Replace all instances of 5900 with <your desired port number - 1>. That is a "minus 1" there, as vncserver will start to listen on the default port number specified in /usr/bin/vncserver + 1.
In my case, I noticed that my companies' proxy still had port 3389 open. So, in /usr/bin/vncserver, I changed the default port of 5900 to 3388. Just to confirm: 3389-1=3388. Yes.
You must then restart vncserver:
[root@computer ~]# service vncserver start
Starting VNC server: 1:root
New 'computer:1 (root)' desktop is computer:1
Starting applications specified in /root/.vnc/xstartup
Log file is /root/.vnc/computer:1.log
[ OK ]
[root@computer ~]# netstat -na | grep 'LISTEN '
tcp 0 0 127.0.0.1:8000 0.0.0.0:* LISTEN
tcp 0 0 127.0.0.1:2208 0.0.0.0:* LISTEN
tcp 0 0 0.0.0.0:5801 0.0.0.0:* LISTEN
tcp 0 0 0.0.0.0:111 0.0.0.0:* LISTEN
tcp 0 0 0.0.0.0:6001 0.0.0.0:* LISTEN
tcp 0 0 127.0.0.1:631 0.0.0.0:* LISTEN
tcp 0 0 0.0.0.0:920 0.0.0.0:* LISTEN
tcp 0 0 0.0.0.0:3389 0.0.0.0:* LISTEN
Et voila!
VNC is up and running on port 3389 and I can slide through the company firewall to get to my home box! Sweet! Of course, VNC traffic is not encrypted, so a wiser solution would be to use an SSH tunnel home. But when I need to open a brief session to access content on my home box, this solution is adequate.
G'night!
Labels:
default port,
fedora,
vnc,
vncserver
If you appreciated this answer..consider buying me a beer via PayPal!
I'm easy..$1 Draft would be great! THANKS!
Tuesday, July 10, 2007
finding out the BIOS version in Linux
Here's another little tidbit of useless information that you will no longer need to keep in your heads because I will have told you and all you will have to do is visit http://www.google.com and search for "finding BIOS version in Linux" and this lovely little article will appear magically before you.
:)
Initially, I thought the best way to find out your BIOS version would be to look in /var/log/dmesg and run this command:
root_testserver root > grep BIOS /var/log/dmesg
BIOS-provided physical RAM map:
BIOS-e820: 0000000000000000 - 000000000009f400 (usable)
BIOS-e820: 000000000009f400 - 00000000000a0000 (reserved)
BIOS-e820: 00000000000f0000 - 0000000000100000 (reserved)
BIOS-e820: 0000000000100000 - 000000009fffa000 (usable)
BIOS-e820: 000000009fffa000 - 00000000a0000000 (ACPI data)
BIOS-e820: 00000000fec00000 - 00000000fec10000 (reserved)
BIOS-e820: 00000000fee00000 - 00000000fee10000 (reserved)
BIOS-e820: 00000000ffc00000 - 0000000100000000 (reserved)
mtrr: probably your BIOS does not setup all CPUs
PCI: PCI BIOS revision 2.10 entry at 0xf0094, last bus=9
PCI: Device 00:00 not found by BIOS
PCI: Device 00:01 not found by BIOS
PCI: Device 00:02 not found by BIOS
PCI: Device 00:78 not found by BIOS
PCI: Device 00:7b not found by BIOS
PCI: Device 00:80 not found by BIOS
PCI: Device 00:82 not found by BIOS
PCI: Device 00:88 not found by BIOS
PCI: Device 00:8a not found by BIOS
apm: BIOS not found.
ide0: BM-DMA at 0x2000-0x2007, BIOS settings: hda:pio, hdb:pio
ide1: BM-DMA at 0x2008-0x200f, BIOS settings: hdc:pio, hdd:pio
The important line in the output should look something like this:
PCI: PCI BIOS revision 2.10 entry at 0xf0094, last bus=9
or, eliminating some extraneous information, you can use the enhanced command:
root_testserver root > grep BIOS /var/log/dmesg grep evision
However! As I looked through the online documentation of my Compaq DL380, I saw that the BIOS version is NOT PCI BIOS revision 2.10, but actually an HP specific BIOS named P52! I asked my friendly neighborhood Unix admin and he turned me onto the "dmidecode" command.
Check it:
root_testserver root > dmidecode more
# dmidecode 2.2
SMBIOS 2.3 present.
54 structures occupying 1477 bytes.
Table at 0x000EC000.
Handle 0x0000
DMI type 0, 20 bytes.
BIOS Information
Vendor: HP
Version: P52
Release Date: 04/14/2005
Address: 0xF0000
Runtime Size: 64 kB
ROM Size: 4096 kB
Characteristics:
PCI is supported
PNP is supported
BIOS is upgradeable
BIOS shadowing is allowed
ESCD support is available
Boot from CD is supported
Selectable boot is supported
5.25"/360 KB floppy services are supported (int 13h)
5.25"/1.2 MB floppy services are supported (int 13h)
3.5"/720 KB floppy services are supported (int 13h)
Print screen service is supported (int 5h)
8042 keyboard services are supported (int 9h)
Serial services are supported (int 14h)
Printer services are supported (int 17h)
CGA/mono video services are supported (int 10h)
ACPI is supported
USB legacy is supported
BIOS boot specification is supported
That's all folks! May all your BIOS dreams come true!
Oh..here's a related article on how to determine the version of your operating system in Linux or SunOS:
http://www.techanswerguy.com/2007/06/how-to-get-operating-system-version-in.html
Labels:
bios,
compaq dl380,
dmesg,
linux
If you appreciated this answer..consider buying me a beer via PayPal!
I'm easy..$1 Draft would be great! THANKS!
Saturday, July 07, 2007
Saving your session preferences in Core 6
This was a little bugger that cost me some time, so I thought I'd share the solution with you guys.
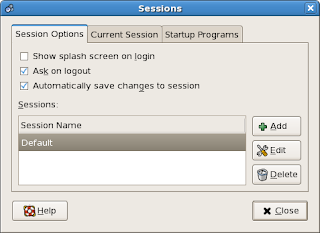
Fedora Core 6 changed the way it saves session information in Gnome from earlier versions of Fedora. Instead of automatically saving your desktop preferences, like which programs automatically start and the position of windows on the desktop, Core 6 does NOT automatically save these settings. You need to manually open up the Sessions configurator and select "Automatically save changes to session" as shown in the below graphic:
Another feature of the Sessions configurator is the ability to trigger programs to startup when your Gnome session begins (the Startup tab):
Go ahead and use the + Add button to add the command line startup parameters of any program you wish to start when Gnome loads.
Finally, another nice feature of the Sessions configurator is the ability to change the order of how an application loads. So if you have one application that depends on another starting, you can specify the order in which they load under the Current Session tab shown below:
have a good day.
Labels:
core 6,
fedora,
gnome,
session preferences,
sessions
If you appreciated this answer..consider buying me a beer via PayPal!
I'm easy..$1 Draft would be great! THANKS!
getting Griffin PowerMate Knob to work in linux
So my friend gave me this neat little USB knob called a Griffin PowerMate that can be used to control volume on your desktop, among other things:
These devices have been around for years and always wanted one. I tried hooking it up to my MacBook Pro first, but couldn't get it to work. So I thought I give it a shot in Linux. I checked out some relevant links on Google, but a number of them were only the driver files or APIs for accessing the device. I wanted a program that I could execute to have the PowerMate come alive in XMMS or the generic volume control in Gnome.
I found this site, http://www.cip.ifi.lmu.de/~bolzer/powermate/ and it provided a number of Ruby programs to get the device recognized in XMMS. But first I needed to install Ruby, as it was not on my system. This was a quick, 1.9MB install of Ruby and Ruby-libs:
[root@computer Desktop]# yum install ruby
Loading "installonlyn" plugin
Setting up Install Process
Setting up repositories ...
Parsing package install arguments
Resolving Dependencies ...
Dependencies Resolved =============================================================================
Package Arch Version Repository Size ============================================================================= Installing: ruby i386 1.8.5.52-1.fc6 updates 282 k
Installing for dependencies: ruby-libs i386 1.8.5.52-1.fc6 updates 1.6 M
Transaction Summary =============================================================================
Install 2 Package(s)
Update 0 Package(s)
Remove 0 Package(s)
Total download size: 1.9 M
Is this ok [y/N]: y
Downloading Packages:
(1/2): ruby-1.8.5.52-1.fc 100% |=========================| 282 kB 00:00
(2/2): ruby-libs-1.8.5.52 100% |=========================| 1.6 MB 00:02
Installed: ruby.i386 0:1.8.5.52-1.fc6
Dependency Installed: ruby-libs.i386 0:1.8.5.52-1.fc6 Complete!
OK. Now to download the three programs responsible for controlling Ruby:
wget http://www.cip.ifi.lmu.de/~bolzer/powermate/xmmsmate.rb
wget http://www.cip.ifi.lmu.de/~bolzer/powermate/xmms.rb
wget http://www.cip.ifi.lmu.de/~bolzer/powermate/PowerMate.rb
Plugging the device in to my Dell monitors' USB port, I saw that my Fedora Core 6 system recognized it:
usb 5-1.4: new low speed USB device using ehci_hcd and address 6
usb 5-1.4: configuration #1 chosen from 1 choice
input: Griffin PowerMate as /class/input/input4
usbcore: registered new interface driver powermate
I downloaded the programs to my $HOME directory and tested the driver program, xmmsmate.rb:
[root@computer ~]# ruby xmmsmate.rb
./PowerMate.rb:356: warning: don't put space before argument parentheses
./PowerMate.rb:109: warning: Object#type is deprecated; use Object#class
You can disregard the output warnings, as they are only warnings, not errors.
Since the three programs only control XMMS, I opened up XMMS and found to my happy surprise, that the cool little volume knob controlled it! I could pause the playing song by holding the knob down for three seconds or forward to the next song in the playlist by holding it down longer. Sweet!
The one bummer was that these programs only allow the volume knob to control XMMS. However, I noticed if I left XMMS up and running, it could also control the volume for any PCM or waveform output. So, I am simply going to leave XMMS running all the time so that the PowerMate can control the volume for the rest of my favorite apps that output a waveform, like YouTube or Cinelerra.
Finally, I wanted the PowerMate to work automatically when my system started, so I did a few things to facilitaate this:
1) copy the three Ruby programs to /usr/bin
2) have XMMS startup automatically
You can follow these directions for starting up applications in your user profile automatically under Gnome in Fedora Core 6:
/2007/07/saving-your-session-preferences-in-core.html
3) once your system starts, execute the driver program
ruby /usr/bin/xmmsmate.rb &
Update 1/19/2008
Unfortunately, since upgrading to Fedora 7 x86_64, I haven't been able to get my powermate to work. Looks like I will have to investigate further. Keep you posted!
enjoy!
Labels:
core 6,
fedora,
griffin powermate,
ruby
If you appreciated this answer..consider buying me a beer via PayPal!
I'm easy..$1 Draft would be great! THANKS!
Friday, July 06, 2007
measuring performance while using VMware Server
My first performance posting regarding VMware Server’s love of large fast drives (/2007/06/performance-note-for-vms-they-love-fast.html) was sufficient, but not detailed enough for some readers. So I thought I’d give you guys a bit more technical information on measuring performance while using VMware Server.
Configuration
I recently created a rather large vm. It is a 45GB XP Professional guest OS built using VMware Converter 3.0.0 build 39557 and runs under the latest VMware Server version 1.0.3 build-44356. VMware Server is running on my desktop, XP Professional running on a Dell Precision 670 workstation with dual 3Ghz Xeons and 3.2GB RAM.
Before I started the test, I already had a couple of virtual machines already running:
- a Windows 2000 Advanced Server vm
- a Fedora Core 6 vm
Monitoring Performance
On my host OS, I started Performance Monitor with the following counters:
* Physical Disk Object -> Avg. Disk Write Queue Length
* Physical Disk Object -> Avg. Disk Read Queue Length
* Physical Disk Object -> Avg. Disk Queue Length
* Processor Object -> % Processor Time
Average Disk Queue Length is a sum of the number of read and write requests (Read/Write Queue Lengths) queued for the selected disk. Obviously, Average Disk Read Queue Length is the number of read requests queued for the selected disk and Average Disk Write Queue Length is the number of read requests queued. Such things as disk speed, disk cache size, i/o bus speed and RAID configuration (if any) affect disk throughput, which is the amount of read and write requests that the disk system can handle at any one time.
I also use the memory counters available in Task Manager:
The Test
I saw that my system slowed down considerably while using my big XP virtual machine, so I started Performance Monitor and selected the key indicators shown above plus “% Processor Time”, a measure of the amount of CPU used. After I started up my XP vm, it booted up to the logon prompt and I logged in. Immediately, I noticed my system slowed down to a crawl. If I tried to open any applications, those applications would take five minutes to start. So where’s the problem?
CPU Not a Problem
For this time period, I first looked at my CPU data in Performance Monitor. I note that since CPU is low, between 5-35%, CPU is not the cause of any system slowdown:
Is Memory the Problem?
Next, I took a look at the stats in Task Manager. I notice that my 1GB pagefile is being utilized:
However, Total Physical Memory does not exceed Total Commit Charge (shown in the above graphic). This would indicate insufficient system RAM. From these stats, it looks like my system is not memory bound.
Disk Queuing Through the Roof!
Looking at the Disk Queue stats, I noticed that disk queuing went through the roof:
In the Performance Monitor graph shown above, the black line is Avg. Disk Queue Length. You’ll notice that if you add the values of Avg. Disk Write Queue Length and Avg. Disk Queue Read Length together at any one point in time, that the sum of those values is equal to Avg. Disk Queue Length.
In a system performing optimally, there should be little disk queuing happening. According to the help menus in Performance Monitor, the recommended values of Avg. Disk Queue Length should be the number of spindles plus 2. In this case, I have a stripe set (RAID0) of two drives. There are two spindles corresponding to the spindle in each drive of the stripe set, so the optimum Avg Disk Queue Length of my system should be less that four.
In the image above, you can see values of between 25 to 40 (note the scale) for Disk Queue Length. There is some pretty heavy queuing going on here! I note that my machine is still barely responsive when I try opening any applications. You'll notice that there are breaks in the Performance Monitor graph. This indicates that my system is so bogged down that the Performance Monitor program is freezing. Youch! This screen was captured after about ten minutes since I started the VM. After about 20 minutes, the disk queuing stops and I am able to open applications normally:
You can see in the above graphic that the high disk queue condition stops after I’ve logged into my XP vm and the guest OS fully loads. For the 45GB XP guest OS running on my dual proc Dell Precision workstation, this took a full twenty minutes! Wow. That is a LOT of disk queuing. Again, CPU and memory stayed fairly constant during this experiment. CPU was roughly 30% and there was a little less than 2GB of RAM available during the process.
One note: if you don't like the default scale of 100:1 on the Performance Monitor chart, you can change that default scale by:
1) right-clicking on the statistic in the legend of the chart
2) select Properties
3) click the Data tab
4) choose another scale under the Default Scale dropdown menu
Conclusions
Perhaps the VMware engineers can explain why the VM took so long to free up my disk resources, but I suspect that it is simply the fact that the virtual machine is so big (45GB) and that VMware Server cannot handle a vm of that size efficiently. I’d really need a server class machine with super fast disk i/o to handle the intense read/write activity.
Perhaps you have an interesting VMware performance story? If so, drop me a line at cacasododom@gmail.com or just comment below.
Have a good weekend everybody!
'sodo
Addendum:
A reader asked if there were any good programs to correlate process id with i/o. For Windows, Mark Russinovich's Process Explorer is an excellent choice. Just add I/O Read/Write Bytes from the View -> Select Columns -> Process I/O tab:
If you appreciated this answer..consider buying me a beer via PayPal!
I'm easy..$1 Draft would be great! THANKS!
Wednesday, July 04, 2007
Beagle and makewhatis consuming resources
You know, I'm really not a fan of having programs doing things on my system without my consent. So I was a bit put off when I heard the fan start on my system the other day when I wasn't even using it for anything. The fan indicates that some system resources, mainly CPU, are being utilized and the system needs to kick into high gear in order to cool it.
Looking at the output of "top", I saw this:
top - 11:58:18 up 1:42, 1 user, load average: 1.41, 1.03, 0.49
Tasks: 126 total, 1 running, 125 sleeping, 0 stopped, 0 zombie
Cpu(s): 0.2%us, 4.8%sy, 13.7%ni, 49.3%id, 30.5%wa, 1.2%hi, 0.3%si, 0.0%st
Mem: 2074372k total, 1131800k used, 942572k free, 164916k buffers
Swap: 2031608k total, 0k used, 2031608k free, 769072k cached
PID USER PR NI VIRT RES SHR S %CPU %MEM TIME+ COMMAND
3846 beaglidx 34 19 81156 26m 9500 S 45 1.3 3:07.64 beagle-build-in
368 root 10 -5 0 0 0 D 2 0.0 0:04.34 kjournald
54 root 10 -5 0 0 0 S 0 0.0 0:00.07 kblockd/1
What the hell is "beagle-build-in" and why is it consuming half my available CPU?! A quick search on google yielded the information that beagle is a new search tool installed on Fedora since Core 5. I am using Core 6. Beagle (http://beagle-project.org) indexes your system drives is installed by Fedora Core 6 without your consent and consumes a good part of your resources for 10-15 minutes.
I understand that new technology like this can be a good thing, especially if you have a lot of files and need to search them frequently, but I want my system to run lean and mean. To me, having a program that is installed to indexing my system and consume resources without me knowing about it goes against the idea of Open Source. Is Fedora getting more like Windows every day? Ugh.
So how do you stop this thing from indexing automatically? There is an entry in /etc/cron.daily that you can remove:
[root@computer ~]# ls /etc/cron.daily/
000-delay.cron 0logwatch cups mlocate.cron tmpwatch
00webalizer beagle-crawl-system logrotate prelink
0anacron certwatch makewhatis.cron rpm
I also found another spot where you can disable beagle indexing. In the lower-right corner of Firefox, there is a little dog icon:
Click on the dog icon and a little red "X" will appear to indicate that you've disabled beagle's indexing function.
Finally, be aware that there is a user created in /etc/passwd for indexing:
beaglidx:x:58:58:User for Beagle indexing:/var/cache/beagle:/sbin/nologin
What an irritation! I decided to move the beagle-crawl-system program out of the /etc/cron.daily folder and put it in root's home directory in case I wanted to run it in the future. Beagle does have some interesting demos for those interested in seeing its very fast indexing capabilities:
http://nat.org/demos/
Soon after I removed the process from starting up every day, I noticed ANOTHER program kicked off and started utilizing my processor. WHAT IS GOING ON, FEDORA??! Now I'm starting to get angry. Again, I start "top" and this is what I see:
top - 12:19:05 up 2:03, 2 users, load average: 0.16, 0.29, 0.45
Tasks: 120 total, 1 running, 119 sleeping, 0 stopped, 0 zombie
Cpu(s): 1.7%us, 0.3%sy, 0.0%ni, 97.5%id, 0.0%wa, 0.2%hi, 0.3%si, 0.0%st
Mem: 2074372k total, 1325996k used, 748376k free, 238596k buffers
Swap: 2031608k total, 0k used, 2031608k free, 869324k cached
PID USER PR NI VIRT RES SHR S %CPU %MEM TIME+ COMMAND
3911 root 15 0 136m 58m 22m S 11 2.9 1:57.56 makewhatis
3444 root 15 0 61720 38m 9928 S 1 1.9 1:05.34 Xorg
Argh! What is this? A quick "man" on "makewhatis" yields this information:
makewhatis reads all the manual pages contained in the given sections of manpath or the preformatted pages contained in the given sections of catpath. For each page, it writes a line in the whatis database; each line consists of the name of the page and a short description, separated by a dash.
Oh..so it is indexing the man pages to give you a quick synopsis of a programs' functions when you type:
whatis <program name>
Like so..
[root@computer ~]# whatis ffmpeg
ffmpeg (1) - FFmpeg video converter
ffmpeg-devel (rpm) - Header files and static library for the ffmpeg codec library
ffmpeg-libpostproc (rpm) - Video postprocessing library from ffmpeg
ffmpeg (rpm) - Utilities and libraries to record, convert and stream audio and video
OK. Well, makewhatis did not take long to run and I did end up liking the simple output of whatis. It is case-insensitive too, as this output of a search on OpenEXR shows:
[root@computer ~]# whatis openexr
OpenEXR-devel (rpm) - Headers and libraries for building apps that use OpenEXR
OpenEXR (rpm) - A high dynamic-range (HDR) image file format
I will use this program in the future. As well, the makewhatis index function did not take up too much CPU (less than 30%) and only ran for about five minutes.
I'm starting to cool off now. But land sakes, do I hate when programs run without my knowledge!!
Labels:
beagle,
core 6,
fedora,
kill process,
makewhatis,
whatis
If you appreciated this answer..consider buying me a beer via PayPal!
I'm easy..$1 Draft would be great! THANKS!
Sunday, July 01, 2007
VMware Fusion Unity mode
I'll start this post with a question: what is wrong with this picture?
If you guessed that there are Windows apps running on my MacBook Pro's desktop, you'd be right! Of course, if you are a true Mac devotee, there's nothing "right" about that at all! In fact, it's all wrong!!
Seriously though, VMware Fusion's Unity mode (like Parallels Coherence mode) is a really nice piece of work. If you ever wanted to run Mac and Windows applications side by side on the same desktop, this is the program for you! I have Fusion running on my MacBook Pro using an XP Professional virtual guest OS and Unity is very sweet. There is a bit of a visual hiccup for the first couple of seconds while you switch from Single Window or Full Screen mode to Unity mode (look under Fusion's "View" menu to switch):
The Mac and Windows desktops then cohere together for a couple of seconds, but after that, Windows apps run right along side the native Mac applications. It was very cool to see and hear a video running in Windows Media Player on the Mac desktop. Now that's quite a feat of engineering! Thanks VMware! This will help ease the transition from PC to Mac for a lot of people. I will mention it to the powers that be at work.
A couple notes:
1) to have access to Unity mode, make sure you have the latest and greatest version of VMware Fusion Beta found here:
http://www.vmware.com/products/desktop/fusion.html
2) to enable the feature, make sure you have the latest version of VMware Tools installed in your guest operating system
3) if you are using XP Service Pack 2, a nice performance boost for the display is to utilize DirectX 8.1 acceleration features. So go to the Display menu under your XP virtual machines' Settings:
Cool!
Labels:
coherence mode,
macbook pro,
parallels,
unity mode,
vmware fusion
If you appreciated this answer..consider buying me a beer via PayPal!
I'm easy..$1 Draft would be great! THANKS!
Subscribe to:
Posts (Atom)
Feel free to drop me a line or ask me a question.