The JRE install is something I always forget and it's always a pain in the ass. I wanted it to be able to view some videos within Firefox from my friends at http://www.kiberpipa.org
Choose a Version 5 or Version 6 JRE install
Here is a quick link to the latest JRE (Version 6 Update 2):
http://java.com/en/download/index.jsp
Here is the link to the full Sun Java download page (
Java Runtime Environment (JRE) 5.0 Update 12):
http://java.sun.com/javase/downloads/index_jdk5.jsp
From the displayed list of downloadable softwares, I suggest you install the latest Java Runtime Environment (JRE) 5.0 Update.
Here are the install notes:
http://java.sun.com/j2se/1.5.0/jre/install-linux.html
The install notes are straight forward. Follow them. However, the one instruction the install notes leave out is to create a symbolic link to the Java plugin shared object from the Firefox plugins directory. Your paths may vary slightly if you've installed a different version of the JRE (either Version 6 Update 2 or
Java Runtime Environment (JRE) 5.0 Update 12).
Here is that command for a JRE 5.0 Update 12 install:
ln -s /usr/java/jre1.5.0_12/plugin/i386/ns7/libjavaplugin_oji.so /usr/lib/mozilla/plugins
Here is the command for a JRE 6.0 Update 2 install:
ln -s /usr/java/jre1.6.0_02/plugin/i386/ns7/libjavaplugin_oji.so /usr/lib/mozilla/plugins
After that, restart your browser. You can then verify the test content on Sun's site:
http://java.com/en/download/installed.jsp
good luck!
Friday, August 31, 2007
Monday, August 27, 2007
be aware that ODBC tracing grinds your web server to a halt
In relation to the recent ODBC to Oracle problem we've been having (/2007/08/high-number-of-db-connections-to-oracle.html), I wanted to make you aware that enabling ODBC Tracing on your web server will cripple the performance of that server.
I enabled ODBC tracing this morning on one of my four load balanced Win2K servers. You can configure this under Control Panel -> Administrative Tools -> Data Sources (ODBC) Administrator:
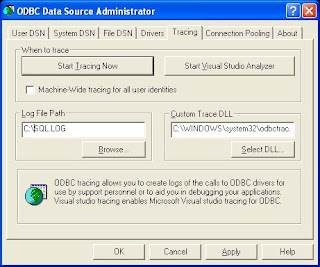
I needed to reboot after doing this to start the trace log file. Once the box came back up, I tested a page that had a dynamic connection to our database. As opposed to the usual 2 seconds, the response took about 90 seconds to complete! So BE VERY CAREFUL when using ODBC tracing, as it will kill performance on your web server.
If you absolutely have to have tracing on, run it from only one of the web servers in your farm and only for a short time..hopefully, only during the duration of the ODBC problem you are experiencing.
live and learn, as always!
'sodo
Wednesday, August 22, 2007
high number of db connections to Oracle from bad Microsoft ODBC driver
In the past week, we've seen a very natty problem between our ASP-based website and our Oracle database that was difficult to troubleshoot. As I'm still on vacation, this problem is even more frustrating!
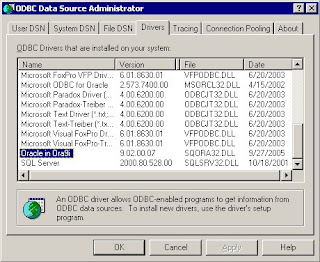
We have a website that is powered by an Oracle database. Our web application is traditional ASP. We were running Oracle 9i on the server; specifically, 9.2.0.7. In the webserver code, we connect to the database via an ODBC system DSN. The Oracle client version was 8.1.7.
We saw that when we used the older Microsoft ODBC for Oracle driver (version 2.573.7400.00):

we'd occasionally see huge spikes in connections and database deadlocks. The side effect of the deadlocks was that connections from the web servers to the database would increase from 5-10 to 50-100! In turn, this spike in connections made the website slow down to a crawl for the users. Ugly!
We were only able to identify the problem by doing memory dumps on both the web servers and database server simultaneously. We then sent the dumps and SQLnet logs to Oracle and Microsoft. It was a Microsoft engineer who identified the lock condition. In this condition, ASP requests for data sent through the Microsoft ODBC driver waited for database responses that were never returned from the database. On the database side, the database was waiting for CLOSE acknowledgements that never came back from the ODBC driver. Nightmare!
The Microsoft engineer told us that the specific Microsoft for Oracle ODBC driver was no longer supported. Oracle technicians stated that they had seen problems with high database connections and ODBC with Oracle driver versions 9.1 and below. Through a series of successful and unsuccessful driver installations, we finally had a working system without the connection hangs using the Oracle for Ora9i driver version 9.02.00.07 and the latest hotfix patches:
Here is a list of the patches to get to 9.2.0.7:
1) Oracle 9207 patch set (#4163445)
2) Oracle Data Access Software for Windows patch (#4622091)
3) ODBC supplementary patch to the above #4622091 patch (#4640047)
Eeesh!
For those of you wishing to see all the ugly install steps, here they are:
1) Download patches at https://metalink.oracle.com/ or more specifically:
http://www.oracle.com/technology/software/tech/windows/odbc/index.html
Install Oracle 9207 patch set (#4163445)
2) shutdown iis, set startup to manual
3) shutdown Distributed Transaction Coordinator and Oracle MTS Recovery Service
4) reboot in order to clear any connections to Oracle DLLs
5) expand the Oracle 9207 patch set (p4163445_92070_WINNT.zip) to a temp dir (view README.html for general install info)
6) The installer uses the Oracle 10i installer that comes with the patch set. So run the installer from the temp directory ->
../Disk1/setup.exe.
7) Click Next on Welcome screen
8) The patchset directory should automatically be filled in as "Source." For Destination, select "OraHome9i". Click Next.
9) You'll get a summary of the files that the Oracle Installer is going to update. Click Install.
10) If all goes well, the Oracle patch set will be installed successfully.
Install Oracle Data Access Software for Windows patch (#4622091)
11) expand the Oracle Data Access Software for Windows patch (p4622091_92070_MSWIN.zip)
12) Run the installer in the expanded directory ..\ODAC9.2.0.7\Disk1\setup.exe
13) The patchset directory should automatically be filled in as "Source."
For Destination, select "OraHome9i". Click Next.
14) Select Oracle ODBC Driver 9.2.0.7.0 and click Next
15) You'll get a Summary screen to review. Click Install. You should get a successful message. Click Next Install.
16) Keep the same Source/Destination as you started with
17) Select Oracle Data Provider for .NET 9.2.0.7.0 and click Next
18) You'll get a Summary screen to review. Click Install. You should get a successful message. Click Exit and Yes to confirm.
Install one-off, ODBC supplementary patch to the above #4622091 patch (#4640047)
19) expand the Oracle Data Access Software for Windows patch (p4640047_92070_MSWIN.zip)
20) copy sqora32.dll, sqoras32.dll, sqresus.dll into the bin folder of Oracle home (should be D:\Oracle9i\bin)
21) reenable iis startup as automatic
22) reboot for good measure
That is the whole enchilada. Yuck!
We have a website that is powered by an Oracle database. Our web application is traditional ASP. We were running Oracle 9i on the server; specifically, 9.2.0.7. In the webserver code, we connect to the database via an ODBC system DSN. The Oracle client version was 8.1.7.
We saw that when we used the older Microsoft ODBC for Oracle driver (version 2.573.7400.00):

we'd occasionally see huge spikes in connections and database deadlocks. The side effect of the deadlocks was that connections from the web servers to the database would increase from 5-10 to 50-100! In turn, this spike in connections made the website slow down to a crawl for the users. Ugly!
We were only able to identify the problem by doing memory dumps on both the web servers and database server simultaneously. We then sent the dumps and SQLnet logs to Oracle and Microsoft. It was a Microsoft engineer who identified the lock condition. In this condition, ASP requests for data sent through the Microsoft ODBC driver waited for database responses that were never returned from the database. On the database side, the database was waiting for CLOSE acknowledgements that never came back from the ODBC driver. Nightmare!
The Microsoft engineer told us that the specific Microsoft for Oracle ODBC driver was no longer supported. Oracle technicians stated that they had seen problems with high database connections and ODBC with Oracle driver versions 9.1 and below. Through a series of successful and unsuccessful driver installations, we finally had a working system without the connection hangs using the Oracle for Ora9i driver version 9.02.00.07 and the latest hotfix patches:

Here is a list of the patches to get to 9.2.0.7:
1) Oracle 9207 patch set (#4163445)
2) Oracle Data Access Software for Windows patch (#4622091)
3) ODBC supplementary patch to the above #4622091 patch (#4640047)
Eeesh!
For those of you wishing to see all the ugly install steps, here they are:
1) Download patches at https://metalink.oracle.com/ or more specifically:
http://www.oracle.com/technology/software/tech/windows/odbc/index.html
Install Oracle 9207 patch set (#4163445)
2) shutdown iis, set startup to manual
3) shutdown Distributed Transaction Coordinator and Oracle MTS Recovery Service
4) reboot in order to clear any connections to Oracle DLLs
5) expand the Oracle 9207 patch set (p4163445_92070_WINNT.zip) to a temp dir (view README.html for general install info)
6) The installer uses the Oracle 10i installer that comes with the patch set. So run the installer from the temp directory ->
../Disk1/setup.exe.
7) Click Next on Welcome screen
8) The patchset directory should automatically be filled in as "Source." For Destination, select "OraHome9i". Click Next.
9) You'll get a summary of the files that the Oracle Installer is going to update. Click Install.
10) If all goes well, the Oracle patch set will be installed successfully.
Install Oracle Data Access Software for Windows patch (#4622091)
11) expand the Oracle Data Access Software for Windows patch (p4622091_92070_MSWIN.zip)
12) Run the installer in the expanded directory ..\ODAC9.2.0.7\Disk1\setup.exe
13) The patchset directory should automatically be filled in as "Source."
For Destination, select "OraHome9i". Click Next.
14) Select Oracle ODBC Driver 9.2.0.7.0 and click Next
15) You'll get a Summary screen to review. Click Install. You should get a successful message. Click Next Install.
16) Keep the same Source/Destination as you started with
17) Select Oracle Data Provider for .NET 9.2.0.7.0 and click Next
18) You'll get a Summary screen to review. Click Install. You should get a successful message. Click Exit and Yes to confirm.
Install one-off, ODBC supplementary patch to the above #4622091 patch (#4640047)
19) expand the Oracle Data Access Software for Windows patch (p4640047_92070_MSWIN.zip)
20) copy sqora32.dll, sqoras32.dll, sqresus.dll into the bin folder of Oracle home (should be D:\Oracle9i\bin)
21) reenable iis startup as automatic
22) reboot for good measure
That is the whole enchilada. Yuck!
Tuesday, August 21, 2007
Saturday, August 18, 2007
mount a windows share under mac
Pretty easy, but I don't do this very often, so I forget.
1) open Finder
2) press the Apple-K key combination:
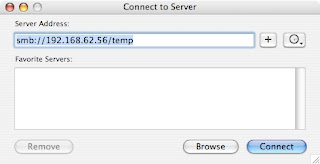
3) enter your Windows share path like so
smb://serverIp/shareName
For example, if your serverIp is 192.168.62.56 and your share name is temp, you'll enter:
smb://192.168.62.56/temp
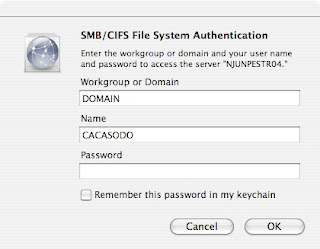
4) enter your credentials if necessary:
that's it!
1) open Finder
2) press the Apple-K key combination:
3) enter your Windows share path like so
smb://serverIp/shareName
For example, if your serverIp is 192.168.62.56 and your share name is temp, you'll enter:
smb://192.168.62.56/temp

4) enter your credentials if necessary:

that's it!
Tuesday, August 14, 2007
eliminating the need to enter your password via SSH or SCP
Everybody and their mother who is a Unix or Windows admin writes shell scripts to perform mundane but necessary work. This work is usually accomplished via SSH, as it is a secure method to transfer information between servers. This is especially true on Unix system, where ssh and scp (Secure Copy) are the hammer and screwdriver of a Unix admins' toolset.
SSH and SCP are great, but one of the pains of using these programs is the constant need to type in a password to logon to different servers. Wouldn't it be nice to not have to enter a password everytime you logged onto a server or had a script run? As well, wouldn't it be even better to have those processes still be secure? Of course! So in order to free your life of passwords, I will now show you pubkey authentication.
In the interest of full disclosure, I got a good bit of the information for this post from Security Focus, but I felt that the way they organized the details was a bit confusing. Hence, I've reworked their original example to something a more understandable. Here is the link to that original article:
http://www.securityfocus.com/infocus/1810
Added 3/1/2008
For a more general understanding of how SSH works with public key encryption, read the following article:
http://www.securityfocus.com/infocus/1806
In order for pubkey authentication to work, you will need to create a public key on your source machine and setup an authorized_keys file on the destination server. The source machine will be the server where you are logging in FROM. The destination server is where you are logging in TO. For instance, I like to run a script on my Fedora desktop that gathers network information FROM my RHEL3 server. So my source is the Fedora desktop and the destination is my RHEL3 server.
Here's the picture:
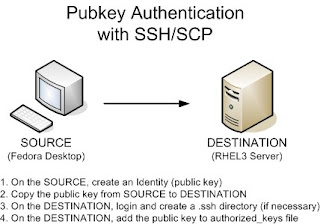
There are four steps to setting up pubkey authentication:
1. On the source, create an Identity (a public key)
2. Copy the public key from the source to the destination
3. On the destination, login and create a .ssh directory (if necessary)
4. On the destination, add the public key to authorized_keys file
So let's begin.
1. On the source machine, create an Identity (a public key)
a. Type ssh-keygen -t rsa as below. You can choose to enter a passphrase or not:
FedoraDesktop$ ssh-keygen -t rsa
Generating public/private rsa key pair.
Enter file in which to save the key (/home/cacasodo/.ssh/id_rsa):
Enter passphrase (empty for no passphrase): (enter passphrase)
Enter same passphrase again: (enter passphrase)
Your identification has been saved in /home/cacasodo/.ssh/id_rsa.
Your public key has been saved in /home/cacasodo/.ssh/id_rsa.pub.
The key fingerprint is:
74:9b:69:24:4a:44:3f:a4:be:46:23:47:19:f7:dc cacasodo@FedoraDesktop
b. Verify that one public (*.pub) and one private file exists by changing to your users's .ssh directory and listing out the files:
FedoraDesktop$ cd $HOME/.ssh
FedoraDesktop$ ls -l
-rw------- 1 cacasodo cacasodo 883 Jan 21 11:52 id_rsa
-rw-r--r-- 1 cacasodo cacasodo 223 Jan 21 11:52 id_rsa.pub
c. Finally, check the contents of both files:
FedoraDesktop$ cat id_rsa
-----BEGIN RSA PRIVATE KEY----- jK2TIwbHtE7GoP/Za3NTZJm2Ozviz8+PHPIEyyt9/kzT0+yo3KmgsstlqwIBIwKB XdBh42izEWsWpXf9t4So0upV1DEcjq8CQQDEKGAzNdgzOoIozE3Z3thIjrmkimXM J/Y3xQJBAMEqZ6syYX/+uRt+any1LADRebCq6UA076Sv1dmQ5HMfPbPuU9d3yOqV j0Fn2H68bX8KkGBzGhhuLmbrgRqr3+SPM/frUj3UyYxns5rnGspRkGB3AkALCbzH 9EAV8Uxn+Jhe5cgAC/hTPPdiwTJD7MpkNCpPuKRwrohytmNAmtIpKipAf0LS61np MIICWgIBAAKBgQCc+1oixZ/g84gpZH0NeI+CvVoY5O0FOCSpFCbhUGJigQ6VeKI5 gpOlDztpJ1Rc+KmfZ2qMaftwwnLmefhk1wPcvfZvvLjfdmHY5/LFgDujLuL2Pv+F 7tBjlyX9e9JfXZau2o8uhBkMbb3ZqYlbUuuoCAnUtL5uZUiiHM0BAtnGAd6epAYE gBHw1xnqsy+mzbuWdLEVF7crlUSsctwGapb6/SEQgEXFm0RITQ3jCY808NjRS3hW Z+uCCO8GGUsn2bZpcGXa5vZzACvZL8epJoMgQ4D0T50rAkEA0AvK4PsMF02Rzi4E mXgzd1yCa030LYR/AkApG1KT//9gju6QCXlWL6ckZg/QoyglW5myHmfPR8tbz+54
/lj06BtBA9iag5+x+caV7qKth1NPBbbUF8Sbs/WI5NYweNoG8dNY2e0JRzLamAUk
59ssjBG/a4ZXNn32n78DO0i6zVV5vwf8rv2sf
-----END RSA PRIVATE KEY-----
FedoraDesktop$ cat id_rsa.pub
ssh-rsa aIsWf4POIKWR9DXiPgr1aGOTtBTgkqRQm4VBiYoEOlXiiOYKTpQ87aSd
B3NzaC1yc2EAAAABIwAAAcMJy5nn4ZNcD3L32b7y433Zh2IEAnPtAAAAUXPipn
2dqjGn7OfyxYA7oy7i9j7/hYytkyMGx7ROxqD/2WtzU2SZtjs74s/PjxzyBMsr ff5M09PsqNypoLLLZas= cacasodo@FedoraDesktop
2. Copy the public key from the source to the destination
a. This one is fairly easy. We'll go ahead and scp the public key file from the source to the destination as below:
FedoraDesktop$ cd $HOME/.ssh
FedoraDesktop$ scp id_rsa.pub rhel3server:id_rsa_FedoraDesktop.pub
cacasodo@rhel3server's password: (enter password)
The scp command above copies the public key to the destination server with a new filename, id_rsa_FedoraDesktop.pub
3. On the destination, login and create a .ssh directory (if necessary)
a. Login via ssh
FedoraDesktop$ ssh rhel3server
cacasodo@rhel3server's password: (enter password)
b. If it does not exist, follow the commands below to make a .ssh directory. Oh, don't forget the "." in front of the ssh!
rhel3server$ mkdir .ssh
rhel3server$ chmod 700 .ssh
rhel3server$ cd .ssh
4. On the destination, add the public key to authorized_keys file
a. We will use the concatenate (>>) redirector to add our source machine's public key to the authorized_keys file on the destination server.
rhel3server$ cat ../id_rsa_FedoraDesktop.pub >> authorized_keys
b. Let's verify the file:
rhel3server$ cat authorized_keys
ssh-rsa n7OfyxYA7oy7i9j7/hYytkyMGx7ROxqD/2WtzU2SZtjs74s/PjxzyBMsr 3NzaC1yc2EAAAABIwAAAcMJy5nn4ZNcD3L32b7y433Zh2IEAnPt f4POIKWR9DXiPgr1aGOTtBTgkqRQm4VBiYoEOlXiiOYKTpQ87aSdUXPipn
M09PsqNypoLLLZas= cacasodo@FedoraDesktop
c. And make sure to lock down the file with tighter permissions:
rhel3server$ chmod 600 authorized_keys
d. OK! So now, the big test is to try and login from your source server to the destination server. You should no longer need to enter a password!
FedoraDesktop$ ssh rhel3server
rhel3server$
We're in! Now you don't have to enter your ssh password at the prompt any longer! Hoo-ah!
attaching a binary file to command line email
In yesterday's post (/2007/08/scripted-gnuplot-graphs.html), I created a chart of the previous days' web server connections. Today, I'd like to expand the functionality of the script by having the script automatically email me the previous days' connections plot. Unfortunately, because mail servers strip out line feeds and other control characters from emails, I can't simply attach a binary file to an email. I must first uuencode the binary file that I wish to send.
Uuencode translates binary code into text, in order that email servers can send along a binary file without garbling it. Fedora Core does not have uuencode installed by default. It is packaged within the sharutils rpm. I can go ahead and install this using yum:
[root@computer ~]# yum install sharutils
*Loading "installonlyn" plugin
Setting up Install Process
Setting up repositories
Reading repository metadata in from local files
Parsing package install arguments
Resolving Dependencies
--> Populating transaction set with selected packages. Please wait.
---> Downloading header for sharutils to pack into transaction set.
sharutils-4.6.1-2.i386.rp 100% ========================= 12 kB 00:00
---> Package sharutils.i386 0:4.6.1-2 set to be updated
--> Running transaction check
Dependencies Resolved
=============================================================================
Package Arch Version Repository Size =============================================================================
Installing: sharutils i386 4.6.1-2 core 201 k
Transaction Summary
=============================================================================
Install 1 Package(s) Update 0 Package(s) Remove 0 Package(s)
Total download size: 201 k
Is this ok [y/N]: y
Downloading Packages:
(1/1): sharutils-4.6.1-2. 100% ========================= 201 kB 00:02
Running Transaction Test
Finished Transaction Test
Transaction Test Succeeded
Running Transaction
Installing: sharutils ######################### [1/1]
Installed: sharutils.i386 0:4.6.1-2
Complete!
Once I've installed uuencode, I can test uuencoding a binary file and emailing it via the command line:
uuencode webconn.png webconn.png mail -s 'Web connections for yesterday'
The syntax of the command is relatively simple. The first argument to uuencode is the file to encode. The second argument is the remote file extraction name; ie, the name of the file that your email client will display.
Cool! This worked! So now, I can simply add a few lines of code to yesterday's script:
if [ -s webconn.png ]
then
uuencode webconn.png webconn.png mail -s 'Web connections for yesterday' admin@techanswerguy.com
fi
This is a simple IF-THEN statement to check that the file exists. If the file exists, I will go ahead, uuencode the file and email it.
You can also use other email programs like nail or mutt to email the file. Here are two examples:
mutt -a webconn.png -s "web conns" admin@site.com < /dev/null
echo ¦ nail -H -a webconn.png -s "web conns" admin@site.com
Wonder of wonders, it works! What will they think of next?! :) Reference: http://www.shelldorado.com/articles/mailattachments.html
Monday, August 13, 2007
scripted gnuplot graphs
One of my many tasks as a webmaster is to monitor the traffic to and from our web servers. As a follow up to my quick start guide to gnuplot: /2007/07/quick-start-guide-to-gnuplot-plotting.html
I will expand upon that posts' themes and give you a simple script that will output a nice PNG graphic of a data set without having to use gnuplot interactively.
As in the previous post, my goal is to plot HTTP connections. I want the script to generate the graph for the previous days' activity. Should be simple enough!
As review, my data file looks like this:
20070727151200 215 210 5
20070727151259 191 186 5
20070727151401 207 201 6
20070727151500 186 180 6
20070727151600 165 156 9
20070727151700 167 161 6
20070727151801 182 174 8
20070727151900 197 190 7
20070727152001 197 191 6
20070727152100 187 181 6
* The first column is date/time stamp.
* The second column is total HTTP connections.
* The third column is HTTP connections from the client browser to the cache.
* The last column is HTTP connections back to the origin server.
Here is the script:
!#/bin/bash
TITLE="Caching server HTTP connections"
TODAY="`date +%Y%m%d`000000"
YESTERDAY="`date +%Y%m%d --date="-1 day"`000000"
YMAX=350
gnuplot -noraise <<-finis
set xdata time
set timefmt "%Y%m%d%H%M%S"
set yrange [0:$YMAX]
set ytics 50
set bmargin 3
set grid xtics mxtics ytics
set title "$TITLE"
set xrange ["$YESTERDAY":"$TODAY"]
set term png medium
set output "webconn.png"
plot 'webconn.txt' using 1:3 title "HTTP_WEB" with lines,\
'webconn.txt' using 1:4 title "HTTP_OWS" with lines
finis
You can see I have a few constants up top that set a title and the date range. Note the neat little "date -1" trick in the date command for the YESTERDAY constant. That has come in handy more than once!
I then set a maximum value for the Y axis.
Using the -noraise switch tells gnuplot to not raise the graph window. Next, I use the input redirector (<<) to feed in parameters to gnuplot. The "-finis" is simply a label to the input that I call at the beginning and the end of my input. I then feed in as many parameters as I need. When I am done, I just call "finis" without the hyphen and this turns off the input.
You can see I feed in a lot of the parameters that I had to manually enter during the last post regarding interactive gnuplot. I've thrown a few more in with this example:
set yrange sets the maximum range of the y axis
set ytics sets the spacing of the bars in the y axis
set bmargin sets the spacing of the bottom margin in pixels
set grid xtics mxtics ytics sets your grid preferences
set term sets the output type; in this case, a medium sized png graphic
set output specifies the name of the file
The rest of the commands you already know from my first post on the subject. At the end of all the parameters I set, I make sure to close the input by entering the keyword "finis" that I defined at the beginning of the input redirection. You can use any non-shell script word for the keyword. I just chose "finis" because it means "The End" and has no other special meaning to the Unix shell.
Finally, here is the lovely output:
Hope you liked it!
'sodo
I will expand upon that posts' themes and give you a simple script that will output a nice PNG graphic of a data set without having to use gnuplot interactively.
As in the previous post, my goal is to plot HTTP connections. I want the script to generate the graph for the previous days' activity. Should be simple enough!
As review, my data file looks like this:
20070727151200 215 210 5
20070727151259 191 186 5
20070727151401 207 201 6
20070727151500 186 180 6
20070727151600 165 156 9
20070727151700 167 161 6
20070727151801 182 174 8
20070727151900 197 190 7
20070727152001 197 191 6
20070727152100 187 181 6
* The first column is date/time stamp.
* The second column is total HTTP connections.
* The third column is HTTP connections from the client browser to the cache.
* The last column is HTTP connections back to the origin server.
Here is the script:
!#/bin/bash
TITLE="Caching server HTTP connections"
TODAY="`date +%Y%m%d`000000"
YESTERDAY="`date +%Y%m%d --date="-1 day"`000000"
YMAX=350
gnuplot -noraise <<-finis
set xdata time
set timefmt "%Y%m%d%H%M%S"
set yrange [0:$YMAX]
set ytics 50
set bmargin 3
set grid xtics mxtics ytics
set title "$TITLE"
set xrange ["$YESTERDAY":"$TODAY"]
set term png medium
set output "webconn.png"
plot 'webconn.txt' using 1:3 title "HTTP_WEB" with lines,\
'webconn.txt' using 1:4 title "HTTP_OWS" with lines
finis
You can see I have a few constants up top that set a title and the date range. Note the neat little "date -1" trick in the date command for the YESTERDAY constant. That has come in handy more than once!
I then set a maximum value for the Y axis.
Using the -noraise switch tells gnuplot to not raise the graph window. Next, I use the input redirector (<<) to feed in parameters to gnuplot. The "-finis" is simply a label to the input that I call at the beginning and the end of my input. I then feed in as many parameters as I need. When I am done, I just call "finis" without the hyphen and this turns off the input.
You can see I feed in a lot of the parameters that I had to manually enter during the last post regarding interactive gnuplot. I've thrown a few more in with this example:
set yrange sets the maximum range of the y axis
set ytics sets the spacing of the bars in the y axis
set bmargin sets the spacing of the bottom margin in pixels
set grid xtics mxtics ytics sets your grid preferences
set term sets the output type; in this case, a medium sized png graphic
set output specifies the name of the file
The rest of the commands you already know from my first post on the subject. At the end of all the parameters I set, I make sure to close the input by entering the keyword "finis" that I defined at the beginning of the input redirection. You can use any non-shell script word for the keyword. I just chose "finis" because it means "The End" and has no other special meaning to the Unix shell.
Finally, here is the lovely output:

Hope you liked it!
'sodo
nCipher hardserver process memory leak
We are using nCipher's 500 F2 SSL acceleration cards in a small farm of four Windows 2000 production web servers. About a month and a half ago, we installed these cards into the servers. Last week, one of the servers went down, gave us the lovely blue screen of death and became unbootable. The only way our server admin could bring the server back up was to remove the nCipher card.
Two days after the card was removed, I started seeing these errors in the System logs:
Event ID: 2019
The server was unable to allocate from the system nonpaged pool because the pool was empty.
That error lead me to a Microsoft Q Article that stated that this error could be associated with an application that was using up too much memory; ie, an application that had a memory leak:
/technet/prodtechnol/windows2000serv/reskit/w2000msgs/4746.mspx
Therefore, I started hunting for a rogue application. I used Performance Monitor to map all the running processes' "Pool Nonpaged Bytes", like so:
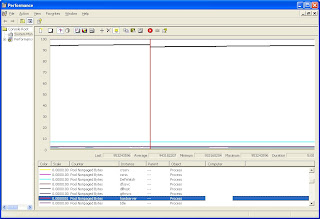
I simply looked at each running process and found the ones using the most Pool Nonpaged Byte memory. I set my refresh to every three seconds, so that I could see the increase in Pool Nonpaged Byte memory as I searched for the rogue. As there were seventy or so processes running, it took a bit of time to identify "hardserver" as the rogue process. I simply looked for the process consuming the most memory! Also, I saw that the memory usage was increasing as I watched the chart.
But what is "hardserver?" Apparently, hardserver is part of nCipher's SSL card driver install:
http://www.ncipher.com/resources/97/sa14_presence_of_flaws_in_firmware_security
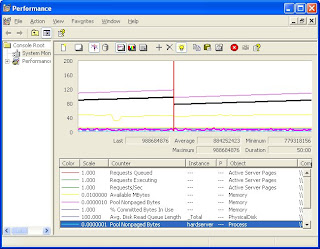
Once I charted hardserver's Pool Nonpaged Byte memory use against the Total Pool Nonpaged Byte memory used, it was easy to see how the hardserver process was driving up Nonpaged memory utilization, as in the screen cap below:
The side effect of this memory leak brought down the ASPNet worker process on the webserver:
"aspnet_wp.exe could not be started. The error code for the failure is 800705AA. This error can be caused when the worker process account has insufficient rights to read the .NET Framework files. Please ensure that the .NET Framework is correctly installed and that the ACLs on the installation directory allow access to the configured account."
This, in turn, showed the ugly error "Server Application Unavailable" to the end user:

So, either the card itself is bad or nCipher's software has a memory leak only when the cards' driver software is installed, but the card is not available.
We put the card in a test server in the lab and it showed the same bad behaviour as in the production server: blue screen of death. Speaking to an nCipher engineer, I found out that the blue indicator light on the back of the card will tell us whether the card is functioning properly. As expected, instead of a constant blink at the 3 or 4 second mark, the indicator light on the card flashed randomly. This tells us the card is not working correctly for some reason.
The nCipher engineers and customer service folks were very helpful and we soon had an RMA number to return the card. Thanks nCipher!
10/23/07 Update
Here's a concise set of instructions about finding processes that are triggering memory leaks. From Microsoft, no less:
http://support.microsoft.com/kb/130926
'sodo
Two days after the card was removed, I started seeing these errors in the System logs:
Event ID: 2019
The server was unable to allocate from the system nonpaged pool because the pool was empty.
That error lead me to a Microsoft Q Article that stated that this error could be associated with an application that was using up too much memory; ie, an application that had a memory leak:
/technet/prodtechnol/windows2000serv/reskit/w2000msgs/4746.mspx
Therefore, I started hunting for a rogue application. I used Performance Monitor to map all the running processes' "Pool Nonpaged Bytes", like so:

I simply looked at each running process and found the ones using the most Pool Nonpaged Byte memory. I set my refresh to every three seconds, so that I could see the increase in Pool Nonpaged Byte memory as I searched for the rogue. As there were seventy or so processes running, it took a bit of time to identify "hardserver" as the rogue process. I simply looked for the process consuming the most memory! Also, I saw that the memory usage was increasing as I watched the chart.
But what is "hardserver?" Apparently, hardserver is part of nCipher's SSL card driver install:
http://www.ncipher.com/resources/97/sa14_presence_of_flaws_in_firmware_security
Once I charted hardserver's Pool Nonpaged Byte memory use against the Total Pool Nonpaged Byte memory used, it was easy to see how the hardserver process was driving up Nonpaged memory utilization, as in the screen cap below:

The side effect of this memory leak brought down the ASPNet worker process on the webserver:
"aspnet_wp.exe could not be started. The error code for the failure is 800705AA. This error can be caused when the worker process account has insufficient rights to read the .NET Framework files. Please ensure that the .NET Framework is correctly installed and that the ACLs on the installation directory allow access to the configured account."
This, in turn, showed the ugly error "Server Application Unavailable" to the end user:

So, either the card itself is bad or nCipher's software has a memory leak only when the cards' driver software is installed, but the card is not available.
We put the card in a test server in the lab and it showed the same bad behaviour as in the production server: blue screen of death. Speaking to an nCipher engineer, I found out that the blue indicator light on the back of the card will tell us whether the card is functioning properly. As expected, instead of a constant blink at the 3 or 4 second mark, the indicator light on the card flashed randomly. This tells us the card is not working correctly for some reason.
The nCipher engineers and customer service folks were very helpful and we soon had an RMA number to return the card. Thanks nCipher!
10/23/07 Update
Here's a concise set of instructions about finding processes that are triggering memory leaks. From Microsoft, no less:
http://support.microsoft.com/kb/130926
'sodo
Monday, August 06, 2007
so your security admin locked down the XP Taskbar..
Man! Another thing I dislike is when your security admins lock down the taskbar. This is silly! There's absolutely NO good reason for this. So here's what you do to unlock it.
For this tweak to work, you'll need to edit the Windows Registry.
***DISCLAIMER***
Editing your Windows registry is a very delicate procedure and must be done with all due caution! The Tech Answer Guy will not be responsible for systems that no longer boot because you fat fingered the wrong registry key!
***END DISCLAIMER***
With our disclaimer in place, let's move on to some fun stuff.
1) Open regedit by clicking Start -> Run -> type "regedit" and press enter
2) Find the following key:
HKEY_CURRENT_USER\Software\Microsoft\Windows\CurrentVersion\Policies\Explorer
3) Change the data value of each key that is set to 1 to the new value of 0. Do NOT change the value of the key called "NoDriveTypeAutoRun" or any other key that does not have a value of 1.
To change the data value of a key, simply double-click on the value and replace the 1 with a 0.
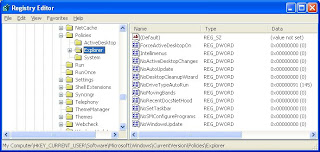
4) Once all the key values are changed, logout and log back in or reboot
You should now have an unlocked taskbar! Hoohah!
Score one for the good guys!
Thursday, August 02, 2007
June/July 2007 Schwag/Goodies archive
You may notice I've updated the "Goodies" section on the right side of the page. I'm currently interested in getting a new camcorder, so the new goodies are my top picks.
Here are the old goodies I'm removing:
Here are the old goodies I'm removing:
Subscribe to:
Posts (Atom)