Thursday, September 27, 2007

setting up the Dell SC1430

Ah! I'm very excited! Got the new 1.6Ghz Quad-Core, dual Xeon CPU Dell SC1430 a couple of days ago! Specifications http://www.dell.com/content/products/featuresdetails.aspx/pedge_sc1430?c=us&cs=04&l=en&s=bsd&%7Elt=popup Chipset: Intel 5000V Compatible quad core processors: E5310 (1.6Ghz), E5320 (1.86Ghz), E5335 (2.0Ghz), E5345 (2.33Ghz) Limitations The following limitations have caused me trouble along my path to computing bliss:
  • One PCI slot
  • Two PCI Express slots have only 4x lanes, though the connectors on each are 8x
  • Little support for high end graphics cards
  • Only one primary IDE controller (to control two IDE CD/DVD or tape backup drives only)
  • Can't boot from an IDE hard drive (See Dell community forum)
  • Only four drive bays (two 5 1/4", two 3 1/2") and a two-drive SATA housing (six total drives)
  • Spartan Dell BIOS does not allow for performance tweaks
  • pre-Win2003 Microsoft OSs are not supported
BIOS Gotchas BIOS resets the boot sequence when you change SATA settings (like changing AUTO to OFF for a drive). So be wary of this feature when you see a black screen upon bootup! Documentation Of course, I followed the "Getting Started" guide. ;) That and the manual are available here: http://support.dell.com/support/edocs/systems/sc1430/ Here is a link to the manual http://support.euro.dell.com/support/edocs/systems/sc1430/en/hom/html/hom_en/index.htm Note: the links to the PDFs on the destination page do not work in Firefox. I used Opera to view the PDFs Here's a nice pic of the motherboard: http://dcse.dell.com/IFR/PowerEdge/PESC1430/images/sysbrd_full.jpg This box has dual, 1.6Ghz E5310 Cloverton CPUs from Intel. Intel Datasheets on 5300 Series processors: http://developer.intel.com/products/processor/xeon5000/index.htm?iid=servproc+body_xeon5000subtitle Diagnostic LED codes for the SC1430: http://www.support.dell.com/support/topics/global.aspx/support/dsn/en/tree?c=us&l=en&s=gen&treeid=17D80717209DC96CE0401E0A5517366C&journalid=0F73CB4574E211DC80D94DDA4FEC1C21&Query=&SystemID=&ServiceTag=&contenttype=-1&os=-1&component=-1&lang=-1&doclang=en&toggle=false Diagnostics http://support.us.dell.com/support/downloads/download.aspx?c=us&l=en&s=gen&releaseid=r132112&formatcnt=1&libid=0&fileid=178687 Dell Diagnostics on SC1430 running Fedora 12, x86-64: Networking Broadcom 5751 NIC, BIOS default: PXE boot enabled Wake On Lan http://en.community.dell.com/forums/p/19278497/19500906.aspx#19500906 Update 2/24/2010 I spent about eight hours debugging why wake on lan wouldn't work on my newly built Fedora 12, x86-64 system. Went through a million threads, learned something about sleep states in Linux..finally got it by putting a line at the top of /etc/init.d/halt script (called by "shutdown -h now") to remove the kernel module (rmmod tg3) for the ethernet driver. Self-evident, right? NOT! What the F? full story here *** end update *** Memory As people add comments regarding memory that works in the SC1430, I will post updates to this section. By the way, dmidecode and lshw can be used to determine the type of memory you have installed: http://www.cyberciti.biz/faq/linux-find-memory-speed-dimm-command/ So far (Thanks John!):
manufacturer model                           part number
Kingston     DDR2 FB-DIMM ECC Fully Buffered KVR667D2D4F5K2/4G
Video Be warned that this server is very picky with video cards. So before you dremel any PCI Express video cards to get them working in the 8x slot, make sure you test them with an 8x-to-16x PCIe adapter in the box first! ;) (thanks John!) Update 2/28/2010 Video card roundup..cards known to work in the box (from the Comments section below) ATI-based cards ATI Radeon hd4630 ATI x300 ATI X1300 PCI ATI x1550 ATI X1900 All-In-Wonder VisionTek X1550 Radeon Pci 256MB VGA Sapphire x1950GT 512mb card Sapphire Radeon HD 4850 NVidia-based cards NVidia BFG 8800GT NVidia BFG 8500GT EVGA GeForce 9400GT 512MB PCI NVidia BFG 9600GT BFG Tech GeForce 9800GT 512MB Nvidia Quadro NVS 290 NVidia Quadro Fx 540 PCI NVIDIA Quadro NVS 400 Note: It would behoove one to read the full comments section for any gotchas. *** end update *** The first thing I wanted to do was use my ATI Tech Radeon 9200 128 MB PCI Video Adapter with it. Well, no go, as I got a blank screen. Much surfing the net later, I found that only the first two PCI-X slots (PCIX_SLOT5, PCIX_SLOT6) will allow a working video adapter. And so far, folks have only gotten the VisionTek X1550 Radeon Pci 256MB VGA Dvi-i Tv Out) to work on this box. I have not tried the PCI Express slots as yet. Original pain listed here, but an interesting story with somewhat satisfactory conclusion: http://forums.anandtech.com/messageview.aspx?catid=31&threadid=2080542 Last week, I bought the VisionTek; however, the ATI drivers have MANY issues on this box. Much more pain listed here: http://forums.fedoraforum.org/showthread.php?p=878133#post878133 Update 10/23/2007: I was successful in getting the BFG Geforce 8500 GT PCI Express 256MB to work in the box, with the caveat that a PCI Express 8x to 16x adapter (which raises the video card) must be used: http://www.orbitmicro.com/global/pciexpressx8tox16adapter-p-755.html http://crazedmuleproductions.blogspot.com/2007/10/nvidia-in-da-house-er-new-server.html Update 8/6/2008 Good Tom's article on the performance impact of using reduced number of PCI Express lanes with a 16x card: http://www.tomshardware.com/reviews/pci-express-2-0,1915-4.html Update 11/10/2007 In the opposite vein, a couple of us have had success taking a dremel to the 8x PCIe slot to make room for 16x graphics adapters. MarioM had success getting the Sapphire x1950GT 512mb card to work with his newly dremeled slot! Bolstered by Mario's success, I also dremeled SLOT3_PCIE with success (video coming). But for God's sake, BE CAREFUL if you attempt this! You can easily damage and/or otherwise FRY your motherboard if you slip up. Click on the comments below for the success stories. Finally, the video below shows a successful dremel job on the SC1430. Update 12/17/2007 Free2go had success using the PCI NVIDIA Quadio NVS vidso card in one of the PCI-X slots using 7.1.8.4 driver. Update 1/19/2008 BFG 8800GT confirmed as working in an SC1430 modded to accept 16x PCI Express adapter cards. Or just use a PCI Express 8x to 16x adapter that raises the video card in the slot: http://www.orbitmicro.com/global/pciexpressx8tox16adapter-p-755.html Update 2/13/2008 Pics of the BFG 8500GT in the box Update 7/9/2008 Sapphire Radeon HD 4850 confirmed as working in the box. Thanks Subbu! Update 2/9/2010 Ati hd4630 confirmed as working in the box. Thanks Daniele! Linux on the Dell SC1430 Update 10/12/2007: Fedora Core 6, x86_64 installed like a champ and is working well with the onboard video. Cinelerra is installed and running without issue. Love to see all eight cores busy through mpstat..yeah! /2007/10/multithreading-in-ffmpeg-and-mpstat.html Here's a link to compiling Cinelerra on FC6 X86_64: /2007/09/building-cinelerra-on-fc6-64-bit.html Fedora 7 also works in the box, but has the dreaded, Fedora 7 broken firewire stack. A workaround is listed at the bottom of the page here through the EZPlanetOne kernel patch: http://www.physics.wustl.edu/~alford/thinkpad/T23_F7.html This patch does work, as I've been running on Fedora 7 with the patch for about two months now. Fans The fans are somewhat loud on boot, but mellow to a comfortable, if not quiet, level after the system boots. Note that the fans will run high speed (ie, LOUD) if the case is open. Fun A little overclocker heaven: http://www.xtremesystems.org/forums/showthread.php?p=2427225 Update 1/21/2008 Finally tried the above FSB overclock. Suh-WHEET! Program to view temp/fan speed and to control at the bottom of this page: http://diefer.de/i8kfan/index.html Update 10/13/2007 As part of a longer tutorial on the layout of the SC1430 that I will release in the coming weeks, this is the goofy commercial that I made with Cinelerra about the SC1430: Update 11/11/2007 New video describing the SC1430 with emphasis on features, video cards and shows an example of dremeling the end off a PCI Express slot: Update 9/26/2009 Installed a 500GB SATA and Vista 64-bit Ultimate. Update 2/17/2010 Installed a Fedora 12 64-bit on a 4.5TB RAID5 set, courtesy of 3ware 9650SE and Western Digital: http://www.techanswerguy.com/2010/02/3ware-9650se-support-experience.html http://www.techanswerguy.com/2010/02/fedora-12-x86-64-first-impressions.html

Update 1/15/2022 Alas, this will be my final post about the trusty old Dell SC1430, as it went to Goodwill to be bought or recycled today. Many a video was edited or blog entry created on it. May your eternal rest be sweet, fair Dell!

'sodo
Friday, September 21, 2007

VMware Server: "You do not have permissions to perform this operation"

I was migrating an ESX VM back to VMserver and saw this error on startup:
"You do not have permissions to perform this operation"

The reason was because my .vmx config file for the VM was Read Only. You can change the attribute via Windows Explorer or the command line like so:

To show you the current attributes on the files, type:
attrib

To remove the read only attrib on a file, type:
attrib -r [filename]

Reading another post:
http://www.vmware.com/community/message.jspa?messageID=432486

I saw that other users saw the same message for a different reason. Their solution was to set the following parameters in the .vmx file for the VM:

> Enable "allVMMemoryLimit":
> prefvmx.useRecommendedLockedMemSize = "FALSE"
> Set to TRUE when value selected in UI matches
> prefered value. Set to FALSE otherwise.
>
> Set limit for all VMs to 1701MB:
> prefvmx.allVMMemoryLimit = "1701"
> Value selected in UI if it differs from prefered
> value.
>
> Allow most of memory to be swapped:
> prefvmx.minVmMemPct = "25"
> Set to 25, 50, or 100, depending on how much swapping
> you allow.

No promises on this one, but give those two options a try..
'sodo

Sunday, September 16, 2007

what's interesting about LinkedIn

This is a slightly different type of post that I normally write, as I've deviated from my normal specific technology rambling to give you my impressions of a social networking website called LinkedIn. The site is useful, as it may provide some direction for skilled individuals who want to reconnect with old work or school mates, beef up their resume in the hopes of getting new employment or just expand their horizons.

LinkedIn is exactly what the name implies: you create a user profile and based upon information you share, like education and jobs you've had, LinkedIn will find old friends and contacts for you. After entering your basic data, LI will pop up a list of possible contacts for you to invite to join your network. It was pretty amazing to see the vendor contacts I've worked with popup on the list of possible contacts list, simply because they had stated that they had worked for some of the same companies that I had. Or old friends who came up because they went to the same university during the same period I did and were also on LinkedIn.

This is the interesting thing about how LI creates your connections. LinkedIn matches people up by the firms they work(ed) for, the universities they attended and the companies they partnered with. It is the concept of six degrees of separation; ie, you are only six hops away from anyone in the world.

It is important to note that you can control who sees your info via the privacy settings, mainly by making your profile public or private.

If you've made your profile public, you can accept an invitation to link up from a person who has found you. Normally, the person who found you will have connections of their own. Going forward, you'll always see how a person on LinkedIn is connected to you by the degrees of separation that person is from you, as well as the total number of people in your extended network. Pretty cool.

Also, people who you are linked to can recommend you, thus adding value to your vita in case you're aiming to get a new job via LI. In addition, you can recommend service providers or be recommended as a service provider. Finally, you can add street cred for yourself by answering questions posed by other members on LinkedIn's Answers from Your Network section. The questions are generally related to the industry you're in.

As I'm exploring new opportunities in the NYC area that better suit my lifestyle (music/video/tech), I'm trying to beef up my own network in the next year. Good luck and see you on LinkedIn!

'sodo

Tuesday, September 11, 2007

capturing boot messages in Linux via serial console

Sometimes, messages scroll by the screen that are not captured in /var/log/messages. such as these ugly messages that appeared after I moved my FC6 installation over to a non-LVM partition:
[/sbin/fsck.vfat (1) -- /mnt/fat] fsck.vfat -a /dev/sda6
dosfsck 2.11, 12 Mar 2005, FAT32, LFN
Wrong checksum for long file name "".
(Short name FSCK0000.REN may have changed without updating the long name)
Not auto-correcting this.
/dev/sda6: 425 files, 3557906/3864252 clusters


Ugly! (But keep reading for the solution to that particular error). And it is especially bad when the messages scroll by so fast that you can't write them down and have to reboot multiple times just to get the gist.

There is a solution, however. The solution is to view these messages via a serial console. A serial console is like being right at the computer, only the viewing of the boot process takes place over your computers' serial port.

Your server or workstation is not configured to use a serial console by default. The console can be enabled by configuring a few files and attaching a serial cable (or null modem cable) from another PC to the PC you want to monitor. Finally, you'll use a terminal program like HyperTerminal or (Putty) to establish the connection and view the boot messages.

Here is the short list of steps to enable a serial console:
1) Find and attach a suitable RS-232 (serial or null modem) cable from the serial port of the PC that will do the monitoring to the serial port on the PC that you want monitored
2) Edit the following files:
- /boot/grub/grub.conf or /etc/lilo.conf
- /etc/inittab
- /etc/securetty


3) Reboot

As the steps have been documented everywhere on the web, I've provided a list of the most well-written, easiest to follow articles below with links to more detail if you need it.

This is a very nice brief article with everything you need to know:
http://www.cpqlinux.com/serialconsole.html

Here's a short article on the configuration steps and a couple new tricks necessary to enable a serial console access:
http://www.vanemery.com/Linux/Serial/serial-console.html

Here's a very helpful, in-depth article on the subject:
http://www.linuxjournal.com/article/7206

Here's the granddaddy of all serial console docs, the HowTo:
http://tldp.org/HOWTO/Remote-Serial-Console-HOWTO/

So..what was the solution to that ugly message I saw while booting:
[/sbin/fsck.vfat (1) -- /mnt/fat] fsck.vfat -a /dev/sda6
dosfsck 2.11, 12 Mar 2005, FAT32, LFN
Wrong checksum for long file name "".
(Short name FSCK0000.REN may have changed without updating the long name)
Not auto-correcting this.
/dev/sda6: 425 files, 3557906/3864252 clusters


Why, delete the file! Of course, you may have a file you can't delete. If so, since this is a FAT32 partition, I'd suggest you run chkdsk /f on the drive when in Windows. I'm not sure if you can do a chkdsk under Linux. I'll have to research this and get back to you.

Enjoy!
'sodo

Sunday, September 09, 2007

could not reliably determine server's fully qualified domain name

This is an error you may see from the Apache web server when the daemon starts up. To resolve this, you need to make sure that your server is assigned a fully qualified domain name [FQDN]. A fully qualified domain name is made up of the following parts:
[hostname].[domain].[top level domain]

Here's further explanation regarding FQDN's:
http://en.wikipedia.org/wiki/Fully_qualified_domain_name

On my home network, I insure this by doing the following:
1) instruct my firewall/router to assign a domain name to all of the hosts on my local network. In this way, my web server running Apache will then be assigned a domain.
2) make sure you have a full domain name for the server listed in /etc/hosts. Here is the generic form of a proper host entry in the hosts file:
[IP address] [hostname.domain name.top level domain] [hostname]

For example:
192.168.0.3 computer.network.com computer

That will do it.

If the IP of the server is statically assigned, alternate methods are:
1) assign a domain in /etc/resolv.conf
2) assign a hostname in /etc/sysconfig/network

The two examples mentioned above are for Fedora and Red Hat. The network files may differ if you use another Linux distribution.

Or
3) specify the ServerName parameter in Apache's httpd.conf file (usually located in /etc/httpd/conf/httpd.conf)

If interested, here's a recent thread with people talking about this subject:
http://www.linuxquestions.org/questions/showthread.php?t=280677

Hope this helps.

Thursday, September 06, 2007

iTunes can convert lossless WMAs

Along with a number of friends of mine, I am a bit of an audiophile. Therefore, when I convert music to digital format, I like to do the conversion losslessly. In like fashion, I don't want to lose the ability to play the files on both Windows and Mac. The good thing I found out today is that I can convert Microsoft lossless WMAs to Apple Lossless Encoding format via iTunes. Hooray!

The Process
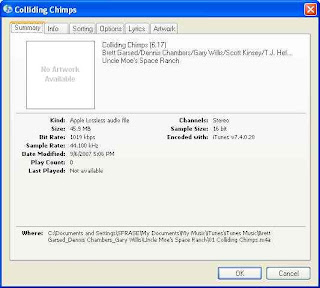
When you drag and drop a WMA into iTunes, you'll see this:


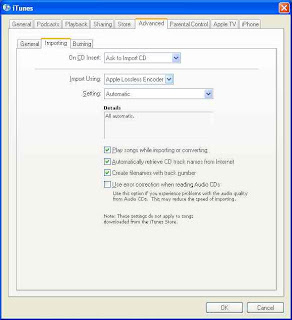
In order to keep the lossless format, make sure your Import settings in iTunes are set to Apple Lossless:


I've imported a file and you can check the format by right-clicking on the song and choose Get Info (don't right click if you're on a Mac..just click!):


Note that "Kind:" says Apple Lossless audio file.

Album Art?
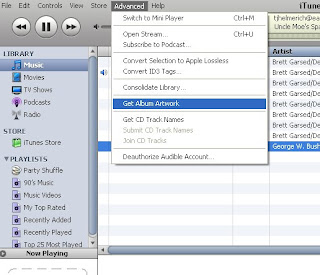
When you import the WMA, iTunes brings all your information will come over as well, except for the album art. But Steve Jobs has not left us in the lurch. There is a function to bring over the album art as well. You'll find "Get Album Artwork" under the Advanced tab:


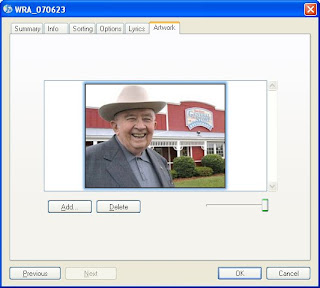
And look! My album now has this jocular octogenerian peeking back at us!

Wednesday, September 05, 2007

a damn nice rgb to hex converter (and hex to rgb)

Such trivial things make us happy..

Here is a very nice rgb-to-hex converter. And there are no popup ads on this one, either!
http://www.yellowpipe.com/yis/tools/hex-to-rgb/color-converter.php

Tuesday, September 04, 2007

creating a Google sitemap for your website

As I wanted Google to better index the website I administer, I needed to create a sitemap. Here is a nice description of the benefits of having a sitemap and the Sitemap XML-based protocol in general:
https://www.google.com/webmasters/tools/docs/en/protocol.html
You'd think creating a sitemap would be a fairly simple, mundane task. It is and it isn't. You need to know about how your website is organized on the webservers' file system. And, to do a sitemap correctly for a large site with more than 500 pages of web accessible content, you need to either spend a bit of money on some software to create a sitemap (see http://www.xml-sitemaps.com/ or http://www.auditmypc.com/free-sitemap-generator.asp) or get your hands dirty using Google's free Python script to generate a sitemap.

The second choice is the more complicated and time consuming, as it involves the following steps:
- install Python
- setup a config file to point at a log or your webroot to get a list of your content
- run a Python script to generate the sitemap
- tell Google you've got a new sitemap

Being the frugal masochist that I am, I chose the second option. The steps are described in great detail here:
https://www.google.com/webmasters/tools/docs/en/sitemap-generator.html

I will try to add value by reviewing the stumbling blocks I encountered along the way to building my first sitemap. Here are the general steps I performed:
1) downloaded the sitemap generator files from Sourceforge
2) created a configuration file for my website
3) downloaded and installed Python from the official website
4) ran sitemap_gen.py
5) added the sitemap I generated to Google Webmaster tools

I suggest you run these steps from a server with a development instance of your current website running.

1) download the sitemap generator files from Sourceforge
Since our website runs on Windows 2000 Server, I grabbed the ZIP version of the sitemap generator files from Sourceforge. I unzipped them to a temporary directory.

2) created a configuration file for my website
I chose access logs as the source
This was a time consuming one, as I first had to figure out whether I wanted to generate my sitemap based on URL or directory listings, access logs or another sitemap. As our website is made up of mostly dynamic pulls from our database via ASP/ASP.net page, I felt that using a sample access log from one of the servers in our farm would give me the most reliable source of data for the sitemap.

I reduced the size of my access log
This part ended up being the most time consuming, because our daily web logs are about 8GB each. Most of the requests for our website are images, so I wrote a simple AWK script to extract out only the 10-15% requests that are ASP related.

***
Be aware that you will get memory errors if you don't have enough RAM installed. I found that it took about 1.9GB of memory for the script to analyze a 1.3GB logfile. So you'll need about 1.5x GB RAM for a filesize of y. (1.9/1.3=1.5)
***

In my logfiles, the seventh column is the uri-stem:
#Fields: date time c-ip cs-username s-ip cs-method cs-uri-stem cs-uri-query sc-status sc-bytes cs-bytes time-taken cs-version cs(User-Agent) cs(Cookie) cs(Referer)

Here is the AWK command to pull the seventh column with the code file path:
awk '{if ($7 ~ /asp/) print $0}' access.log > access2.log

I use the Cygwin Unix tools for NT. These tools are invaluable for munging through large logfiles.

The sitemap_gen.py script is going to look for the #FIELD header in the log, so I modified my awk command to include it:
awk '{if ($7 ~ /asp/ ¦¦ $1 ~ /#Fields/) print $0}' access.log > access2.log

OK! So that trimmed my weblog down to about 1.5GB. This should be enough data to make a valid sitemap file!

I also used some filters to reduce the amount of redundant data in the logfile
My awk script should have removed any gif or jpeg requests, but if not, I went ahead and added those to the filter section in config.xml, in addition to any requests for our store locator:

In the end, here is what my config.xml file looked like:
<?xml version="1.0" encoding="UTF-8"?>
<site

base_url="http://www.mywebsite.com/"
store_into="/Inetpub/development/sitemap.xml.gz"

verbose="1"
suppress_search_engine_notify="1"
>
<accesslog path="/temp/access.log" encoding="UTF-8" />
<filter action="drop" type="wildcard" pattern="*.jpg" />
<filter action="drop" type="wildcard" pattern="*.gif" />
<filter action="drop" type="regexp" pattern="/storeLocator/" />
</site>


3) downloaded and installed Python from the official website
Since I didn't have Python installed on my development server, I went ahead and followed this nice little instructional video on Installing Python from ShowMeDo.com. The process was very easy..point and click and accept the defaults. But the video made it even easier.

The one other thing you should do is add the Python executable to your PATH. In Windows, I added C:\Python25\ to my PATH system variable. The PATH system variable is found in MyComputer -> Properties -> Advanced tab -> Environment Variables.

4) ran sitemap_gen.py
Alright! The moment of truth is upon me. I ran the python script from the command line:
bash-2.02$ python sitemap_gen.py --config=/temp/sitemap_gen-1.4/config.xml
Reading configuration file: /temp/sitemap_gen-1.4/config.xml
Opened ACCESSLOG file: /temp/access.log
[WARNING] Discarded URL for not starting with the base_url: http://ghome.asp?
Sorting and normalizing collected URLs.
Writing Sitemap file "\Inetpub\development\sitemap.xml.gz" with 50000 URLs
C:\Program Files\Python25\lib\urlparse.py:188: UnicodeWarning: Unicode equal comparison failed to convert both arguments to Unicode - interpreting them as being unequal cached = _parse_cache.get(key, None)
C:\Program Files\Python25\lib\urlparse.py:220: UnicodeWarning: Unicode equal comparison failed to convert both arguments to Unicode - interpreting them as being unequal
_parse_cache[key] = v
Sorting and normalizing collected URLs.
Writing Sitemap file "\Inetpub\development\sitemap1.xml.gz" with 50000 URLs
[WARNING] Discarded URL for not starting with the base_url: http://ghome.asp?
Sorting and normalizing collected URLs.
Writing Sitemap file "\Inetpub\development\sitemap2.xml.gz" with 10985 URLs
Writing index file "\Inetpub\development\sitemap_index.xml" with 3 Sitemaps
Search engine notification is suppressed.
Count of file extensions on URLs:
110962 .asp
23 .aspx
Number of errors: 0
Number of warnings: 525

Interpreting this output, we learn the following things:
1) there is a 50,000 URL limit to the sitemap files
2) some URLs will get bounced if they don't begin with your base_url
This is the "[WARNING] Discarded URL for not starting with the base_url" line.
3) some unicode parsing errors will occur

In terms of speed, here are the performance stats of sitemap_gen.py on my dual Xeon3.2 workstation with 3.2GB of RAM:
- 10 minutes to parse a 2,000,000 record logfile (about 1.9GB in size)
- 1.3GB of RAM used

***
Be aware that you will get memory errors if you don't have enough RAM installed. I found that it took about 1.9GB of memory for the script to analyze a 1.3GB logfile. So you'll need about 1.5x GB RAM for a filesize of y. (1.9/1.3=1.5)
***

Troubleshooting
Be prepared to encounter failures like the below if you don't have enough memory:
bash-2.02$ python sitemap_gen.py --config=/temp/sitemap_gen-1.4/config.xml
Reading configuration file: /temp/sitemap_gen-1.4/config.xml
Opened ACCESSLOG file: /temp/access.log
Traceback (most recent call last):
File "sitemap_gen.py", line 2203, in
sitemap.Generate()
File "sitemap_gen.py", line 1775, in Generate
input.ProduceURLs(self.ConsumeURL)
File "sitemap_gen.py", line 1115, in ProduceURLs
for line in file.readlines():
MemoryError

In case you do run out of memory, reduce the size of your logfile. As I stated above, a 2GB logfile will take up about 1.3GB of physical memory to process. So sitemap_gen.py needs physical memory equal to about 66% of the total size of the logfile you are analyzing. In other words, I found that it took about 1.9GB of memory for the script to analyze a 1.3GB logfile. So you'll need about 1.5x GB RAM for a filesize of y. (1.9/1.3=1.5)

Also, if you neglect to have a #Fields record header in your access log, you'll get a warning like this:
[WARNING] No URLs were recorded, writing an empty sitemap.

Finally, if you point to a missing logfile, you'll get an error like this:
[ERROR] Can not locate file: /temp/access.log

5) added the sitemap I generated to Google Webmaster tools
OK. This is the last step and a fairly simple one:
1) Upload the sitemap(s) to your website and
2) Point the Google Webmaster tools at it:


Update 2009/11/17
Actually, the best workaround for memory errors is to limit each logfile to 50,000 lines long by using the Unix "split" command:
http://www.worldwidecreations.com/google_sitemap_generator_memoryerror_workaround_fix.htm

This is the best solution because the python script can accept the "*" wildcard for multiple file inputs.

That's it!
'sodo

Sunday, September 02, 2007

setting the screen resolution in Fedora under VMware Fusion

I was having trouble locking the screen resolution of Fedora as it ran under VMware Fusion on my MacBook Pro 2.33Ghz Intel Core 2 Duo. Initially, I set the screen resolution using Administration -> Display. For a reason unknown to me, setting the resolution of 1440x900 always reverted to 1680x1000. Playing around for a half an hour, I finally figured out that Display was not going to work. I then used Preferences -> Screen Resolution:


This widget successfully set my Fedora Core 6 desktop resolution to the exact screen size of my MacBook, a lovely widescreen 1440x900.

Nice!
'sodo

mounting a windows file share in Fedora using mount -t cifs switch

I was rebuilding my main webserver and needed to copy the webroot to a temporary server. My main webserver is a Fedora Core 6 box and the temporary is a Win2K server (no laughs, please). As I started the job, I noticed that smbmount was missing from the command set found in my path:
COMPUTER:~ cacasodo$ smbmount
-bash: smbmount: command not found


If you need to recall smbmount command syntax, here's a link to an old post about it:
/2007/03/always-tricky-smb-mount-syntax.html

Thinking smbmount was in samba-client, I installed the samba client package (yum install samba-client*). Unfortunately, smbmount was not included. Next, I could have researched where smbmount was packaged and rpm could give me that answer, if I wanted to muddle through its cryptic command-line argument structure. Instead though, I recalled in my foggy memory that mount had a new filetype switch, -t cifs, that will allows one to mount a Windows file share. CIFS stands for Common Internet File System and essentially, supercedes Windows Server Message Blocks (SMB) as a file sharing technology. Here's a quick description of CIFS:
http://linux-cifs.samba.org/

How to Mount Using CIFS
The command line parameters to mount using CIFS are similar to smbmount. Here is the general format of the command:
mount -t cifs //servername/sharename /mountpoint -o username=username,password=password,mounttype

For example:
mount -t cifs //computer/temp /windowsshare -o username=cacasodo,password=mypassword,rw

A second example, different syntax:
[sodo@computer mnt]$ sudo mount -t cifs //wl03/C$ /mnt/wl -o user=sodo2%pass -rw

A third example using a domain:
[sodo@computer mnt]$ sudo mount -t cifs //wsunoula/Windows\ Server\ 2008\ R2\ x64 /mnt/windows -o username=sodo,password=gabbagabba,domain=gabba.corp

An error, resolved by using IP instead of hostname:
[sudo] password for sodo: 
mount error(5): Input/output error
[sodo@computer mnt]$ sudo mount -t cifs //192.168.101.23/C$ /mnt/wl -o user=sodo2%pass -rw

So, the -t cifs switch to mount solved my problem.

Update 2013/03/09
Latest update to Fedora 17 broke CIFS mounts.  Had to use a credentials file, comme ca:
sudo mount -t cifs //drobo/Linux /mnt/drobo -o credentials=/home/sodo/smb.credentials

Credentials file is just:
username=[user]
password=[password]

You'd probably want to encrypt this file, but it got me past the problem.
*** end update ***

And there you have it!
'sodo

Samba Troubleshooting Reference
The Best Samba Troubleshooting Guide:
http://www.linuxhomenetworking.com/wiki/index.php/Quick_HOWTO_:_Ch12_:_Samba_Security_and_Troubleshooting
http://www.server-world.info/en/note?os=Fedora_15&p=samba
https://www.linux.com/learn/tutorials/296391-easy-samba-setup
http://vijayk.blogspot.com/2008/09/cifs-mount-error-13-permission-denied.html
https://www.linux.com/learn/tutorials/305771-quick-and-dirty-samba-setup
http://opensuse.swerdna.org/susesambacifs.html


Feel free to drop me a line or ask me a question.