Sunday, February 22, 2009

extending a logical volume in Fedora

I have a Fedora 10, x86-64 installation running under VMware Fusion on my Mac. Today, I ran out of disk space on my root partition. My root partition sits on a logical volume. In the "df" output below, note that I only have 92MB left on my / drive:
[root@ogre ~]# df -h
Filesystem Size Used Avail Use% Mounted on
/dev/mapper/VolGroup00-LogVol00 5.7G 5.4G 92M 99% /
/dev/sda1 190M 30M 151M 17% /boot
tmpfs 543M 0 543M 0% /dev/shm
/dev/sr0 96M 96M 0 100% /media/GParted-live


Oh no!

Research Necessary
Now, I haven't worked with logical volumes in quite some time, so I had to do a bunch of reading to figure out what the heck to do. These documents were of immeasurable help:
A Beginner's Guide to LVM
VMware Fusion - Expanding a Disk
Resizing LVM Volumes in Linux

Summary
In a nutshell, here are the steps necessary to expand the amount of space in your logical volume on Fedora. The first step is the allocation of new space in the context of VMware, but you could easily substitute the installation of a new hard drive:
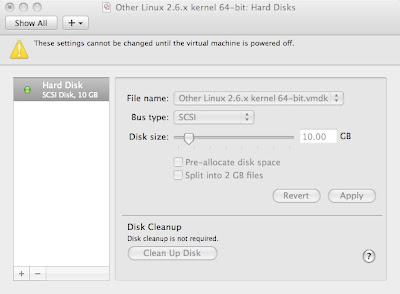
1) In VMware Fusion, under Virtual Machine -> Settings -> Hard Disk, expand the size of your disk to the desired amount. I increased my disk space allocation from 8GB to 10GB:

2) Make a new partition using unallocated space
3) Create a new physical volume from the new partition that was just created
4) Extend the volume group into the new physical volume that was just created
5) Note the amount of free space in the volume group
6) Extend the amount of space in the logical volume using the value of free space
7) Resize the filesystem on the logical volume
8) Note the increased available space in the filesystem on the logical volume
9) Drink beer, you've earned it!

Details
##########
#2) MAKE A NEW PARTITION USING UNALLOCATED SPACE
##########
[root@ogre ~]# parted
GNU Parted 1.8.8
Using /dev/sda
Welcome to GNU Parted! Type 'help' to view a list of commands.
(parted) print
Model: VMware, VMware Virtual S (scsi)
Disk /dev/sda: 10.7GB
Sector size (logical/physical): 512B/512B
Partition Table: msdos

Number Start End Size Type File system Flags
1 32.3kB 206MB 206MB primary ext3 boot
2 206MB 8587MB 8382MB primary lvm

(parted) mkpart primary 8588 10700
(parted) print
Model: VMware, VMware Virtual S (scsi)
Disk /dev/sda: 10.7GB
Sector size (logical/physical): 512B/512B
Partition Table: msdos

Number Start End Size Type File system Flags
1 32.3kB 206MB 206MB primary ext3 boot
2 206MB 8587MB 8382MB primary lvm
3 8587MB 10.7GB 2113MB primary

(parted) quit
Information: You may need to update /etc/fstab.

##########
#3) CREATE A NEW PHYSICAL VOLUME FROM THE NEW PARTITION THAT WAS JUST CREATED
##########
[root@ogre ~]# lvm
lvm> pvcreate /dev/sda3
Physical volume "/dev/sda3" successfully created
lvm> pvs
PV VG Fmt Attr PSize PFree
/dev/sda2 VolGroup00 lvm2 a- 7.78G 32.00M
/dev/sda3 lvm2 -- 1.97G 1.97G

##########
#4) EXTEND THE VOLUME GROUP INTO THE NEW PHYSICAL VOLUME THAT WAS JUST CREATED
##########
lvm> vgextend VolGroup00 /dev/sda3
Volume group "VolGroup00" successfully extended
lvm> pvs
PV VG Fmt Attr PSize PFree
/dev/sda2 VolGroup00 lvm2 a- 7.78G 32.00M
/dev/sda3 VolGroup00 lvm2 a- 1.94G 1.94G

##########
#5) NOTE THE AMOUNT OF FREE SPACE IN THE VOLUME GROUP
##########
lvm> vgdisplay VolGroup00
--- Volume group ---
VG Name VolGroup00
System ID
Format lvm2
Metadata Areas 2
Metadata Sequence No 4
VG Access read/write
VG Status resizable
MAX LV 0
Cur LV 2
Open LV 2
Max PV 0
Cur PV 2
Act PV 2
VG Size 9.72 GB
PE Size 32.00 MB
Total PE 311
Alloc PE / Size 248 / 7.75 GB
Free PE / Size 63 / 1.97 GB
VG UUID H89xDs-yTqE-y2YZ-ORVq-idgW-HdGf-hHU8m3

##########
#6) EXTEND THE AMOUNT OF SPACE IN THE LOGICAL VOLUME USING THE VALUE OF FREE SPACE
##########
lvm> lvextend -l+63 /dev/VolGroup00/LogVol00
Extending logical volume LogVol00 to 7.75 GB
Logical volume LogVol00 successfully resized
lvm> lvs
LV VG Attr LSize Origin Snap% Move Log Copy% Convert
LogVol00 VolGroup00 -wi-ao 7.75G
LogVol01 VolGroup00 -wi-ao 1.97G
lvm> quit
Exiting.

##########
#7) RESIZE THE FILESYSTEM ON THE LOGICAL VOLUME
##########
[root@ogre ~]# resize2fs /dev/VolGroup00/LogVol00
resize2fs 1.41.3 (12-Oct-2008)
Filesystem at /dev/VolGroup00/LogVol00 is mounted on /; on-line resizing required
old desc_blocks = 1, new_desc_blocks = 1
Performing an on-line resize of /dev/VolGroup00/LogVol00 to 2031616 (4k) blocks.
The filesystem on /dev/VolGroup00/LogVol00 is now 2031616 blocks long.

##########
#8) NOTE THE INCREASED AVAILABLE SPACE IN THE FILESYSTEM ON THE LOGICAL VOLUME
##########
[root@ogre ~]# df -h
Filesystem Size Used Avail Use% Mounted on
/dev/mapper/VolGroup00-LogVol00
7.7G 5.4G 2.0G 74% /
/dev/sda1 190M 30M 151M 17% /boot
tmpfs 543M 0 543M 0% /dev/shm
/dev/sr0 96M 96M 0 100% /media/GParted-live

##########
#9) DRINK BEER!
##########


Hooray! Now I won't run out of space in my VM!
TAG

vmware tools install in Fedora 10

Here are some quick notes to installing VMware Tools in Fedora 10 in Fusion. My particular architecture is x86-64, but these should work for regular x86 installs:
1) yum groupinstall "Development Tools"
2) yum install kernel-devel* kernel-headers*
3) run ./vmware-install.pl as root

Also, I had one problem where the kernel-devel* and kernel-headers* package did not match my kernel, which was one revision lower than my installed kernel. The vmware-install.pl program told me this when I tried to run it. The solution to this was to simply update my kernel:
yum install kernel

TAG

pulseaudio and Fedora 10 don't get along

Working with my Fedora 10, x86-64 VM running under Fusion on my MacBook Pro was an exercise in frustration today:
- pulseaudio was spitting out noise and I couldn't uninstall it
- VMware Tools wouldn't compile
- I was running out of disk space in the VM

PulseAudio Problem
The problem with PulseAudio and Fedora 10, x86-64 is that when you use any multimedia application that has sound, the pulseaudio driver just creates noise in your speakers. Also, any video stream associated with the audio stream will be corrupted or at a minimum, sped up or slowed down and generally unwatchable.

Solutions that should work, don't
Under System -> Preferences -> Personal -> Sessions, I unchecked the PulseAudio Sound System. Even with this change, my apps in Gnome kept using Pulse. I'm wondering if this problem is related to Gnome in the last three Fedoras not saving session information properly?

Also, reading the man pages for pulse-daemon.conf, pulse-client.conf and pulseaudio wasn't much help as it did not yield a simple solution for disabling it.

I couldn't remove pulseaudio, because the beast has hooks into everything:
[sodo@ogre ~]$ sudo yum remove pulseaudio*
compiz-gnome x86_64 0.7.8-7.fc10

control-center x86_64 1:2.24.0.1-12.fc10
gdm x86_64 1:2.24.0-12.fc10
gdm-user-switch-applet x86_64 1:2.24.0-12.fc10
gnome-applets x86_64 1:2.24.3.1-1.fc10
gnome-panel x86_64 2.24.3-1.fc10
gnome-session x86_64 2.24.3-1.fc10
gnome-session-xsession x86_64 2.24.3-1.fc10
gnome-settings-daemon x86_64 2.24.1-7.fc10
gstreamer-plugins-good x86_64 0.10.11-4.fc10
libcanberra x86_64 0.10-3.fc10
libcanberra-gtk2 x86_64 0.10-3.fc10
mencoder x86_64 1.0-0.103.20080903svn.fc10
mjpegtools x86_64 1.9.0-0.6.rc3.fc10
mjpegtools-gui x86_64 1.9.0-0.6.rc3.fc10
mplayer x86_64 1.0-0.103.20080903svn.fc10
orca x86_64 2.24.3-1.fc10
plymouth-gdm-hooks x86_64 0.6.0-0.2008.11.17.3.fc10
totem x86_64 2.24.3-1.fc10
totem-gstreamer x86_64 2.24.3-1.fc10
totem-mozplugin x86_64 2.24.3-1.fc10
totem-nautilus x86_64 2.24.3-1.fc10
vlc x86_64 0.9.8a-1.fc10
vlc-devel


A Working Solution!
The pulseaudio* removal wasn't going to work, as it was going to remove a helluva lot of dependent programs. However, a different syntax for the removal of pulseaudio seemed to work a little better:
[sodo@ogre ~]$ sudo yum remove pulseaudio

Without the asterisk (*), yum removed only pulseaudio programs and not any dependencies. So it was just a tweak to the yum remove syntax that did the trick. Thank God. Now my videos don't break up!

FYI - As a last resort, if none of these removals work, just rename the binary to something else:
sudo mv /usr/bin/pulseaudio /usr/bin/paudio

That way, the system won't be able to find it. Of course, this isn't the preferred method of disabling pulseaudio!
;)
TAG

Reference
http://forums.fedoraforum.org/showthread.php?t=213711
An untested solution:
http://forums.fedoraforum.org/showthread.php?t=206868

Friday, February 20, 2009

smtp mail from evolution to comcast

Well, this is completely f'd up. Suddenly, outbound SMTP mail from Evolution on my Fedora 10 install just stopped working. The only thing I had done was install Alpine, the most recent version of what used to be the Pine command line email program.

Digging further, I found this post suggesting that both Compuserve and Comcast have been using port 587 instead of port 25 to receive SMTP email.

Thanks Comcast. You just killed more than two hours of my time. You incompetent fools.

Sunday, February 15, 2009

100% cpu on vmware fusion 2.0.2 with Mac OSX 10.5.6

This weekend, I installed Fusion 2.0.2 on my MacBook Pro 17" (dual core 2.4Ghz, 2GB RAM) running OSX 10.5.6. I was running an XP SP2 VM using one processor and 512MB. The one dedicated CPU would spike to 100% and my mouse disappeared. Thus, I had to control XP via the keyboard, always an exciting task. Of course, the display was really sluggish as others in this thread have reported. I did try the reinstall of VMware Tools, but that didn't work. Two things in conjunction did work:

1) under Settings -> Sharing -> Shared Applications, I disabled "Allow your Mac to open applications in the virtual machine"

2) in the same dialog box, select "Never" for "Show running virtual machine applications in the dock". This essentially disables Unity mode for that option.

Update 2009/02/16
Shutdown your vm and restart Fusion to make sure the changes are effective.
*** end update ***

Update 2009/02/18
I should clarify that my MacBook was upgraded to OSX 10.5 Leopard recently. I believe the DVD upgraded it to 10.5.4, and then I did another interim upgrade via Internet download to 10.5.6
*** end update ***

When you read the list of caveats in the VMware Fusion Release Notes, it is quite a litany of troubles. I guess this is where complexity gets us..too many combinations of guest and host OS versions for the company to adequately QA their products.

Unfortunately, it cost me at least two hours of my time today.
TAG

References:
Beginner's Guide to VMware Fusion
Power User's Guide to VMware Fusion
Resizing Virtual Disks with Step-by-Step Instructions
Run a Virtual Machine at Boot
Workstation 6 Manual
Modifying Fusion's Network Settings

Wednesday, February 11, 2009

the pleasure of command line email

I don't think there is anything as satisfying as the simplicity of sending an email at the command line. Like so:
[sodo@ogre ~]$ mail -s "short and sweet" cacasododom@gmail.com
This is my email.
.
EOT
[sodo@ogre ~]$


Simplicity Itself
I mean, really, how sweet is that? No opening a big fat email client, no clicking "Compose Email", no clicking into an address textbox field, no surfing through lists of adressees, you get the point. Command line email is simplicity itself. Of course, its simplicity is its drawback..you can't do the fancy stuff. But for simple communications or piping the input of text files into an email and sending it off, command line email can't be beat.
[sodo@ogre ~]$ mail -s "Fedora 10 random lockups" cacasododom@gmail.com
[sodo@ogre ~]$

Sending Mail Via Comcast
Fedora 10's base install comes with "mail". However, you need to tweak your .mailrc file for it to work with your mail provider. In my case, I am on Comcast. Comcast's mail requires your username and password. And of course you need to specify the outbound SMTP server. Finally, I want to set the "From:" address, so replies go to the right place. So my .mailrc file looks like this:
[sodo@ogre ~]$ cat .mailrc
set smtp-auth-user=myaccount
set smtp-auth-password=password
set smtp=smtp.comcast.net
set from=myaccount@comcast.net

Just put this .mailrc file in your home directory and you should be good to go. Test it by sending a mail from the command line:
[sodo@ogre ~]$ mail -s "test email #1" yourtestemail@mailhost.com < /dev/null
[sodo@ogre ~]$

Test That This Works
After sending your email, you may get a bounce back if something is incorrectly configured. So you may receive a message at the command line:
[sodo@ogre ~]$
You have new mail in /var/spool/mail/root
[sodo@ogre ~]$

Just type "mail" and hit enter. The interactive version of "mail" will start and you'll see a list of mail headers:
[sodo@ogre ~]$ mail
Heirloom Mail version 12.4 7/29/08. Type ? for help.
"/var/spool/mail/sodo": 2 messages
> 1 Mail Delivery Subsys Fri Feb 6 11:07 253/20968 "Returned mail: see transcript for details"
2 Mail Delivery Subsys Fri Feb 6 11:07 249/20491 "Returned mail: see transcript for details"

Type the number of the email header (1, 2, 3, etc) to see its contents.
Message
1:From MAILER-DAEMON@localhost.localdomain Fri Feb 6 11:07:40 2009
Return-Path: <MAILER-DAEMON@localhost.localdomain>
Date: Fri, 6 Feb 2009 11:07:40 -0500
From: Mail Delivery Subsystem <MAILER-DAEMON@localhost.localdomain>
To: <sodo@localhost.localdomain>
Content-Type: multipart/report; report-type=delivery-status; boundary="n16G7eTG018842.1233936460/localhost.localdomain"
Subject: Returned mail: see transcript for details
Auto-Submitted: auto-generated (failure)
Status: RO

Part 1:

The original message was received at Fri, 6 Feb 2009 11:07:39 -0500
from localhost.localdomain [127.0.0.1]

----- The following addresses had permanent fatal errors -----<
cacasododom@gmail.com> (reason: 554 Blocked by SPAM RBL check senderbase.org orwikipedia.org/wiki/DNSBL)

Debug
Usually, there will be a very clear indication in the email as to what is going on. Such as in the above email:
reason: 554 Blocked by SPAM RBL check senderbase.org orwikipedia.org/wiki/DNSBL

Type "quit" to exit.

So that's it. Enjoy your command line email!
TAG


PS - As shown in the example above, I have been experiencing some random lockups in Fedora 10: http://forums.fedoraforum.org/showthread.php?t=205950
My current workaround is to use the "noapic" command line option. But I will need to further investigate why these lockups just started happening with Fedora 10. They didn't happen with Fedora 9 or 7!

Tuesday, February 10, 2009

creating a ramdisk in Linux

So I have all this extra memory going unused and want to make a really fast drive for video editing.  That's how it starts.

*** Update 2013/04/20 ***
Easiest method here to create a temporary file system in RAM: http://forums.fedoraforum.org/showthread.php?t=272413

On my new i7 box, I was able to create the ramdisk, mount it and test it successfully by using dd:

Create a mount point
[sodo@monstrous ~]$ mkdir -p /mnt/ramdisk

Create The Ramdisk
[sodo@monstrous ~]$ mount -t tmpfs -o size=19.1G tmpfs /mnt/ramdisk

Test it Out
[sodo@monstrous ~]$ dd if=/dev/zero of=/mnt/ramdisk/zerofile.tst bs=1k count=19100000
19100000+0 records in
19100000+0 records out
19558400000 bytes (20 GB) copied, 15.1903 s, 1.3 GB/s


It created the 19GB file in about 25 seconds.  Amazing.
*** end update ***

In the example below, I'll show you the short steps to create a 6GB ramdisk. I'm running Fedora 10, x86-64.

1) pass an argument to the kernel
This usually involves editing /etc/grub.conf, finding the line beginning with "kernel" and adding the below parameter to it:
ramdisk_size="some size in kilobytes"

For example:
ramdisk_size=6291456

2) reboot

3) take a look at your ramdisk on the filesystem
[sodo@ogre ~]$ dmesg | grep RAMDISK
RAMDISK: 37c75000 - 37fef3a0
#3 [0037c75000 - 0037fef3a0] RAMDISK ==> [0037c75000 - 0037fef3a0]
[sodo@ogre ~]$ ls -lh /dev/ramdisk*
lrwxrwxrwx 1 root root 4 2009-02-09 23:15 /dev/ramdisk -> ram0
brw-rw---- 1 root disk 1, 0 2009-02-09 23:15 /dev/ram0

Looks like the ramdisk is pointing to /dev/ram0!

4) format the ramdisk device as a filesystem
[sodo@ogre ~]$ mke2fs -m 0 /dev/ram0
mke2fs 1.41.3 (12-Oct-2008)
Filesystem label=
OS type: Linux
Block size=4096 (log=2)
Fragment size=4096 (log=2)
393216 inodes, 1572864 blocks
0 blocks (0.00%) reserved for the super user
First data block=0
Maximum filesystem blocks=1610612736
48 block groups
32768 blocks per group, 32768 fragments per group
8192 inodes per group
Superblock backups stored on blocks:
32768, 98304, 163840, 229376, 294912, 819200, 884736

Writing inode tables: done
Writing superblocks and filesystem accounting information: done

This filesystem will be automatically checked every 37 mounts or
180 days, whichever comes first. Use tune2fs -c or -i to override.


4) create a mount point
[sodo@ogre ~]$ mkdir /mnt/ramdisk

5) mount the ramdisk as a usable filesystem
[sodo@ogre ~]$ mount /dev/ram0 /mnt/ramdisk

6) check out how much space you have on the filesystem
[sodo@ogre ~]$ df -m
Filesystem 1M-blocks Used Available Use% Mounted on
/dev/md0 459121 10491 425309 3% /
/dev/md2 469453 413351 32255 93% /mnt
/dev/sda1 190 22 159 12% /boot
tmpfs 5013 0 5013 0% /dev/shm
/dev/ram0 6048 12 6036 1% /mnt/ramdisk


7) copy some files to it
[sodo@ogre ~]$ ll /mnt/ramdisk/
total 4018740
drwx------ 2 root root 16384 2009-02-09 23:20 lost+found
-rw-rw-r-- 1 sodo sodo 50590800 2009-02-09 23:24 mvi_0703.m2t
-rw-rw-r-- 1 sodo sodo 318906280 2009-02-09 23:24 mvi_0705.m2t
-rw-rw-r-- 1 sodo sodo 599845208 2009-02-09 23:24 mvi_0706.m2t


Pretty cool.

After it seems to be working, I decided to add the few steps necessary to /etc/rc.local, so that my ramdrive can come up on boot:
mke2fs -m 0 /dev/ram0
mount /dev/ram0 /mnt/ramdisk
chown youruser:youruser /mnt/ramdisk


TAG

Reference
http://jayant7k.blogspot.com/2006/08/ram-disk-in-linux.html

Tuesday, February 03, 2009

handy TOP reference

Top is a program that monitors the CPU and memory utilization of individual processes on your Unix or Linux machine. The output of top normally defaults to a list of processes sorted from high CPU to low CPU utilization. It is helpful to know some of the commands, so that you can sort through and find specific processes based on memory, status or any number of statistics top has available to it.

The command sets listed below were tested in Fedora 10, but vary across distributions. Use the ? or type "h" to get the list of commands specific to your distribution.

default output
To run top interactively, just type "top" at a command line and hit enter. It will refresh once every three seconds by default until you quit (press "Q") to exit.
top - 14:23:03 up 14 days, 4:16, 4 users, load average: 0.25, 0.13, 0.09
Tasks: 127 total, 1 running, 125 sleeping, 0 stopped, 1 zombie
Cpu(s): 15.8%us, 9.0%sy, 0.0%ni, 74.5%id, 0.0%wa, 0.6%hi, 0.1%si, 0.0%st
Mem: 551296k total, 498888k used, 52408k free, 43980k buffers
Swap: 2031608k total, 88k used, 2031520k free, 134708k cached

PID USER PR NI VIRT RES SHR S %CPU %MEM TIME+ COMMAND

2406 tag 15 0 74868 45m 8860 S 43 8.4 3:58.37 Xorg
2541 tag 15 0 68596 17m 8636 S 6 3.3 0:18.07 gnome-terminal
18561 tag 15 0 734m 143m 12m S 1 26.6 0:09.36 cinelerra
2527 tag 15 0 17804 8992 6532 S 0 1.6 0:13.27 metacity
2405 tag 15 0 16636 1652 1080 S 0 0.3 0:06.01 gdm-binary
2657 tag 15 0 48260 10m 7788 S 0 1.9 0:22.62 mixer_applet2

19284 tag 15 0 2164 1036 796 R 0 0.2 0:00.06 top

You see the output defaults to a list of processes the length of your terminal window. To shorten this list to a more manageable set of processes, type # or n to limit the number of tasks displayed.

To sort the list by a column other than %CPU, type <> to sort the output by the column that is to the left or right of %CPU.

To choose a specific column to sort by, press "F" or "O" and select the letter that corresponds to the column you'd like to sort.

To reverse the sort, press "R"

To toggle columns of data on and off, press "f".

Interactive Mode
Here is a list of commands that you can type while in interactive mode:
f - toggle individual fields on and off
F or O - choose a field to sort on
?/h - help
H - toggle the display of program threads
I - toggle IRIX mode
K - kill a process
M - sort on %MEM
N - sort on process ID (PID)
P - sort on %CPU
R - reverse the sort
T - sort on TIME process has been running
U - select processes by user
#/n - display n number of processes
enter - refresh display


Process States
A process can be in a number of states, shown by the Status column:
D - uninterruptable sleep
R - running
S - sleeping
T - traced or stopped
Z - zombie


Command line options
-d delay in seconds
-p display process ID (PID)
-H toggle display of threads
-i toggle idle processes
-n number of iterations before top ends
-u monitor by user
-v version


Notes on fields related to memory
VIRT = total amount of virtual memory used by the task. Includes all code/data/shared libraries and swapped pages
VIRT = SWAP + RES
SWAP = the swapped out portion of a task's total virtual memory
RES = Non-swapped physical memory a task has used
RES = CODE + DATA
CODE = amount of physical memory devoted to executable code. "text resident set"
DATA = amount of physical memory devoted to other than executable code. "data resident set"
SHR = amount of shared memory. This reflects the memory that could be potentially shared with other processes.


On my Fedora 10 machine, I noticed that RES does NOT equal the sum of the text plus data resident sets. Maybe I should file a bug?

In any case, that's a synopsis of top.

Enjoy,
TAG
Feel free to drop me a line or ask me a question.