I had to troubleshoot some natty SSL (Secure Sockets Layer) certificate issues and thought I'd add these informative articles that I found in my research.
SSL Basics
Technical
From the high level down to the more detailed
http://sericontech.com/Downloads/Introduction_to_SSL.pdf
http://publib.boulder.ibm.com/infocenter/tpfhelp/current/index.jsp?topic=/com.ibm.ztpf-ztpfdf.doc_put.cur/gtps5/s5why.html
http://www.codeguru.com/cpp/i-n/internet/securesocketlayerssl/article.php/c6187
SSL: certs, cert types, CAs, cert chain, formats
http://docs.sun.com/source/816-6156-10/contents.htm
For Admins
Verisign Intermediate Certificate information
Verisign Intermediate Certificate Install Instructions
Curl/openssl command line options for working with certificates
OpenSSL commands from a blog article
SSL Handshake
GUI Front-end to OpenSSL: TinyCA
For Developers
Using the OpenSSL libraries
Validators
SSL Checker
Troubleshooting
SSL Certificate Not Trusted Error
Debugging at the Command Line Using OpenSSL Basics
OpenSSL "s_client" Documentation
OpenSSL Tricks
OpenSSL Command-Line HOWTO
OpenSSL "verify" error output
Nice example of how to use the "verify" command
Wednesday, December 01, 2010
Wednesday, November 17, 2010
setting up IIS to use shell scripts as CGI scripts
Because I'm old school and love shell scripts, I wanted to kick off a shell script from my web browser. In this case, my shell script would sort through a text file, use gnuplot to output a graphic as a png and then display the script in the browser.
Setup IIS to execute shell scripts
I won't belabor how to setup your web server to execute shell scripts, as the link below Installing CGI Applications in IIS 6.0 explains most of the steps. However, I will call out one caveat that was tricky to setup. I use Cygwin to write my shell scripts, so I wanted IIS to use Cygwin's sh.exe as the shell script command interpreter. The nut here is that I needed to add a special configuration in order to have IIS execute Cygwin's script interpreter. Here's how to do this.
Create a Simple Shell Script as a CGI
It is useful to setup a simple script in order to test that IIS is calling sh.exe properly. Here is mine:
#!/bin/sh
echo "HTTP/1.0 200 OK"
echo "Content-type: text/html"
echo
echo "<HTML><HEAD><TITLE>environment variables test</TITLE></HEAD>"
echo "<BODY>"
/usr/bin/env ¦ /usr/bin/sort
echo "</BODY></HTML>"
exit
Remember that this script is essentially hand-rolling an HTTP response. Breaking it down:
1. Send the header:
echo "HTTP/1.0 200 OK"
echo "Content-type: text/html"
2. Make sure you send a blank line (\n\r )
echo
3. After the header and the blank line, send out well-formed HTML
echo "<HTML><HEAD><TITLE>environment variables test</TITLE></HEAD>"
4. Plop some shell functions in there to verify that sh.exe is interpreting commands correctly. In this example, I am printing out and sorting the results of the "env" command. The "env" command prints out the IIS working set of environment variables. Make sure to put the full path in your command string:
/usr/bin/env ¦ /usr/bin/sort
5. Close your HTML
echo "</BODY></HTML>"
6. Exit the script
exit
Reference the script in the HTML of a test page:
<a href="/cgi-bin/env.sh">click me</a>
Here is the output of the script
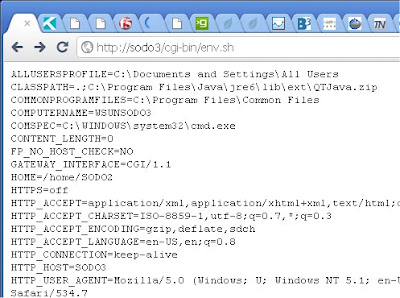
This is a very simple script, but you can see that the sucker works. As it took a good two hours of finagling, I thought it worthwhile to post these instructions and links to further reading.
My gnuplot script is much more involved. If interested, drop me a line and I can send you that script or maybe post another blog article about how to create it.
Good luck!
TAG
References
Common Gateway Interface (CGI)
Short list of HTTP status codes
Installing CGI Applications in IIS 6.0
Writing CGI Scripts for a Web Server
Setup IIS to execute shell scripts
I won't belabor how to setup your web server to execute shell scripts, as the link below Installing CGI Applications in IIS 6.0 explains most of the steps. However, I will call out one caveat that was tricky to setup. I use Cygwin to write my shell scripts, so I wanted IIS to use Cygwin's sh.exe as the shell script command interpreter. The nut here is that I needed to add a special configuration in order to have IIS execute Cygwin's script interpreter. Here's how to do this.
- right-click on the cgi folder
- click Properties
- select the Virtual Directory tab
- click Configuration
- click Add and type the following:
Create a Simple Shell Script as a CGI
It is useful to setup a simple script in order to test that IIS is calling sh.exe properly. Here is mine:
#!/bin/sh
echo "HTTP/1.0 200 OK"
echo "Content-type: text/html"
echo
echo "<HTML><HEAD><TITLE>environment variables test</TITLE></HEAD>"
echo "<BODY>"
/usr/bin/env ¦ /usr/bin/sort
echo "</BODY></HTML>"
exit
Remember that this script is essentially hand-rolling an HTTP response. Breaking it down:
1. Send the header:
echo "HTTP/1.0 200 OK"
echo "Content-type: text/html"
2. Make sure you send a blank line (\n\r )
echo
3. After the header and the blank line, send out well-formed HTML
echo "<HTML><HEAD><TITLE>environment variables test</TITLE></HEAD>"
4. Plop some shell functions in there to verify that sh.exe is interpreting commands correctly. In this example, I am printing out and sorting the results of the "env" command. The "env" command prints out the IIS working set of environment variables. Make sure to put the full path in your command string:
/usr/bin/env ¦ /usr/bin/sort
5. Close your HTML
echo "</BODY></HTML>"
6. Exit the script
exit
Reference the script in the HTML of a test page:
<a href="/cgi-bin/env.sh">click me</a>
Here is the output of the script

This is a very simple script, but you can see that the sucker works. As it took a good two hours of finagling, I thought it worthwhile to post these instructions and links to further reading.
My gnuplot script is much more involved. If interested, drop me a line and I can send you that script or maybe post another blog article about how to create it.
Good luck!
TAG
References
Common Gateway Interface (CGI)
Short list of HTTP status codes
Installing CGI Applications in IIS 6.0
Writing CGI Scripts for a Web Server
Saturday, October 30, 2010
quick LAMP install in fedora
I wanted to create a database of songs for my band, the stormpigs, and figured I use the Linux Apache Mysql Php (LAMP) stack to do it. Having this goal in mind, here are a few notes on installing apache, mysql, php, phpmyadmin in fedora.
1) install apache
yum install httpd
2) start apache
[root@box /]# service httpd start
Starting httpd: httpd: Could not reliably determine the server's fully qualified domain name, using ::1 for ServerName [ OK ]
3) install mysql and mysql-server
[root@ogre /]# yum install mysql mysql-server
Loaded plugins: presto, refresh-packagekit
Setting up Install Process
Resolving Dependencies
--> Running transaction check
---> Package mysql.x86_64 0:5.1.47-2.fc12 set to be installed
---> Package mysql-server.x86_64 0:5.1.47-2.fc12 set to be installed
--> Processing Dependency: perl-DBD-MySQL for package: mysql-server-5.1.47-2.fc12.x86_64
--> Processing Dependency: perl-DBI for package: mysql-server-5.1.47-2.fc12.x86_64
--> Processing Dependency: perl(DBI) for package: mysql-server-5.1.47-2.fc12.x86_64
--> Running transaction check
---> Package perl-DBD-MySQL.x86_64 0:4.017-1.fc12 set to be installed
---> Package perl-DBI.x86_64 0:1.609-3.fc12 set to be installed
--> Finished Dependency Resolution
Dependencies Resolved
====================================================================================================================================================================================
Package Arch Version Repository Size
====================================================================================================================================================================================
Installing:
mysql x86_64 5.1.47-2.fc12
mysql-server x86_64 5.1.47-2.fc12 updates 9.4 M
Installing for dependencies:
perl-DBD-MySQL x86_64 4.017-1.fc12 updates 161 k
perl-DBI x86_64 1.609-3.fc12 fedora 695 k
Transaction Summary
====================================================================================================================================================================================
Install 3 Package(s)
Total download size: 9.3 M
Installed size: 27 M
Is this ok [y/N]: y
4) start your mysql server
[root@box /]# /etc/init.d/mysql start
or
[root@box /]# service mysqld start
Initializing MySQL database: Installing MySQL system tables...
OK
Filling help tables...
OK
To start mysqld at boot time you have to copy
support-files/mysql.server to the right place for your system
PLEASE REMEMBER TO SET A PASSWORD FOR THE MySQL root USER !
To do so, start the server, then issue the following commands:
/usr/bin/mysqladmin -u root password 'new-password'
/usr/bin/mysqladmin -u root -h ogre password 'new-password'
Alternatively you can run:
/usr/bin/mysql_secure_installation
which will also give you the option of removing the test
databases and anonymous user created by default. This is
strongly recommended for production servers.
See the manual for more instructions.
You can start the MySQL daemon with:
cd /usr ; /usr/bin/mysqld_safe &
You can test the MySQL daemon with mysql-test-run.pl
cd /usr/mysql-test ; perl mysql-test-run.pl
Please report any problems with the /usr/bin/mysqlbug script!
[ OK ]
Starting MySQL: [ OK ]
5) setup mysql database root password
[root@box /]# mysqladmin -u root password 'password'
Sample login:
ip-10-203-5-13:~ # mysql -u root -p
Enter password:
Welcome to the MariaDB monitor. Commands end with ; or \g.
Your MariaDB connection id is 17
Server version: 5.1.44b-MariaDB-log SUSE MariaDB RPM
Type 'help;' or '\h' for help. Type '\c' to clear the current input statement.
MariaDB [(none)]>
6) install php and phpmyadmin
(installing phpmyadmin installs all you'll need)
[root@box ~]$ sudo yum install phpmyadmin Loaded plugins: presto, refresh-packagekit Setting up Install Process Resolving Dependencies --> Running transaction check ---> Package phpMyAdmin.noarch 0:3.3.7-1.fc12 set to be installed --> Processing Dependency: php-gd >= 5.2.0 for package: phpMyAdmin-3.3.7-1.fc12.noarch --> Processing Dependency: php-mbstring >= 5.2.0 for package: phpMyAdmin-3.3.7-1.fc12.noarch --> Processing Dependency: php-mysql >= 5.2.0 for package: phpMyAdmin-3.3.7-1.fc12.noarch --> Processing Dependency: php >= 5.2.0 for package: phpMyAdmin-3.3.7-1.fc12.noarch --> Processing Dependency: php-mcrypt >= 5.2.0 for package: phpMyAdmin-3.3.7-1.fc12.noarch --> Running transaction check ---> Package php.x86_64 0:5.3.3-1.fc12 set to be installed --> Processing Dependency: php-common = 5.3.3-1.fc12 for package: php-5.3.3-1.fc12.x86_64 --> Processing Dependency: php-cli = 5.3.3-1.fc12 for package: php-5.3.3-1.fc12.x86_64 ---> Package php-gd.x86_64 0:5.3.3-1.fc12 set to be installed --> Processing Dependency: libt1.so.5()(64bit) for package: php-gd-5.3.3-1.fc12.x86_64 ---> Package php-mbstring.x86_64 0:5.3.3-1.fc12 set to be installed ---> Package php-mcrypt.x86_64 0:5.3.3-1.fc12 set to be installed --> Processing Dependency: libmcrypt.so.4()(64bit) for package: php-mcrypt-5.3.3-1.fc12.x86_64 ---> Package php-mysql.x86_64 0:5.3.3-1.fc12 set to be installed --> Processing Dependency: php-pdo for package: php-mysql-5.3.3-1.fc12.x86_64 --> Running transaction check ---> Package libmcrypt.x86_64 0:2.5.8-9.fc12 set to be installed ---> Package php-cli.x86_64 0:5.3.3-1.fc12 set to be installed ---> Package php-common.x86_64 0:5.3.3-1.fc12 set to be installed ---> Package php-pdo.x86_64 0:5.3.3-1.fc12 set to be installed ---> Package t1lib.x86_64 0:5.1.2-5.fc12 set to be installed --> Finished Dependency Resolution Dependencies Resolved ==================================================================================================================================================================================== Package Arch Version Repository Size ==================================================================================================================================================================================== Installing: phpMyAdmin noarch 3.3.7-1.fc12 updates 3.6 M Installing for dependencies: libmcrypt x86_64 2.5.8-9.fc12 fedora 92 k php x86_64 5.3.3-1.fc12 updates 1.1 M php-cli x86_64 5.3.3-1.fc12 updates 2.2 M php-common x86_64 5.3.3-1.fc12 updates 521 k php-gd x86_64 5.3.3-1.fc12 updates 105 k php-mbstring x86_64 5.3.3-1.fc12 updates 452 k php-mcrypt x86_64 5.3.3-1.fc12 updates 30 k php-mysql x86_64 5.3.3-1.fc12 updates 77 k php-pdo x86_64 5.3.3-1.fc12 updates 71 k t1lib x86_64 5.1.2-5.fc12 fedora 153 k Transaction Summary ==================================================================================================================================================================================== Install 11 Package(s) Total download size: 8.3 M Installed size: 31 M Is this ok [y/N]: y
8) inspect the environment
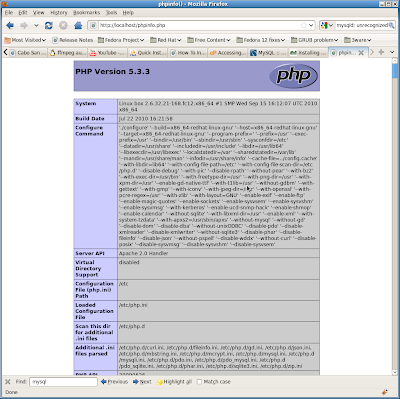
Create a file called phpinfo.php and place it in the webroot of apache, usually /var/www/html
[root@box /]# cat /var/www/html/phpinfo.php
< ? phpinfo();
?>
This is a very nice utility that inspects your php and apache environment showing headers, modules, etc.
9) login to phpMyAdmin
Visit http://localhost/phpmyadmin. You will be prompted to enter the username and password of an authorized user (root, usually).

Those are the basics of a LAMP install. More to come.
TAG
Troubleshooting
If you setup mysql, but not the server component, you'll get this error
ERROR 2002 (HY000): Can't connect to local MySQL server through socket '/var/lib/mysql/mysql.sock'
References
http://www.flmnh.ufl.edu/linux/install_apache.htm
http://wiki.phpmyadmin.net/pma/Welcome_to_phpMyAdmin_Wiki
MySQL Tutorial
1) install apache
yum install httpd
2) start apache
[root@box /]# service httpd start
Starting httpd: httpd: Could not reliably determine the server's fully qualified domain name, using ::1 for ServerName [ OK ]
3) install mysql and mysql-server
[root@ogre /]# yum install mysql mysql-server
Loaded plugins: presto, refresh-packagekit
Setting up Install Process
Resolving Dependencies
--> Running transaction check
---> Package mysql.x86_64 0:5.1.47-2.fc12 set to be installed
---> Package mysql-server.x86_64 0:5.1.47-2.fc12 set to be installed
--> Processing Dependency: perl-DBD-MySQL for package: mysql-server-5.1.47-2.fc12.x86_64
--> Processing Dependency: perl-DBI for package: mysql-server-5.1.47-2.fc12.x86_64
--> Processing Dependency: perl(DBI) for package: mysql-server-5.1.47-2.fc12.x86_64
--> Running transaction check
---> Package perl-DBD-MySQL.x86_64 0:4.017-1.fc12 set to be installed
---> Package perl-DBI.x86_64 0:1.609-3.fc12 set to be installed
--> Finished Dependency Resolution
Dependencies Resolved
====================================================================================================================================================================================
Package Arch Version Repository Size
====================================================================================================================================================================================
Installing:
mysql x86_64 5.1.47-2.fc12
mysql-server x86_64 5.1.47-2.fc12 updates 9.4 M
Installing for dependencies:
perl-DBD-MySQL x86_64 4.017-1.fc12 updates 161 k
perl-DBI x86_64 1.609-3.fc12 fedora 695 k
Transaction Summary
====================================================================================================================================================================================
Install 3 Package(s)
Total download size: 9.3 M
Installed size: 27 M
Is this ok [y/N]: y
4) start your mysql server
[root@box /]# /etc/init.d/mysql start
or
[root@box /]# service mysqld start
Initializing MySQL database: Installing MySQL system tables...
OK
Filling help tables...
OK
To start mysqld at boot time you have to copy
support-files/mysql.server to the right place for your system
PLEASE REMEMBER TO SET A PASSWORD FOR THE MySQL root USER !
To do so, start the server, then issue the following commands:
/usr/bin/mysqladmin -u root password 'new-password'
/usr/bin/mysqladmin -u root -h ogre password 'new-password'
Alternatively you can run:
/usr/bin/mysql_secure_installation
which will also give you the option of removing the test
databases and anonymous user created by default. This is
strongly recommended for production servers.
See the manual for more instructions.
You can start the MySQL daemon with:
cd /usr ; /usr/bin/mysqld_safe &
You can test the MySQL daemon with mysql-test-run.pl
cd /usr/mysql-test ; perl mysql-test-run.pl
Please report any problems with the /usr/bin/mysqlbug script!
[ OK ]
Starting MySQL: [ OK ]
5) setup mysql database root password
[root@box /]# mysqladmin -u root password 'password'
Sample login:
ip-10-203-5-13:~ # mysql -u root -p
Enter password:
Welcome to the MariaDB monitor. Commands end with ; or \g.
Your MariaDB connection id is 17
Server version: 5.1.44b-MariaDB-log SUSE MariaDB RPM
Type 'help;' or '\h' for help. Type '\c' to clear the current input statement.
MariaDB [(none)]>
6) install php and phpmyadmin
(installing phpmyadmin installs all you'll need)
[root@box ~]$ sudo yum install phpmyadmin Loaded plugins: presto, refresh-packagekit Setting up Install Process Resolving Dependencies --> Running transaction check ---> Package phpMyAdmin.noarch 0:3.3.7-1.fc12 set to be installed --> Processing Dependency: php-gd >= 5.2.0 for package: phpMyAdmin-3.3.7-1.fc12.noarch --> Processing Dependency: php-mbstring >= 5.2.0 for package: phpMyAdmin-3.3.7-1.fc12.noarch --> Processing Dependency: php-mysql >= 5.2.0 for package: phpMyAdmin-3.3.7-1.fc12.noarch --> Processing Dependency: php >= 5.2.0 for package: phpMyAdmin-3.3.7-1.fc12.noarch --> Processing Dependency: php-mcrypt >= 5.2.0 for package: phpMyAdmin-3.3.7-1.fc12.noarch --> Running transaction check ---> Package php.x86_64 0:5.3.3-1.fc12 set to be installed --> Processing Dependency: php-common = 5.3.3-1.fc12 for package: php-5.3.3-1.fc12.x86_64 --> Processing Dependency: php-cli = 5.3.3-1.fc12 for package: php-5.3.3-1.fc12.x86_64 ---> Package php-gd.x86_64 0:5.3.3-1.fc12 set to be installed --> Processing Dependency: libt1.so.5()(64bit) for package: php-gd-5.3.3-1.fc12.x86_64 ---> Package php-mbstring.x86_64 0:5.3.3-1.fc12 set to be installed ---> Package php-mcrypt.x86_64 0:5.3.3-1.fc12 set to be installed --> Processing Dependency: libmcrypt.so.4()(64bit) for package: php-mcrypt-5.3.3-1.fc12.x86_64 ---> Package php-mysql.x86_64 0:5.3.3-1.fc12 set to be installed --> Processing Dependency: php-pdo for package: php-mysql-5.3.3-1.fc12.x86_64 --> Running transaction check ---> Package libmcrypt.x86_64 0:2.5.8-9.fc12 set to be installed ---> Package php-cli.x86_64 0:5.3.3-1.fc12 set to be installed ---> Package php-common.x86_64 0:5.3.3-1.fc12 set to be installed ---> Package php-pdo.x86_64 0:5.3.3-1.fc12 set to be installed ---> Package t1lib.x86_64 0:5.1.2-5.fc12 set to be installed --> Finished Dependency Resolution Dependencies Resolved ==================================================================================================================================================================================== Package Arch Version Repository Size ==================================================================================================================================================================================== Installing: phpMyAdmin noarch 3.3.7-1.fc12 updates 3.6 M Installing for dependencies: libmcrypt x86_64 2.5.8-9.fc12 fedora 92 k php x86_64 5.3.3-1.fc12 updates 1.1 M php-cli x86_64 5.3.3-1.fc12 updates 2.2 M php-common x86_64 5.3.3-1.fc12 updates 521 k php-gd x86_64 5.3.3-1.fc12 updates 105 k php-mbstring x86_64 5.3.3-1.fc12 updates 452 k php-mcrypt x86_64 5.3.3-1.fc12 updates 30 k php-mysql x86_64 5.3.3-1.fc12 updates 77 k php-pdo x86_64 5.3.3-1.fc12 updates 71 k t1lib x86_64 5.1.2-5.fc12 fedora 153 k Transaction Summary ==================================================================================================================================================================================== Install 11 Package(s) Total download size: 8.3 M Installed size: 31 M Is this ok [y/N]: y
8) inspect the environment
Create a file called phpinfo.php and place it in the webroot of apache, usually /var/www/html
[root@box /]# cat /var/www/html/phpinfo.php
< ? phpinfo();
?>
This is a very nice utility that inspects your php and apache environment showing headers, modules, etc.

9) login to phpMyAdmin
Visit http://localhost/phpmyadmin. You will be prompted to enter the username and password of an authorized user (root, usually).

Those are the basics of a LAMP install. More to come.
TAG
Troubleshooting
If you setup mysql, but not the server component, you'll get this error
ERROR 2002 (HY000): Can't connect to local MySQL server through socket '/var/lib/mysql/mysql.sock'
References
http://www.flmnh.ufl.edu/linux/install_apache.htm
http://wiki.phpmyadmin.net/pma/Welcome_to_phpMyAdmin_Wiki
MySQL Tutorial
Thursday, September 09, 2010
DHCP renewals interrupt shell script
I was running a script to convert a bunch of Canon 5D photos from high res to HD resolution and noticed the script would die after 15-30 minutes.
It didn't seem likely that "convert" would die, as the script logged into the server that I was using to execute convert and I only executed convert once on that server:
Update 2010/09/13
Here's an example of a simple interfaces file with dynamic setting:
auto lo
iface lo inet loopback
auto eth0
iface eth0 inet dhcp
It didn't seem likely that "convert" would die, as the script logged into the server that I was using to execute convert and I only executed convert once on that server:
for FILE in $(cat $FILES)
do
COUNT=$(expr $COUNT + 1)
NEWFILE=$(echo $FILE | sed 's/Remote\(.*\)/new\/\1/g')
echo "FILE $COUNT of $NUMFILES is $FILE, NEWFILE is $NEWFILE"
echo "converting $FILE to $NEWFILE"
ssh $CRED "/opt/local/bin/convert -verbose -resize 1920x1280 $FILE $NEWFILE"
echo
#break
done
do
COUNT=$(expr $COUNT + 1)
NEWFILE=$(echo $FILE | sed 's/Remote\(.*\)/new\/\1/g')
echo "FILE $COUNT of $NUMFILES is $FILE, NEWFILE is $NEWFILE"
echo "converting $FILE to $NEWFILE"
ssh $CRED "/opt/local/bin/convert -verbose -resize 1920x1280 $FILE $NEWFILE"
echo
#break
done
Snooping in /var/log/syslog, I found that the DHCP server was renewing my IP address every 28 minutes or so:
Sep 8 07:47:52 ubuntu NetworkManager: address 192.168.0.95
Sep 8 05:02:22 ubuntu NetworkManager: address 192.168.0.95
Sep 8 05:26:27 ubuntu NetworkManager: DHCP: device eth0 state changed bound -> expire
Sep 8 05:26:27 ubuntu NetworkManager: DHCP: device eth0 state changed expire -> preinit
Sep 8 05:26:28 ubuntu NetworkManager: address 192.168.0.96
Sep 8 05:53:04 ubuntu NetworkManager: DHCP: device eth0 state changed bound -> expire
Sep 8 05:53:04 ubuntu NetworkManager: DHCP: device eth0 state changed expire -> preinit
Sep 8 05:53:08 ubuntu NetworkManager: address 192.168.0.97
Sep 8 06:21:25 ubuntu NetworkManager: DHCP: device eth0 state changed bound -> expire
Sep 8 06:21:25 ubuntu NetworkManager: DHCP: device eth0 state changed expire -> preinit
Sep 8 06:21:26 ubuntu NetworkManager: address 192.168.0.98
Sep 8 06:50:47 ubuntu NetworkManager: DHCP: device eth0 state changed bound -> expire
Sep 8 06:50:47 ubuntu NetworkManager: DHCP: device eth0 state changed expire -> preinit
What the hell? So I manually set the IP address of the box using these instructions from Jonathan Moeller:
Sep 8 07:47:52 ubuntu NetworkManager:
Sep 8 05:02:22 ubuntu NetworkManager:
Sep 8 05:26:27 ubuntu NetworkManager:
Sep 8 05:26:27 ubuntu NetworkManager:
Sep 8 05:26:28 ubuntu NetworkManager:
Sep 8 05:53:04 ubuntu NetworkManager:
Sep 8 05:53:04 ubuntu NetworkManager:
Sep 8 05:53:08 ubuntu NetworkManager:
Sep 8 06:21:25 ubuntu NetworkManager:
Sep 8 06:21:25 ubuntu NetworkManager:
Sep 8 06:21:26 ubuntu NetworkManager:
Sep 8 06:50:47 ubuntu NetworkManager:
Sep 8 06:50:47 ubuntu NetworkManager:
What the hell? So I manually set the IP address of the box using these instructions from Jonathan Moeller:
The comment from Anurag fit my bill the best; ie, giving the complete network info to the /etc/network/interfaces files, including network and broadcast IPs.
ubuntu:~$ cat /etc/network/interfaces
auto eth0
iface eth0 inet static
address 192.168.0.98
netmask 255.255.255.0
gateway 192.168.0.1
network 192.168.0.0
broadcast 192.168.0.255
auto eth0
iface eth0 inet static
address 192.168.0.98
netmask 255.255.255.0
gateway 192.168.0.1
network 192.168.0.0
broadcast 192.168.0.255
cheers,
sodo
Update 2010/09/13
Here's an example of a simple interfaces file with dynamic setting:
auto lo
iface lo inet loopback
auto eth0
iface eth0 inet dhcp
Wednesday, August 25, 2010
irssi behind proxy (via ssh port forwarding)
A Problem
To get natty technical questions answered, sometimes you hafta go to the source and drop a line to the mavens on IRC (Internet Relay Chat). But IRC uses a specific port (6667) denied by the average corporate firewall. Unfortunately, I could not get irssi functioning through my http proxy at work. What to do? Well..secure SSH tunneling and port forwarding to the rescue!
ssh -p 443 -L 1234:irc.freenode.net:6667 user@homemachine
But what the heck is all that stuff? I will explain.
The Solution
Like most companies, my company allows port 443 traffic through their firewall. I decided to use this open access to create a secure tunnel from my workstation in the office to a machine in my home network that has a running SSH server. I then use a very nice feature of SSH to forward traffic through the tunnel to my machine at home and onto a specific server out in the internet. This *should* be as easy as 1 - 2 - 3 (shown below), though to me, it's a bit mindbending. Read on..
1 - Configure the Home Router/Firewall
In order to get the above solution working, I needed to configure my home firewall to forward requests for port 443 to the SSH server (port 22) at home. Most home routers/firewalls have the ability to setup this hardware-based port forwarding.
2 - SSH Tunnel and Forward
After making sure that the port forwarding described in Step 1 is setup, I then use SSH on my machine at work to:
1) create a secure tunnel to my home machine over port 443 (ssh -p 443 user@homemachine)
2) create a listener on my local machine on port 1234 (-L 1234:)
3) forward requests to a specific IRC server on a specific port via that secure tunnel. In this case, port 6667 on irc.freenode.net , like so (:irc.freenode.net:6667)
The whole shebang is efficiently handled with that one ssh command string:
ssh -p 443 -L 1234:irc.freenode.net:6667 user@homemachine
On the host at work
After making sure Step 1 was completed, I received a "Password:" prompt after hitting "enter" on the above SSH command line:
$ ssh -p 443 -L 1234:irc.freenode.net:6667 user@homemachine
Password:
Last login: Wed Aug 25 11:20:09 2010 from 26.176.213.71
Now that I'm properly authenticated, I checked to see that the local machine is listening on port 1234. I did this by opening a second command prompt on the machine at work and looking at the output of "netstat -na":
$ netstat -na grep LISTEN
..
TCP 127.0.0.1:1234 0.0.0.0:0 LISTENING
TCP 127.0.0.1:5152 0.0.0.0:0 LISTENING
TCP 127.0.0.1:8198 0.0.0.0:0 LISTENING
SSH has opened that local port and will forward traffic bound for it to the remote SSH server. But I'm not done yet. IRSSI needs to point to that local port in order to use my home machine to connect to the IRC server. Much like a frog uses one lily pad to hop to another.
3 - IRSSI config change
To point IRSSI to utilize that SSH tunnel, I made two minor tweaks to IRSSI's configuration: proxy_address and proxy_port via the /SET command:
[(status)] /set proxy_address 127.0.0.1
[(status)] /set proxy_port 1234
[(status)] /set use_proxy ON
[(status)] /set
15:33 [proxy]
15:33 proxy_address = 127.0.0.1
15:33 [proxy]
15:33 proxy_port = 1234
15:33 [proxy]
15:33 use_proxy = ON
Note the localhost IP address in "proxy_address" and, of course, the appropriate port that I've opened.
With these tweaks in place and the secure tunnel created, I can then startup IRSSI and successfully connect to the IRC node via the local port, 1234:
11:35 -!- Irssi: Looking up irc.freenode.net
11:35 -!- Irssi: Connecting to irc.freenode.net [127.0.0.1] port 6667
11:35 -!- Irssi: Connection to irc.freenode.net established
11:35 !gibson.freenode.net *** Looking up your hostname...
11:35 !gibson.freenode.net *** Checking Ident
11:35 !gibson.freenode.net *** Found your hostname
11:35 !gibson.freenode.net *** No Ident response
11:35 -!- You have not registered
11:35 -!- Welcome to the freenode Internet Relay Chat Network user
11:35 -!- Your host is gibson.freenode.net[213.179.58.83/6667], running version ircd-seven-1.0.0
11:35 -!- This server was created Sat Jan 30 2010 at 01:13:47 CET
11:35 -!- Highest connection count: 6923 (6922 clients) (3140303 connections received)
11:35 -!- - gibson.freenode.net Message of the Day -
11:35 -!- - Welcome to gibson.freenode.net in Norway, EU! Thanks to
11:35 -!- - SSC Networks (www.ssc.no) for sponsoring this server!
Yahoo!
Conclusion
In the fashion of port forwarding, SSH works its magic to create a listener on the local machine, forward the packets destined for it through an SSH tunnel to my home server and onto somewhere else. In my case, I use my machine at home to forward my IRC requests onto irc.freenode.net. Very cool! Don't forget this same port forwarding feature of SSH can be applied to other TCP applications, such as VLC running on that same remote machine:
ssh -p 443 -L 1234:localhost:5900 user@homemachine
Have a good one,
TAG
Reference
http://www.techanswerguy.com/2006/09/irssi-chat-client.html
http://blag.andrewyates.net/2008/06/17/dynamic-port-forwarding-with-ssh-ssh-d/
Monday, August 02, 2010
drobo fs install, review
If all computer technology was like the Drobo, there would be less people complaining that their tech is difficult to use or doesn't work. I've had my Drobo FS for three days, but man, I love the thing. It is such a pleasure to not have to worry about RAID arcana just to have your systems safely backed up.
Got It!
I bought the Drobo FS from Amazon (about $694 with free shipping) and set it up between yesterday and today. I installed the Drobo Dashboard, the utility program for the Drobo, on my MacBook Pro, rebooted the Mac, popped a combination of five 250GB and 500GB drives in, hooked up the power and the ethernet cables and fired it up. Drobo Dashboard saw the unit as it sat attached to my router.
The Basics
Dashboard asked me if I wanted to upgrade the firmware..so I did. There was a small hiccup with Dashboard not seeing the Drobo after doing the firmware, so I had to hard power it down. But second time around, the firmware update worked. Dashboard then asked me if I wanted to upgrade the Dashboard software, which I did. I restarted the Mac. I then went into Advanced Settings -> Tools and configured email alerts to send me an email if Drobo becomes too full or has problems.
Create Shares
Back in Dashboard, I created a couple of shares, one as backup for my main Linux video editing workstation and the other for my MacBook and TimeMachine. I setup my MacBook to use 500GB of storage as a TimeMachine backup. The TimeMachine hook up worked like a charm and started backing up.
Stress Test Drobo!
I decided to test it hard out of the box and ran that TimeMachine backup from the mac (connected wirelessly) coincident with a big copy from my Linux video editing box. On my Linux box, I mounted the Drobo via SMB/CIFS and copied over my 460GB archive. The backup of the Linux archive took about 3.5 hours at about 25MiB/s over wired ethernet. Not bad for over gigE and with contention from the Time Machine backup.
The next morning, I got tired of waiting for the wireless TM backup of 130GB to finish, so I stopped the TM backup and then hooked up the Mac to a hard wired ethernet connection. Still took about five hours to copy over the remaining 80GB.
Update
I recently created a 760GB archive of my video workstation using fsarchiver. Copying the one file from my workstation to the Drobo took about 10 hours (8pm to 6am). That was with contention from a 40GB Time Machine backup that was running at the same time.
***end update***
Drobo Apps
Today I installed a few Drobo Apps (apache/droboutils/dropbear). DroboUtils is an easier way to manage Drobo Apps and as a prerequisite, it requires Apache to be installed. I used Apache for another function, setup of my personal website. I haven't cutover to using the apache web server as my main webserver yet because I need to tweak the apache config to hide some of the directory structures.
There is no telnet client for DroboApps, but DropBear is the SSH server for the Drobo. After installing, it was pretty cool to be able to logon to the device.
Summary
All-in-all, the process was super smooth and the device is everything I hoped for. With the ability to expand drive space at will, I shouldn't outgrow the FS very soon. I'm also looking forward to using more Drobo Apps and letting that be my server, instead of my XP VM on my Mac!
Long live Drobo!
Some Pics of the Process
drobo formatting my stack of drives

updating the firmware on the drobo

drobo temporarily loses its mind during firmware update

don't touch drobo while firmware is being updated!

drobo starting up after successful firmware update

drobo successfully updates its firmware

drobo dashboard download for update

time machine backup using drobo!

25MiBps (Mebibytes per second) network copy speed (with two backups to Drobo running..Time Machine and a backup of a 438GB archive)

Got It!
I bought the Drobo FS from Amazon (about $694 with free shipping) and set it up between yesterday and today. I installed the Drobo Dashboard, the utility program for the Drobo, on my MacBook Pro, rebooted the Mac, popped a combination of five 250GB and 500GB drives in, hooked up the power and the ethernet cables and fired it up. Drobo Dashboard saw the unit as it sat attached to my router.
The Basics
Dashboard asked me if I wanted to upgrade the firmware..so I did. There was a small hiccup with Dashboard not seeing the Drobo after doing the firmware, so I had to hard power it down. But second time around, the firmware update worked. Dashboard then asked me if I wanted to upgrade the Dashboard software, which I did. I restarted the Mac. I then went into Advanced Settings -> Tools and configured email alerts to send me an email if Drobo becomes too full or has problems.
Create Shares
Back in Dashboard, I created a couple of shares, one as backup for my main Linux video editing workstation and the other for my MacBook and TimeMachine. I setup my MacBook to use 500GB of storage as a TimeMachine backup. The TimeMachine hook up worked like a charm and started backing up.
Stress Test Drobo!
I decided to test it hard out of the box and ran that TimeMachine backup from the mac (connected wirelessly) coincident with a big copy from my Linux video editing box. On my Linux box, I mounted the Drobo via SMB/CIFS and copied over my 460GB archive. The backup of the Linux archive took about 3.5 hours at about 25MiB/s over wired ethernet. Not bad for over gigE and with contention from the Time Machine backup.
The next morning, I got tired of waiting for the wireless TM backup of 130GB to finish, so I stopped the TM backup and then hooked up the Mac to a hard wired ethernet connection. Still took about five hours to copy over the remaining 80GB.
Update
I recently created a 760GB archive of my video workstation using fsarchiver. Copying the one file from my workstation to the Drobo took about 10 hours (8pm to 6am). That was with contention from a 40GB Time Machine backup that was running at the same time.
***end update***
Drobo Apps
Today I installed a few Drobo Apps (apache/droboutils/dropbear). DroboUtils is an easier way to manage Drobo Apps and as a prerequisite, it requires Apache to be installed. I used Apache for another function, setup of my personal website. I haven't cutover to using the apache web server as my main webserver yet because I need to tweak the apache config to hide some of the directory structures.
There is no telnet client for DroboApps, but DropBear is the SSH server for the Drobo. After installing, it was pretty cool to be able to logon to the device.
syslog entries
Sep 13 17:40:23 MAC sudo[57338]: root : TTY=unknown ; PWD=/ ; USER=newuser ; COMMAND=/sbin/mount_afp afp://user:pass@192.168.1.87/DroboApps /Volumes/DroboFS/0db102670141/1/DroboApps
Sep 13 17:40:24 MAC kernel[0]: AFP_VFS afpfs_mount: /Volumes/DroboFS/0db112312341/1/DroboApps, pid 57338
Sep 13 17:44:09 MAC /System/Library/CoreServices/backupd[57359]: Backup requested by user
Sep 13 17:44:09 MAC /System/Library/CoreServices/backupd[57359]: Starting standard backup
Sep 13 17:44:24 MAC kernel[0]: AFP_VFS afpfs_mount: /Volumes/MacTimeMachine, pid 57360
Sep 13 17:44:24 MAC /System/Library/CoreServices/backupd[57359]: Mounted network destination using URL: afp://user@Drobo.local/MacTimeMachine
Sep 13 17:44:24 MAC /System/Library/CoreServices/backupd[57359]: Backup destination mounted at path: /Volumes/MacTimeMachine
Sep 13 17:44:30 MAC /System/Library/CoreServices/backupd[57359]: Disk image /Volumes/MacTimeMachine/MAC_0017f2ca5f8b.sparsebundle mounted at: /Volumes/Backup of MAC
Sep 13 17:44:30 MAC /System/Library/CoreServices/backupd[57359]: Backing up to: /Volumes/Backup of MAC/Backups.backupdb
Summary
All-in-all, the process was super smooth and the device is everything I hoped for. With the ability to expand drive space at will, I shouldn't outgrow the FS very soon. I'm also looking forward to using more Drobo Apps and letting that be my server, instead of my XP VM on my Mac!
Long live Drobo!
Some Pics of the Process
drobo formatting my stack of drives

updating the firmware on the drobo

drobo temporarily loses its mind during firmware update

don't touch drobo while firmware is being updated!

drobo starting up after successful firmware update

drobo successfully updates its firmware

drobo dashboard download for update

time machine backup using drobo!

25MiBps (Mebibytes per second) network copy speed (with two backups to Drobo running..Time Machine and a backup of a 438GB archive)

Update 2010/08/14
Drobo shell commands
Found some good links on cross-compiling packages for the Drobo:
Ethtool specific links
Drobo Forums
Thursday, July 01, 2010
X server in cygwin
Start an X server locally
Install Cygwin
http://x.cygwin.com/docs/ug/setup.html
Identify X Displays
Start by identifying your X displays. Xrandr is good for this:
$ xrandr
Screen 0: minimum 2560 x 1024, current 2560 x 1024, maximum 2560 x 1024
default connected 2560x1024+0+0 0mm x 0mm
2560x1024 50.0*
For cygwin, start X:
$ startxwin &
[1] 3528
Make sure you have a DISPLAY environment variable set locally:
$ export DISPLAY=:0.0
To verify, echo it out:
$ echo $DISPLAY
:0.0
This is important because a properly working X server will export the DISPLAY environment variable to the remote server.
You can discover the process id of the X server by looking at the lock file:
$ ll /tmp/.X0-lock
-r--r--r-- 1 root root 11 Sep 13 11:26 /tmp/.X0-lock
$ cat /tmp/.X0-lock
5647
$ ps -ef | grep 5647
root 5647 5645 5 Sep13 tty7 1-00:16:30 /usr/bin/Xorg :0 -br -verbose -auth /var/run/gdm/auth-for-gdm-SWEiqo/database -nolisten tcp
X servers will listen on port 6000 by default:
$ netstat -na | grep LISTENING
TCP 0.0.0.0:6000 0.0.0.0:0 LISTENING
The first digit of the port will change based on the display number (0, 1, 2 etc). So the default port of 6000 may change to 6001 if you've started an X server on display 1:
$ startxwin -- :1
$ netstat -na | grep LISTENING
TCP 0.0.0.0:6001 0.0.0.0:0 LISTENING
Test by opening an xterm locally:
$ /usr/X11R6/bin xterm -display 127.0.0.1:0.0 -ls
Running remote X commands
Once I've verified that my X server is running properly, I will test running an X program remotely. In this example, I needed to kick off a script on my Mac that depends on X. My Macbook Pro (downstairs) is remote to my main Linux box which is upstairs. I needed to startup an X session on the remote Mac.
From my local Linux box, I start a secure X session on my remote Mac:
$ ssh -Y sodo@192.168.110.177
Password:
Warning: No xauth data; using fake authentication data for X11 forwarding.
Last login: Fri Sep 30 14:23:09 2011 from computer
Have a lot of fun...
sodo@remote:~>
This sets up a secure X windows communication, the DISPLAY environment variable, the X authentication and starts up the local X terminal application logged on to the remote server.
I verify that the Mac's X server has a DISPLAY environment variable set. This variable was properly forwarded by my Linux box and translated by the Mac:
sodo@remote:~> echo $DISPLAY
localhost:10.0
Once these settings were confirmed, I started an xterm
sodo@remote:~> xterm

Note that the above steps could have been accomplished with a one liner:
$ ssh -Y sodo@192.168.110.177 xterm
Cool.
Troubleshooting
1) I first got this error:
Warning: No xauth data; using fake authentication data for x11 forwarding
From this thread:
http://www.cygwin.com/ml/cygwin-xfree/2004-10/msg00236.html
I choose to ignore!
2) This is very important. The remote server's SSH daemon must be configured to forward X11 requests. From http://x.cygwin.com/docs/ug/using-remote-apps.html#using-remote-apps-ssh:
Note: By default, the OpenSSH server does not allow forwarded X connections. This must be configured on the remote host by adding X11Forwarding yes to the sshd_config configuration file. The OpenSSH server must be restarted or SIGHUP'ed to re-read the configuration file after it is changed.
Note: The OpenSSH server requires the xauth command to be available to forward X connections. Consequently, it must be installed on the remote host.
3) .Xauthority does not exist
$ ssh -X liveuser@192.168.x.x
liveuser@192.168.x.x's password:
Last login: Thu Oct 4 16:59:48 2012 from 192.168.x.y
/usr/bin/xauth: file /home/liveuser/.Xauthority does not exist
Well..create it then, fah Gawd's sake!
[liveuser@localhost ~]$ touch .Xauthority
[liveuser@localhost ~]$ chmod 755 .Xauthority
[liveuser@localhost ~]$ exit
logout
Connection to 192.168.x.x closed.
$ ssh -X liveuser@192.168.x.x
liveuser@192.168.x.x's password:
Last login: Thu Oct 4 17:02:13 2012 from 192.168.x.y
[liveuser@localhost ~]$ cat .Xauthority
localhost.localdomain10MIT-MAGIC-COOKIE-165??
About .Xauthority
http://en.wikipedia.org/wiki/X_Window_authorization#Cookie-based_access
ReferenceUsing Cygwin/X
Cygwin X FAQ
Using Cygwin/XUsing Cygwin/X
http://www.int.gu.edu.au/~anthony/info/X/Display.needs
Install Cygwin
http://x.cygwin.com/docs/ug/setup.html
Identify X Displays
Start by identifying your X displays. Xrandr is good for this:
$ xrandr
Screen 0: minimum 2560 x 1024, current 2560 x 1024, maximum 2560 x 1024
default connected 2560x1024+0+0 0mm x 0mm
2560x1024 50.0*
$ startxwin &
[1] 3528
Make sure you have a DISPLAY environment variable set locally:
$ export DISPLAY=:0.0
To verify, echo it out:
$ echo $DISPLAY
:0.0
This is important because a properly working X server will export the DISPLAY environment variable to the remote server.
$ ll /tmp/.X0-lock
-r--r--r-- 1 root root 11 Sep 13 11:26 /tmp/.X0-lock
$ cat /tmp/.X0-lock
5647
$ ps -ef | grep 5647
root 5647 5645 5 Sep13 tty7 1-00:16:30 /usr/bin/Xorg :0 -br -verbose -auth /var/run/gdm/auth-for-gdm-SWEiqo/database -nolisten tcp
X servers will listen on port 6000 by default:
$ netstat -na | grep LISTENING
TCP 0.0.0.0:6000 0.0.0.0:0 LISTENING
The first digit of the port will change based on the display number (0, 1, 2 etc). So the default port of 6000 may change to 6001 if you've started an X server on display 1:
$ startxwin -- :1
$ netstat -na | grep LISTENING
TCP 0.0.0.0:6001 0.0.0.0:0 LISTENING
Test by opening an xterm locally:
$ /usr/X11R6/bin xterm -display 127.0.0.1:0.0 -ls
Running remote X commands
Once I've verified that my X server is running properly, I will test running an X program remotely. In this example, I needed to kick off a script on my Mac that depends on X. My Macbook Pro (downstairs) is remote to my main Linux box which is upstairs. I needed to startup an X session on the remote Mac.
From my local Linux box, I start a secure X session on my remote Mac:
$ ssh -Y sodo@192.168.110.177
Password:
Warning: No xauth data; using fake authentication data for X11 forwarding.
Last login: Fri Sep 30 14:23:09 2011 from computer
Have a lot of fun...
sodo@remote:~>
This sets up a secure X windows communication, the DISPLAY environment variable, the X authentication and starts up the local X terminal application logged on to the remote server.
I verify that the Mac's X server has a DISPLAY environment variable set. This variable was properly forwarded by my Linux box and translated by the Mac:
sodo@remote:~> echo $DISPLAY
localhost:10.0
Once these settings were confirmed, I started an xterm
sodo@remote:~> xterm

Note that the above steps could have been accomplished with a one liner:
$ ssh -Y sodo@192.168.110.177 xterm
Cool.
Troubleshooting
1) I first got this error:
Warning: No xauth data; using fake authentication data for x11 forwarding
http://www.cygwin.com/ml/cygwin-xfree/2004-10/msg00236.html
I choose to ignore!
2) This is very important. The remote server's SSH daemon must be configured to forward X11 requests. From http://x.cygwin.com/docs/ug/using-remote-apps.html#using-remote-apps-ssh:
Note: By default, the OpenSSH server does not allow forwarded X connections. This must be configured on the remote host by adding X11Forwarding yes to the sshd_config configuration file. The OpenSSH server must be restarted or SIGHUP'ed to re-read the configuration file after it is changed.
Note: The OpenSSH server requires the xauth command to be available to forward X connections. Consequently, it must be installed on the remote host.
3) .Xauthority does not exist
$ ssh -X liveuser@192.168.x.x
liveuser@192.168.x.x's password:
Last login: Thu Oct 4 16:59:48 2012 from 192.168.x.y
/usr/bin/xauth: file /home/liveuser/.Xauthority does not exist
Well..create it then, fah Gawd's sake!
[liveuser@localhost ~]$ touch .Xauthority
[liveuser@localhost ~]$ chmod 755 .Xauthority
[liveuser@localhost ~]$ exit
logout
Connection to 192.168.x.x closed.
$ ssh -X liveuser@192.168.x.x
liveuser@192.168.x.x's password:
Last login: Thu Oct 4 17:02:13 2012 from 192.168.x.y
[liveuser@localhost ~]$ cat .Xauthority
localhost.localdomain10MIT-MAGIC-COOKIE-165??
About .Xauthority
http://en.wikipedia.org/wiki/X_Window_authorization#Cookie-based_access
ReferenceUsing Cygwin/X
Cygwin X FAQ
Using Cygwin/XUsing Cygwin/X
http://www.int.gu.edu.au/~anthony/info/X/Display.needs
Thursday, March 25, 2010
doing an end around RDP's connection limit
try something like this:
mstsc /console /v:[ip address or hostname] /admin /f
mstsc /console /v:[ip address or hostname] /admin /f
Wednesday, February 24, 2010
wake on lan redux
Just like my other wake on lan experience, I spent about eight hours debugging why wake on lan wouldn't work on my newly built Fedora 12 system. I went through a bunch of threads and learned something about sleep states in Linux. I also learned that ACPI has supplanted APM. ACPI is now being replaced by /sys interfaces to power states.
Problem
The network card port was getting disabled by Fedora 12 for wake on lan when the box was shutdown.
Observations
I noticed that the status of the network activity led on the network card went dark when I shut the machine down. This means that my network card was not active and listening for incoming WOL requests. If I removed the power cable and plugged the power cable back in, the traffic light blipped on a couple times. For some reason then, Linux was shutting off or disabling a WOL state for the network card when I would shutdown the machine.
Resolution
After much googling and testing, I found that the sleep state for my network card was disabled. My network card's identification was found in lspci output:
[sodo@computer ~]$ lspci -tv | grep 1c
+-1c.0-[01]----00.0 Broadcom Corporation NetXtreme BCM5751 Gigabit Ethernet PCI Express
[sodo@computer ~]$ acpitool -w
Device S-state Status Sysfs node
---------------------------------------
1. DWN1 S5 *disabled pci:0000:03:00.0
2. PE2X S5 *disabled pci:0000:02:00.3
3. PEX3 S5 *disabled pci:0000:00:03.0
4. SBEX S5 *disabled pci:0000:00:1c.0
5. COMP S5 *disabled pci:0000:00:1e.0
Seeing it as disabled, I could reenable it by using this command:
I finally resolved my WakeOnLan issue by creating a script to do three things:
1) remove my network card module
modprobe -r tg3
2) enabling sleep states
acpitool -W 1 (and also 2-5)
3) call "shutdown -h now"
The script is simple enough, though it is a bit of a pain to manually call it. I put an alias to "sd" in my .bashrc:
[sodo@computer ~]$ sudo cat /usr/sbin/sd
modprobe -r tg3
# sleep state for Broadcom card (#4 from acpitool output)
acpitool -W 4
/usr/sbin/shutdown -h now
A variation on the script for my new i7 box:
#!/bin/bash
sudo ethtool -s p5p1 wol g
for i in 1 2 3 4 5 6 7 8 9 10 11 12 13 14 15 16 17 18 19 20 21 22 23
do
sudo acpitool -W $i
done
sudo shutdown -h now
A second variation for my latest i9 box (note that I don't need to enable all sleep states, just the one for the card. Not sure why I thought I needed to enable all sleep states, I was probably just being lazy):
#!/bin/bash
# enable wak-on-lan
sudo ethtool -s enp10s0 wol g
# enable sleep state for Realtek card (#20 from acpitool output)
acpitool -W 20
/usr/sbin/shutdown -h now
Previous tries
try acpi=off (in grub.conf)
get this error: nvrm failed to register with acpi subsystem
try adding mem to /sys/power/state (in rc.local)
didn't work
try init=0 (each time you shutdown)
didn't work
now that edits are done to rc.local, try resetting card with Broadcom Diagnostic CD
didn't work
try just hitting power button
didn't work
Commands
ethtool eth0
ethtool -i eth0
ethtool -s eth0 wol d
ethtool -s eth0 wol g
WakeOnLan options description
wol pumbagsd...
Sets Wake-on-LAN options. Not all devices support this. The argument to this option is a string of
characters specifying which options to enable.
p Wake on phy activity
u Wake on unicast messages
m Wake on multicast messages
b Wake on broadcast messages
a Wake on ARP
g Wake on MagicPacket(tm)
s Enable SecureOn(tm) password for MagicPacket(tm)
d Disable (wake on nothing). This option clears all previous options.
acpitool -w
[root@ogre ~]$ cat /proc/acpi/sleep
S0 S4 S5
[root@ogre ~]$ cat /sys/power/state
disk
[root@ogre /]# acpitool -w
Device S-state Status Sysfs node
---------------------------------------
1. DWN1 S5 enabled pci:0000:03:00.0
2. PE2X S5 enabled pci:0000:02:00.3
3. PEX3 S5 enabled pci:0000:00:03.0
4. SBEX S5 enabled pci:0000:00:1c.0
5. COMP S5 enabled pci:0000:00:1e.0
[root@ogre ~]# cat /proc/acpi/wakeup
Device S-state Status Sysfs node
DWN1 S5 enabled pci:0000:03:00.0
PE2X S5 enabled pci:0000:02:00.3
PEX3 S5 enabled pci:0000:00:03.0
SBEX S5 enabled pci:0000:00:1c.0
COMP S5 enabled pci:0000:00:1e.0
[root@ogre ~]# sh -c "echo COMP > /proc/acpi/wakeup"
[root@ogre /]# lspci -tv
-[0000:00]-+-00.0 Intel Corporation 5000V Chipset Memory Controller Hub
+-02.0-[02-06]--+-00.0-[03-05]--+-00.0-[04]----00.0 3ware Inc 9650SE SATA-II RAID PCIe
\-01.0-[05]--
\-00.3-[06]--
+-03.0-[07]----00.0 nVidia Corporation GeForce 8800 GT
+-10.0 Intel Corporation 5000 Series Chipset FSB Registers
+-10.1 Intel Corporation 5000 Series Chipset FSB Registers
+-10.2 Intel Corporation 5000 Series Chipset FSB Registers
+-11.0 Intel Corporation 5000 Series Chipset Reserved Registers
+-13.0 Intel Corporation 5000 Series Chipset Reserved Registers
+-15.0 Intel Corporation 5000 Series Chipset FBD Registers
+-16.0 Intel Corporation 5000 Series Chipset FBD Registers
+-1c.0-[01]----00.0 Broadcom Corporation NetXtreme BCM5751 Gigabit Ethernet PCI Express
+-1d.0 Intel Corporation 631xESB/632xESB/3100 Chipset UHCI USB Controller #1
+-1d.1 Intel Corporation 631xESB/632xESB/3100 Chipset UHCI USB Controller #2
+-1d.2 Intel Corporation 631xESB/632xESB/3100 Chipset UHCI USB Controller #3
+-1d.3 Intel Corporation 631xESB/632xESB/3100 Chipset UHCI USB Controller #4
+-1d.7 Intel Corporation 631xESB/632xESB/3100 Chipset EHCI USB2 Controller
+-1e.0-[08]--
+-1f.0 Intel Corporation 631xESB/632xESB/3100 Chipset LPC Interface Controller
\-1f.1 Intel Corporation 631xESB/632xESB IDE Controller
[root@ogre ~]# lsmod grep tg
tg3 105476 0
[root@ogre ~]# modinfo tg3
filename: /lib/modules/2.6.31.12-174.2.22.fc12.x86_64/kernel/drivers/net/tg3.ko
firmware: tigon/tg3_tso5.bin
firmware: tigon/tg3_tso.bin
firmware: tigon/tg3.bin
version: 3.99
license: GPL
description: Broadcom Tigon3 ethernet driver
author: David S. Miller (davem@redhat.com) and Jeff Garzik (jgarzik@pobox.com)
srcversion: 5B5CB8F28F8498838A4DBA7
alias: pci:v0000106Bd00001645sv*sd*bc*sc*i*
alias: pci:v0000173Bd000003EAsv*sd*bc*sc*i*
alias: pci:v0000173Bd000003EBsv*sd*bc*sc*i*
alias: pci:v0000173Bd000003E9sv*sd*bc*sc*i*
alias: pci:v0000173Bd000003E8sv*sd*bc*sc*i*
alias: pci:v00001148d00004500sv*sd*bc*sc*i*
alias: pci:v00001148d00004400sv*sd*bc*sc*i*
alias: pci:v000014E4d0000168Csv*sd*bc*sc*i*
alias: pci:v000014E4d00001694sv*sd*bc*sc*i*
alias: pci:v000014E4d00001690sv*sd*bc*sc*i*
alias: pci:v000014E4d00001692sv*sd*bc*sc*i*
alias: pci:v000014E4d00001699sv*sd*bc*sc*i*
alias: pci:v000014E4d00001689sv*sd*bc*sc*i*
alias: pci:v000014E4d00001688sv*sd*bc*sc*i*
alias: pci:v000014E4d00001680sv*sd*bc*sc*i*
alias: pci:v000014E4d00001681sv*sd*bc*sc*i*
alias: pci:v000014E4d0000165Bsv*sd*bc*sc*i*
alias: pci:v000014E4d00001684sv*sd*bc*sc*i*
alias: pci:v000014E4d00001698sv*sd*bc*sc*i*
alias: pci:v000014E4d00001713sv*sd*bc*sc*i*
alias: pci:v000014E4d00001712sv*sd*bc*sc*i*
alias: pci:v000014E4d000016DDsv*sd*bc*sc*i*
alias: pci:v000014E4d0000166Bsv*sd*bc*sc*i*
alias: pci:v000014E4d0000166Asv*sd*bc*sc*i*
alias: pci:v000014E4d00001679sv*sd*bc*sc*i*
alias: pci:v000014E4d00001678sv*sd*bc*sc*i*
alias: pci:v000014E4d00001669sv*sd*bc*sc*i*
alias: pci:v000014E4d00001668sv*sd*bc*sc*i*
alias: pci:v000014E4d0000167Fsv*sd*bc*sc*i*
alias: pci:v000014E4d00001693sv*sd*bc*sc*i*
alias: pci:v000014E4d0000169Bsv*sd*bc*sc*i*
alias: pci:v000014E4d0000169Asv*sd*bc*sc*i*
alias: pci:v000014E4d00001674sv*sd*bc*sc*i*
alias: pci:v000014E4d00001673sv*sd*bc*sc*i*
alias: pci:v000014E4d0000167Bsv*sd*bc*sc*i*
alias: pci:v000014E4d00001672sv*sd*bc*sc*i*
alias: pci:v000014E4d0000167Asv*sd*bc*sc*i*
alias: pci:v000014E4d000016FEsv*sd*bc*sc*i*
alias: pci:v000014E4d000016FDsv*sd*bc*sc*i*
alias: pci:v000014E4d000016F7sv*sd*bc*sc*i*
alias: pci:v000014E4d00001601sv*sd*bc*sc*i*
alias: pci:v000014E4d00001600sv*sd*bc*sc*i*
alias: pci:v000014E4d0000167Esv*sd*bc*sc*i*
alias: pci:v000014E4d0000167Dsv*sd*bc*sc*i*
alias: pci:v000014E4d0000167Csv*sd*bc*sc*i*
alias: pci:v000014E4d00001677sv*sd*bc*sc*i*
alias: pci:v000014E4d00001676sv*sd*bc*sc*i*
alias: pci:v000014E4d0000165Asv*sd*bc*sc*i*
alias: pci:v000014E4d00001659sv*sd*bc*sc*i*
alias: pci:v000014E4d00001658sv*sd*bc*sc*i*
alias: pci:v000014E4d0000166Esv*sd*bc*sc*i*
alias: pci:v000014E4d00001649sv*sd*bc*sc*i*
alias: pci:v000014E4d0000170Esv*sd*bc*sc*i*
alias: pci:v000014E4d0000170Dsv*sd*bc*sc*i*
alias: pci:v000014E4d0000169Dsv*sd*bc*sc*i*
alias: pci:v000014E4d0000169Csv*sd*bc*sc*i*
alias: pci:v000014E4d00001696sv*sd*bc*sc*i*
alias: pci:v000014E4d000016C7sv*sd*bc*sc*i*
alias: pci:v000014E4d000016C6sv*sd*bc*sc*i*
alias: pci:v000014E4d000016A8sv*sd*bc*sc*i*
alias: pci:v000014E4d000016A7sv*sd*bc*sc*i*
alias: pci:v000014E4d000016A6sv*sd*bc*sc*i*
alias: pci:v000014E4d0000165Esv*sd*bc*sc*i*
alias: pci:v000014E4d0000165Dsv*sd*bc*sc*i*
alias: pci:v000014E4d00001654sv*sd*bc*sc*i*
alias: pci:v000014E4d00001653sv*sd*bc*sc*i*
alias: pci:v000014E4d0000164Dsv*sd*bc*sc*i*
alias: pci:v000014E4d00001648sv*sd*bc*sc*i*
alias: pci:v000014E4d00001647sv*sd*bc*sc*i*
alias: pci:v000014E4d00001646sv*sd*bc*sc*i*
alias: pci:v000014E4d00001645sv*sd*bc*sc*i*
alias: pci:v000014E4d00001644sv*sd*bc*sc*i*
depends:
vermagic: 2.6.31.12-174.2.22.fc12.x86_64 SMP mod_unload
parm: tg3_debug:Tigon3 bitmapped debugging message enable value (int)
References
HOWTO: Set your system up for Wake On LAN (WOL)
http://en.wikipedia.org/wiki/Advanced_Configuration_and_Power_Interface
http://acpi.sourceforge.net/documentation/sleep.html
http://ubuntuforums.org/showthread.php?t=1309820
http://forums.fedoraforum.org/archive/index.php/t-63763.html
http://www.gelato.unsw.edu.au/lxr/source/Documentation/power/tricks.txt
http://ubuntuforums.org/showthread.php?t=234588&page=3
http://ubuntuforums.org/showthread.php?t=814939&page=4
https://askubuntu.com/questions/654820/how-to-find-pci-address-of-an-ethernet-interface
http://ask.xmodulo.com/network-card-driver-name-version-linux.html
Fedora List of Kernel Parameters
NOTE: The full list of kernel options is in the file /usr/share/doc/kernel-doc-/Documentation/kernel-parameters.txt, which is installed with the kernel-doc package.
Problem
The network card port was getting disabled by Fedora 12 for wake on lan when the box was shutdown.
Observations
I noticed that the status of the network activity led on the network card went dark when I shut the machine down. This means that my network card was not active and listening for incoming WOL requests. If I removed the power cable and plugged the power cable back in, the traffic light blipped on a couple times. For some reason then, Linux was shutting off or disabling a WOL state for the network card when I would shutdown the machine.
Resolution
After much googling and testing, I found that the sleep state for my network card was disabled. My network card's identification was found in lspci output:
[sodo@computer ~]$ lspci -tv | grep 1c
+-1c.0-[01]----00.0 Broadcom Corporation NetXtreme BCM5751 Gigabit Ethernet PCI Express
I then correlated the pci card info to acpitool output. I found my card (1c) in the output below at #4:
[sodo@computer ~]$ acpitool -w
Device S-state Status Sysfs node
---------------------------------------
1. DWN1 S5 *disabled pci:0000:03:00.0
2. PE2X S5 *disabled pci:0000:02:00.3
3. PEX3 S5 *disabled pci:0000:00:03.0
4. SBEX S5 *disabled pci:0000:00:1c.0
5. COMP S5 *disabled pci:0000:00:1e.0
Seeing it as disabled, I could reenable it by using this command:
[sodo@computer ~]$ acpitool -W 4
Device S-state Status Sysfs node
---------------------------------------
1. DWN1 S5 *disabled pci:0000:03:00.0
2. PE2X S5 *disabled pci:0000:02:00.3
3. PEX3 S5 *disabled pci:0000:00:03.0
4. SBEX S5 *enabled pci:0000:00:1c.0
5. COMP S5 *disabled pci:0000:00:1e.0
Device S-state Status Sysfs node
---------------------------------------
1. DWN1 S5 *disabled pci:0000:03:00.0
2. PE2X S5 *disabled pci:0000:02:00.3
3. PEX3 S5 *disabled pci:0000:00:03.0
4. SBEX S5 *enabled pci:0000:00:1c.0
5. COMP S5 *disabled pci:0000:00:1e.0
I finally resolved my WakeOnLan issue by creating a script to do three things:
1) remove my network card module
modprobe -r tg3
2) enabling sleep states
acpitool -W 1 (and also 2-5)
3) call "shutdown -h now"
The script is simple enough, though it is a bit of a pain to manually call it. I put an alias to "sd" in my .bashrc:
[sodo@computer ~]$ sudo cat /usr/sbin/sd
modprobe -r tg3
# sleep state for Broadcom card (#4 from acpitool output)
acpitool -W 4
/usr/sbin/shutdown -h now
A variation on the script for my new i7 box:
#!/bin/bash
sudo ethtool -s p5p1 wol g
for i in 1 2 3 4 5 6 7 8 9 10 11 12 13 14 15 16 17 18 19 20 21 22 23
do
sudo acpitool -W $i
done
sudo shutdown -h now
A second variation for my latest i9 box (note that I don't need to enable all sleep states, just the one for the card. Not sure why I thought I needed to enable all sleep states, I was probably just being lazy):
#!/bin/bash
# enable wak-on-lan
sudo ethtool -s enp10s0 wol g
# enable sleep state for Realtek card (#20 from acpitool output)
acpitool -W 20
/usr/sbin/shutdown -h now
Previous tries
try acpi=off (in grub.conf)
get this error: nvrm failed to register with acpi subsystem
try adding mem to /sys/power/state (in rc.local)
didn't work
try init=0 (each time you shutdown)
didn't work
now that edits are done to rc.local, try resetting card with Broadcom Diagnostic CD
didn't work
try just hitting power button
didn't work
Commands
ethtool eth0
ethtool -i eth0
ethtool -s eth0 wol d
ethtool -s eth0 wol g
WakeOnLan options description
wol pumbagsd...
Sets Wake-on-LAN options. Not all devices support this. The argument to this option is a string of
characters specifying which options to enable.
p Wake on phy activity
u Wake on unicast messages
m Wake on multicast messages
b Wake on broadcast messages
a Wake on ARP
g Wake on MagicPacket(tm)
s Enable SecureOn(tm) password for MagicPacket(tm)
d Disable (wake on nothing). This option clears all previous options.
acpitool -w
[root@ogre ~]$ cat /proc/acpi/sleep
S0 S4 S5
[root@ogre ~]$ cat /sys/power/state
disk
[root@ogre /]# acpitool -w
Device S-state Status Sysfs node
---------------------------------------
1. DWN1 S5 enabled pci:0000:03:00.0
2. PE2X S5 enabled pci:0000:02:00.3
3. PEX3 S5 enabled pci:0000:00:03.0
4. SBEX S5 enabled pci:0000:00:1c.0
5. COMP S5 enabled pci:0000:00:1e.0
[root@ogre ~]# cat /proc/acpi/wakeup
Device S-state Status Sysfs node
DWN1 S5 enabled pci:0000:03:00.0
PE2X S5 enabled pci:0000:02:00.3
PEX3 S5 enabled pci:0000:00:03.0
SBEX S5 enabled pci:0000:00:1c.0
COMP S5 enabled pci:0000:00:1e.0
[root@ogre ~]# sh -c "echo COMP > /proc/acpi/wakeup"
[root@ogre /]# lspci -tv
-[0000:00]-+-00.0 Intel Corporation 5000V Chipset Memory Controller Hub
+-02.0-[02-06]--+-00.0-[03-05]--+-00.0-[04]----00.0 3ware Inc 9650SE SATA-II RAID PCIe
\-01.0-[05]--
\-00.3-[06]--
+-03.0-[07]----00.0 nVidia Corporation GeForce 8800 GT
+-10.0 Intel Corporation 5000 Series Chipset FSB Registers
+-10.1 Intel Corporation 5000 Series Chipset FSB Registers
+-10.2 Intel Corporation 5000 Series Chipset FSB Registers
+-11.0 Intel Corporation 5000 Series Chipset Reserved Registers
+-13.0 Intel Corporation 5000 Series Chipset Reserved Registers
+-15.0 Intel Corporation 5000 Series Chipset FBD Registers
+-16.0 Intel Corporation 5000 Series Chipset FBD Registers
+-1c.0-[01]----00.0 Broadcom Corporation NetXtreme BCM5751 Gigabit Ethernet PCI Express
+-1d.0 Intel Corporation 631xESB/632xESB/3100 Chipset UHCI USB Controller #1
+-1d.1 Intel Corporation 631xESB/632xESB/3100 Chipset UHCI USB Controller #2
+-1d.2 Intel Corporation 631xESB/632xESB/3100 Chipset UHCI USB Controller #3
+-1d.3 Intel Corporation 631xESB/632xESB/3100 Chipset UHCI USB Controller #4
+-1d.7 Intel Corporation 631xESB/632xESB/3100 Chipset EHCI USB2 Controller
+-1e.0-[08]--
+-1f.0 Intel Corporation 631xESB/632xESB/3100 Chipset LPC Interface Controller
\-1f.1 Intel Corporation 631xESB/632xESB IDE Controller
[root@ogre ~]# lsmod grep tg
tg3 105476 0
[root@ogre ~]# modinfo tg3
filename: /lib/modules/2.6.31.12-174.2.22.fc12.x86_64/kernel/drivers/net/tg3.ko
firmware: tigon/tg3_tso5.bin
firmware: tigon/tg3_tso.bin
firmware: tigon/tg3.bin
version: 3.99
license: GPL
description: Broadcom Tigon3 ethernet driver
author: David S. Miller (davem@redhat.com) and Jeff Garzik (jgarzik@pobox.com)
srcversion: 5B5CB8F28F8498838A4DBA7
alias: pci:v0000106Bd00001645sv*sd*bc*sc*i*
alias: pci:v0000173Bd000003EAsv*sd*bc*sc*i*
alias: pci:v0000173Bd000003EBsv*sd*bc*sc*i*
alias: pci:v0000173Bd000003E9sv*sd*bc*sc*i*
alias: pci:v0000173Bd000003E8sv*sd*bc*sc*i*
alias: pci:v00001148d00004500sv*sd*bc*sc*i*
alias: pci:v00001148d00004400sv*sd*bc*sc*i*
alias: pci:v000014E4d0000168Csv*sd*bc*sc*i*
alias: pci:v000014E4d00001694sv*sd*bc*sc*i*
alias: pci:v000014E4d00001690sv*sd*bc*sc*i*
alias: pci:v000014E4d00001692sv*sd*bc*sc*i*
alias: pci:v000014E4d00001699sv*sd*bc*sc*i*
alias: pci:v000014E4d00001689sv*sd*bc*sc*i*
alias: pci:v000014E4d00001688sv*sd*bc*sc*i*
alias: pci:v000014E4d00001680sv*sd*bc*sc*i*
alias: pci:v000014E4d00001681sv*sd*bc*sc*i*
alias: pci:v000014E4d0000165Bsv*sd*bc*sc*i*
alias: pci:v000014E4d00001684sv*sd*bc*sc*i*
alias: pci:v000014E4d00001698sv*sd*bc*sc*i*
alias: pci:v000014E4d00001713sv*sd*bc*sc*i*
alias: pci:v000014E4d00001712sv*sd*bc*sc*i*
alias: pci:v000014E4d000016DDsv*sd*bc*sc*i*
alias: pci:v000014E4d0000166Bsv*sd*bc*sc*i*
alias: pci:v000014E4d0000166Asv*sd*bc*sc*i*
alias: pci:v000014E4d00001679sv*sd*bc*sc*i*
alias: pci:v000014E4d00001678sv*sd*bc*sc*i*
alias: pci:v000014E4d00001669sv*sd*bc*sc*i*
alias: pci:v000014E4d00001668sv*sd*bc*sc*i*
alias: pci:v000014E4d0000167Fsv*sd*bc*sc*i*
alias: pci:v000014E4d00001693sv*sd*bc*sc*i*
alias: pci:v000014E4d0000169Bsv*sd*bc*sc*i*
alias: pci:v000014E4d0000169Asv*sd*bc*sc*i*
alias: pci:v000014E4d00001674sv*sd*bc*sc*i*
alias: pci:v000014E4d00001673sv*sd*bc*sc*i*
alias: pci:v000014E4d0000167Bsv*sd*bc*sc*i*
alias: pci:v000014E4d00001672sv*sd*bc*sc*i*
alias: pci:v000014E4d0000167Asv*sd*bc*sc*i*
alias: pci:v000014E4d000016FEsv*sd*bc*sc*i*
alias: pci:v000014E4d000016FDsv*sd*bc*sc*i*
alias: pci:v000014E4d000016F7sv*sd*bc*sc*i*
alias: pci:v000014E4d00001601sv*sd*bc*sc*i*
alias: pci:v000014E4d00001600sv*sd*bc*sc*i*
alias: pci:v000014E4d0000167Esv*sd*bc*sc*i*
alias: pci:v000014E4d0000167Dsv*sd*bc*sc*i*
alias: pci:v000014E4d0000167Csv*sd*bc*sc*i*
alias: pci:v000014E4d00001677sv*sd*bc*sc*i*
alias: pci:v000014E4d00001676sv*sd*bc*sc*i*
alias: pci:v000014E4d0000165Asv*sd*bc*sc*i*
alias: pci:v000014E4d00001659sv*sd*bc*sc*i*
alias: pci:v000014E4d00001658sv*sd*bc*sc*i*
alias: pci:v000014E4d0000166Esv*sd*bc*sc*i*
alias: pci:v000014E4d00001649sv*sd*bc*sc*i*
alias: pci:v000014E4d0000170Esv*sd*bc*sc*i*
alias: pci:v000014E4d0000170Dsv*sd*bc*sc*i*
alias: pci:v000014E4d0000169Dsv*sd*bc*sc*i*
alias: pci:v000014E4d0000169Csv*sd*bc*sc*i*
alias: pci:v000014E4d00001696sv*sd*bc*sc*i*
alias: pci:v000014E4d000016C7sv*sd*bc*sc*i*
alias: pci:v000014E4d000016C6sv*sd*bc*sc*i*
alias: pci:v000014E4d000016A8sv*sd*bc*sc*i*
alias: pci:v000014E4d000016A7sv*sd*bc*sc*i*
alias: pci:v000014E4d000016A6sv*sd*bc*sc*i*
alias: pci:v000014E4d0000165Esv*sd*bc*sc*i*
alias: pci:v000014E4d0000165Dsv*sd*bc*sc*i*
alias: pci:v000014E4d00001654sv*sd*bc*sc*i*
alias: pci:v000014E4d00001653sv*sd*bc*sc*i*
alias: pci:v000014E4d0000164Dsv*sd*bc*sc*i*
alias: pci:v000014E4d00001648sv*sd*bc*sc*i*
alias: pci:v000014E4d00001647sv*sd*bc*sc*i*
alias: pci:v000014E4d00001646sv*sd*bc*sc*i*
alias: pci:v000014E4d00001645sv*sd*bc*sc*i*
alias: pci:v000014E4d00001644sv*sd*bc*sc*i*
depends:
vermagic: 2.6.31.12-174.2.22.fc12.x86_64 SMP mod_unload
parm: tg3_debug:Tigon3 bitmapped debugging message enable value (int)
References
HOWTO: Set your system up for Wake On LAN (WOL)
http://en.wikipedia.org/wiki/Advanced_Configuration_and_Power_Interface
http://acpi.sourceforge.net/documentation/sleep.html
http://ubuntuforums.org/showthread.php?t=1309820
http://forums.fedoraforum.org/archive/index.php/t-63763.html
http://www.gelato.unsw.edu.au/lxr/source/Documentation/power/tricks.txt
http://ubuntuforums.org/showthread.php?t=234588&page=3
http://ubuntuforums.org/showthread.php?t=814939&page=4
https://askubuntu.com/questions/654820/how-to-find-pci-address-of-an-ethernet-interface
http://ask.xmodulo.com/network-card-driver-name-version-linux.html
Fedora List of Kernel Parameters
NOTE: The full list of kernel options is in the file /usr/share/doc/kernel-doc-
Tuesday, February 23, 2010
how to determine sid of a user
Nice VB script here from Daniel Petri:
http://www.petri.co.il/forums/showthread.php?t=21332
reprinted here for convenience
OUTPUT
C:\WINDOWS>user.vbs
Microsoft (R) Windows Script Host Version 5.7
Copyright (C) Microsoft Corporation. All rights reserved.
HKU-path for DOMAIN\sodo
HKEY_USERS\S-1-5-11-7177352686-8047241297-547765659-67771
http://www.petri.co.il/forums/showthread.php?t=21332
reprinted here for convenience
' www.petri.co.il/forums/showthread.php?p=61469#post61469

Const HKEY_USERS = &H80000003


strComputer = "."  '<-- name of remote computer

Set objWMIService = GetObject( _
  "winmgmts:{impersonationLevel=impersonate}!\\" _
  & strComputer & "\root\cimv2")

Set Users = objWMIService.InstancesOf ("Win32_ComputerSystem")

 for each User in Users
   logonname = User.UserName
   strUsr    = Split(logonname,"\")(1)
   strDomain = Split(logonname,"\")(0)
   exit For
 next

set colAccounts = objWMIService.ExecQuery _
       ("select * From Win32_UserAccount where " _
       & "name = '" & strUsr & "' AND domain = '" & strDomain & "'")

 For each objAccount in colAccounts
   strSID = objAccount.SID
   exit For
 Next


wsh.echo "HKU-path for", logonname, vbNewLine & "HKEY_USERS\" & strSID & "\..."
OUTPUT
C:\WINDOWS>user.vbs
Microsoft (R) Windows Script Host Version 5.7
Copyright (C) Microsoft Corporation. All rights reserved.
HKU-path for DOMAIN\sodo
HKEY_USERS\S-1-5-11-7177352686-8047241297-547765659-67771
Saturday, February 13, 2010
Fedora 12, x86-64 first impressions
I recently installed Fedora 12, x86-64 on my Dell SC1430. I will say that the new ext4 filesystem is fast, fast. And the kernel loads in about 30 seconds for me:
bootchart.jpg
However, Fedora's latest disappoints with a bunch of minor, yet completely annoying bugs. It's kind of like the Chinese "Death of One Thousand Cuts."
CUT 1
CTRL-ALT-BACKSPACE no longer works
This convenient method of restarting X was disabled for the fat-fingering newbie. Maybe Fedora should have a multicolored penguin (a Mac-Linux hybrid) as its' logo from now on?

At least it was easily solved.
CUT 2
Virtual consoles don't work
You know..the CTRL-ALT-F[1-6] keys. Maybe this one is related to my NVidia card. Still, I'm using the nouveau driver, not the NVidia driver. Don't know why this should have broken.
CUT 3
Nautilus browser doesn't load
I found this error in xsession-errors:
LoadPlugin: failed to initialize shared library ./mozilla/plugins/nppdf.so [./mozilla/plugins/nppdf.so: wrong ELF class: ELFCLASS32]
Turns out, the install of Adobe Reader (32-bit) caused this error, which in turn, stopped Nautilus from loading. Yanking out the Reader resolved the issue. Maybe this isn't the fault of Fedora, but the Adobe RPMs. Still burned about three hours tracking this one down.
CUT 4
Window positions in workspaces not saved
I guess we can blame GNOME here for this annoyance. Devilspie is an interesting workaround, but GNOME should just do the right thing the first time. Currently, it doesn't. Here's another link re:devilspie.
CUT 5
Wake on Lan is now broken
Perhaps this is related to my new 3ware 9650SE RAID card. It was working fine before. I've gone through the Broadcom diagnostics bootable CD (b57udiag.exe) which fixed it the last time. No go this time. And ethtool reports wake on lan should be good to go and the BIOS is enabled for WOL:
[sodo@ogre fedora12]$ sudo ethtool eth0
Settings for eth0:
Supported ports: [ TP ]
Supported link modes: 10baseT/Half 10baseT/Full
100baseT/Half 100baseT/Full
1000baseT/Half 1000baseT/Full
Supports auto-negotiation: Yes
Advertised link modes: 10baseT/Half 10baseT/Full
100baseT/Half 100baseT/Full
1000baseT/Half 1000baseT/Full
Advertised auto-negotiation: Yes
Speed: 1000Mb/s
Duplex: Full
Port: Twisted Pair
PHYAD: 1
Transceiver: internal
Auto-negotiation: on
Supports Wake-on: g
Wake-on: g
Current message level: 0x000000ff (255)
Link detected: yes
So I don't know whussup here.
Update 2/24/2010
I spent about eight hours debugging why wake on lan wouldn't work on my newly built system. When through a million threads, learned something about sleep states in Linux..finally got it by putting a line in the Linux halt script (called by "shutdown -h now" to remove the kernel module for the ethernet driver. Self-evident, right? NOT! What the F?
full story here
*** end update ***
CUT 6
GRUB takes 3.5 minutes to boot!
Man, this one is a bugger. Grub loads and then the system hangs for 3.5 minutes until kernel starts up. Probably related to the new GPT partitioning that I'm using on the new 4.5TB RAID5 set. Drag having to wait that long for boot. I've got a few leads on the issue, nothing solved yet.
Update 2/28/2010
Looks like I was barking up the wrong tree with my assumption that it was Grub and GPT causing my long boot times. It seems to be an interaction with the two PCI Express cards that I have in the box: the NVidia 8800GT and the 3Ware 9650SE card. Once I removed the 8800GT, the box booted up in about 40 seconds. Of course, I can't put the 8800GT in the lower slow because it is does not fit with the 8x-16x PCIe adapter. Now I have to figure out what the heck is going on..
*** end update ***
Update 3/2/2010
So whaddya do when you have a sticky problem? YOU DREMEL THE F*CKER!

I must say I did a much nicer job dremeling the lower slot (the one on the right in the picture) this time.
Now the box boots in 40 seconds instead of 4 minutes..wahoo!
*** end update ***
CUT 7
Preferences -> Windows control has been removed by default
Another irritation. I like my Windows to come to the foreground by simply mousing over them. The Windows Preference control is not installed by default. So, you'll need to install control-center-extra to return the ability to tweak your window focus settings. Argh.
CUT 8
No Xorg.conf file
The Fedora 12 Deployment Guide makes no mention of the possibility of having no xorg.conf file after a new install:
http://docs.fedoraproject.org/deployment-guide/f12/en-US/html/s1-x-server-configuration.html
But it is mentioned in the list of Fedora 12 bugs.
CUT 9
Disabling the nouveau video driver in favor of the NVidia proprietary driver is a pain
Related to #8. If you'd rather use NVidia's driver instead of the open source nouveau video driver, this can cause some pain too. Here's info on that process. The x86-64 NVidia install per those instructions may break with the following error in Xorg.0.log:
(II) Loading /usr/lib64/xorg/modules/extensions/nvidia/libglx.so
dlopen: libGLcore.so.1: cannot open shared object file: No such file or directory
(EE) Failed to load /usr/lib64/xorg/modules/extensions/nvidia/libglx.so
(II) UnloadModule: "glx"
(EE) Failed to load module "glx" (loader failed, 7)
This is due to the installer either installing the NVidia 32-bit libraries first, or just not working properly. So the fix is to install the 64-bit libraries first and then the 32-bit ones second, as per my post on FedoraForum.org:
http://forums.fedoraforum.org/showpost.php?p=1332653&postcount=961
Related, here's info on video modes you can select upon boot using a kernel switch. More importantly, how the nouveau driver gets loaded in the kernel here and in the context of Mandriva, here (via initrd).
I was interested in disabling the nouveau driver altogether, just in case it fixed issue #2 above, so I:
1) added nouveau to /etc/modprobe.d/blacklist.conf
2) rebuilt my mkinitrd file (had to "yum install mkinitrd" on F12)
mkinitrd -v -f /root/initrd-`uname -r`.img `uname -r`
3) added a new entry in my grub.conf pointing to that mkinitrd, no longer using an initial ram filesystem:
title Fedora (2.6.31.12-174.2.3.fc12.x86_64)
root (hd0,0)
kernel /vmlinuz-2.6.31.12-174.2.3.fc12.x86_64 ro root=/dev/mapper/vg_ogre-lv_root scsi_mod.scan=sync
initrd /initramfs-2.6.31.12-174.2.3.fc12.x86_64.img
but using old school initrd file:
title Fedora (2.6.31.12-174.2.3.fc12.x86_64_minusNouveau)
root (hd0,0)
kernel /vmlinuz-2.6.31.12-174.2.3.fc12.x86_64 ro root=/dev/mapper/vg_ogre-lv_root scsi_mod.scan=sync
initrd /initrd-2.6.31.12-174.2.3.fc12.x86_64.img
Sankaran Raman provides an alternate method of disabling the nouveau driver by creating and editing an xorg.conf file.
CUT 10
Mplayer keeps resetting volume to maximum
This one is not good for my ears or my speakers. Thankfully, there is an easy fix:
http://www.linuxquestions.org/questions/linux-software-2/mplayer-keeps-resetting-volume-to-max-773269/
CUT 11
AAC audio encoding not included in ffmpeg non-free distro
Now, this isn't a cut on Fedora. Rightly so, RPM Fusion doesn't package FAAC support as it is a proprietary codec. So you'll get errors in FFMPEG like "unsupported audio codec: libfaac" if you try to convert an audio or video file to AAC audio format. Ugh. Here is a solution to this problem:
http://fozzolog.fozzilinymoo.org/tech/2009/11/recompiling-ffmpeg-for-fedora-12-to-add-faac-support.html
CUT 12
lose control of left mouse button
The left mouse button stops functioning. This is an incredible pain in the a$$. From a link I found I Google (of course), under Keyboard Preferences -> Mouse Keys, I disabled "Pointer can be controlled using the keypad". This seems to have resolved the issue. Yarg!!
Pardon my evident frustration on these issues folks, but I'm spending too much time on install problems and not enough time creating. It's brutal just trying to get work done. I'm not leaving Fedora, but everytime I upgrade, this is what happens.
I'll keep you abreast of the various remaining situations..
TAG
Subscribe to:
Posts (Atom)