I've had my MacBook Pro 2.33Ghz Intel Core 2 Duo for over six months now and thought I'd give a quick review and impressions. Disclaimer: This review will be from the standpoint of a guy who uses the box mainly to connect to his corporate network, surf the web and do some occasional live video importing using iMovie HD.
Stability
It is pretty bulletproof and does not hang, until you start playing with HDV. Then things slow down or in some very rare situations, have hung the box. Thus, a restart is necessary.
Networking
Wi-Fi and hardwired ethernet setup are a breeze. At home, WiFi performance to my NetGear WGT624 is excellent and works from the first floor in my loft, through metal studded walls up to the router which is upstairs in the loft roughly twenty feet away. I have had no trouble connecting to WiFi networks in hotels or conference centers.
Connectivity
In order to logon to other boxes at my home and corp networks, I run Microshaft Terminal Services and Chicken of the VNC. This is our peak season at work, so when I am home, I will log in over Cisco VPN to my workstation at work via MS RDP and keep the connection up as long as possible. Cisco VPN has been connected for as long as fourteen days with no downtime. Microsoft RDP occasionally hangs and I will have to restart the box. Figures..the times I have had to restart a Mac is because of a Microsoft product. Finally, built in BSD Unix gives you all the Unix tools plus ssh/scp for other connectivity options.
OS Alternatives
I don't run Boot Camp; instead, I run VMware Fusion (VMware's answer to Parallels) and have XP and Fedora running in virtual machines on the MacBook. Parallels works for some people; however, I encountered problems with a kernel panic when I installed Fedora. Since we use VMware at work, I just opted to use VMware Fusion.
XP and Fedora performance in Fusion is good, but not great for things like editing video. However, at least you have the capability of running an alternate OS without fear of the virtual PC going down. VMware allows you to assign one or more processors to a VM, so that is an additional performance boost.
I know folks who do run Boot Camp without issue if you want to go down that route.
Applications
I haven't used the Mac apps other than Safari/TextEdit/Preview/IMovie HD/iTunes. But those programs seem really intuitive. Kudos to Jobs for enforcing ease of use. On certain websites. there is squirrely-ness with Safari and some form fields. I suspect this is due to those sites' coders not doing a good job of testing. For those websites, I run Firefox and that usually will get around these problems.
Battery Life
Multimedia will suck the juice out of this thing. I probably get only 1 1/2 to 2 hours of battery life if I am viewing YouTube or watching a DVD. However, if I use non-multimedia apps, I get quite a bit more usable batt time. For instance, I was able to use Microsoft Word on a plane for about 4.5 hours straight before the box died.
All in all, I am a man for all seasons: PC for noodling about or raw firepower and the Mac for "it just works"
sodo
Thursday, December 13, 2007
Monday, December 10, 2007
Google Gmail shortcut keys
In Settings, enable keyboard shortcuts.
j (move to older thread; aka. Conversation)
k (move to newer thread)
o (open thread)
With thread open:
n (next email in thread)
p (previous email)
o (open/expand email (or collapse it if it currently expanded))
u (return to list view)
y (if reading Inbox, archive thread; ie. remove from Inbox)
s (star or un-star message/thread)
# (delete; ie, send to Trash)
x (select thread -- useful in thread list view, in conjunction with j & k shortcuts)
? (Help; ie. show list of keyboard shortcuts)
Link to full list of shortcuts:
http://mail.google.com/support/bin/answer.py?hl=en&ctx=mail&answer=6594
Thanks to BT for the reminder!
Tuesday, November 27, 2007
"out of memory" messages while opening windows in XP
I'd been plagued with this annoyance for a couple years, but never bothered to research it until today. Here's a nice solution, compliments of Kevin Dente:
http://weblogs.asp.net/kdente/archive/2004/06/04/148145.aspx
Update 2007/11/28
Woops..link now works!
Thanks Kevin!
'sodo
http://weblogs.asp.net/kdente/archive/2004/06/04/148145.aspx
Update 2007/11/28
Woops..link now works!
Thanks Kevin!
'sodo
Monday, November 05, 2007
determining the version of the Javascript (JScript) engine
Here's a quick way to determine the version of Javascript running on your computer:
http://www.java2s.com/Tutorial/JavaScript/0600__MS-JScript/JScriptsElementsforDeterminingScriptingEngineVersionInformationIE.htm
http://www.java2s.com/Tutorial/JavaScript/0600__MS-JScript/JScriptsElementsforDeterminingScriptingEngineVersionInformationIE.htm
Monday, October 22, 2007
command line to send test email via SMTP
Because I always forget this, here is the command line syntax for sending a test email through an SMTP mail server. Commands to enter at a prompt are in RED.
telnet mail.whateverdomain.com 25
Connected to whateverdomain.com.
Escape character is '^]'.
220-whateverdomain.com Smail-3.2.0.101 (#2 1998-Jul-16) ready at Mon, 27 Nov 2000 13: 34:55 -0600 (EST)
HELO yourmachine.yourdomain.com
250 yourdomain.com Hello yourmachine.yourdomain.com (yourdomain.com from address 64.214.123.23).
MAIL FROM:foo@yourdomain.com
250 foo@yourdomain.com ... Sender Okay
RCPT TO:joe_user@yahoo.com
250 'joe_user@yahoo.com' Recipient Okay.
DATA
354 Enter mail, end with "." on a line by itself
From: Meredith Foo
To: Joe
CC: foo@yourdomain.com
BCC: bar@yourdomain.com
Subject: Test Message
This is only a test.
.
250 Mail accepted
QUIT
221 whateverdomain.com closing connection
Don't forget that if your telnet session is hanging, the key combination of CTRL-] will exit you to the command prompt of telnet (Windows) or the shell prompt (Unix). If you're in Windows, simply type "quit" at the telnet command prompt in order to exit.
Expanding upon this simple test email, I've written some instructions on how to automate emails via shell script that some of you might find useful:
/2007/08/attaching-binary-file-to-command-line.html
cheers,
sodo
Thursday, October 04, 2007
Google Analytics - understanding the Advanced Filter
As our web presence is a typical eCommerce site, we tag our pages with Google Analytics javascript tag to save all of our web traffic information. Google Analytics is great software that is free, as long as your traffic is less than five million pageviews per month. So first, a big Thank You to Google! That disclaimer in place, I will have to say that some of the documentation regarding the advanced features of Analytics is not the greatest. Case in point: Advanced Filters.
Filters
With Filters, you can perform data transformations on the information that Analytics gathers. You can use filters to do a number of things:
* exclude or include data matching certain criterion
* do lowercase or uppercase transformations of data
* search and replace data matching expressions
* do table lookups to transform lists of meaningless codes to something that actually might mean something to a human being
More detail about filters is available here on Google's site. Also, here is detail on how to create a basic filter.
Advanced Filter
An Advanced Filter does a little something different than a normal filter. For instance, using an Advanced Filter, you can match a generic text string and write that data to an empty, user defined field. For instance, if I want to find the value of a specific query parameter in a URL, I can use an Advanced Filter to pull the values from each URL and store them in a separate data field.
Real World Example
Our product search page allows users to enter in a keyword phrase to search on. After the customer submits the form, a list of matching products will be returned. The FORM element of the web page uses a GET request that is made from the browser to the server for the list of matching products. When the GET request is made, the query parameter in the URL is exposed in the Address bar of the browser:
http://ecommercewebsite/search.asp?SSTR=radio&go=1
Therefore, the SSTR parameter in our product search page determines the keyword search that is performed. One of the excellent reports GA gives you is the Top Content report. However, looking at the Top Content report for our search page, we see that a lot of data repeats and it is not easy to pick out the product that the customer wanted to find:

Defining the Advanced Filter
In this case, I want to pluck out only the value of the SSTR parameter and store it in another field. To do this, I will use an Advanced Filter. This filter will have an input value (the URL of the customer request), a match criterion (the value of SSTR) and a place to store the output (an empty column named User Defined in the Visitors report).
Creating the Advanced Filter
Here are the steps we need to perform in Google Analytics to create our Advanced Filter:
1 - Click on "Analytics Settings" in the upper-left of GA.
2 - Click on "Filter Manager"
3 - Click "Add Filter"
4 - In Filter type, select "Custom Filter" and choose "Advanced" from the selection of radio buttons.
5 - Since we need to select the URL of the customer request, select the Request URI as the input field. This input field is listed as Field A.
6 - We will need to define a regular expression as the match criterion. Here is a quick tutorial on using regular expressions. In this case, the verbal description of our match criterion is "pull the words after the "SSTR=" and before the first ampersand, the "&" character. So our match criterion, transformed into a regular expression, becomes this:
.*&SSTR=(.*)&go.*
As noted in the tutorial, the parentheses capture one or more parts of the input field. The text between the parentheses is captured and can then be referenced and stored. We reference the value captured between the parentheses in Field A later by using the shorthand $A1. $A1 translates to "what was in the first set of parentheses in Field A".
7 - Select "User Defined" as the Output Field.
8 - Since we want the values captured between the parentheses, our Constructor will be $A1.
9 - Select a value for "Yes" for "Override Output Field"
Here is how our Advanced Filter should look:
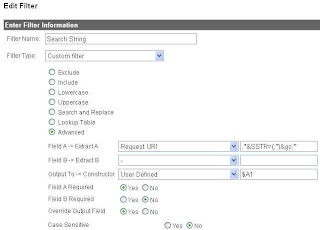
10 - To make the filter active for your specific website, from the "Available Website Profiles", add your website to the "Selected Website Profiles"
11 - Save the filter by clicking Finish
After Google has caught up(probably four to five hours from now), check the data by going back to View Reports -> Visitors -> User Defined report:

Eh Voila! Our report is there! I hope you enjoyed this discussion of Google Analytics Advanced Filtering and it will help you make new, easy-to-read reports for you and your team.
'sodo
Thursday, September 27, 2007
setting up the Dell SC1430
Ah! I'm very excited! Got the new 1.6Ghz Quad-Core, dual Xeon CPU Dell SC1430 a couple of days ago!
Specifications
http://www.dell.com/content/products/featuresdetails.aspx/pedge_sc1430?c=us&cs=04&l=en&s=bsd&%7Elt=popup
Chipset: Intel 5000V
Compatible quad core processors: E5310 (1.6Ghz), E5320 (1.86Ghz), E5335 (2.0Ghz), E5345 (2.33Ghz)
Limitations
The following limitations have caused me trouble along my path to computing bliss:
 Networking
Broadcom 5751 NIC, BIOS default: PXE boot enabled
Wake On Lan
http://en.community.dell.com/forums/p/19278497/19500906.aspx#19500906
Update 2/24/2010
I spent about eight hours debugging why wake on lan wouldn't work on my newly built Fedora 12, x86-64 system. Went through a million threads, learned something about sleep states in Linux..finally got it by putting a line at the top of /etc/init.d/halt script (called by "shutdown -h now") to remove the kernel module (rmmod tg3) for the ethernet driver. Self-evident, right? NOT! What the F?
full story here
*** end update ***
Memory
As people add comments regarding memory that works in the SC1430, I will post updates to this section.
By the way, dmidecode and lshw can be used to determine the type of memory you have installed:
http://www.cyberciti.biz/faq/linux-find-memory-speed-dimm-command/
So far (Thanks John!):
Networking
Broadcom 5751 NIC, BIOS default: PXE boot enabled
Wake On Lan
http://en.community.dell.com/forums/p/19278497/19500906.aspx#19500906
Update 2/24/2010
I spent about eight hours debugging why wake on lan wouldn't work on my newly built Fedora 12, x86-64 system. Went through a million threads, learned something about sleep states in Linux..finally got it by putting a line at the top of /etc/init.d/halt script (called by "shutdown -h now") to remove the kernel module (rmmod tg3) for the ethernet driver. Self-evident, right? NOT! What the F?
full story here
*** end update ***
Memory
As people add comments regarding memory that works in the SC1430, I will post updates to this section.
By the way, dmidecode and lshw can be used to determine the type of memory you have installed:
http://www.cyberciti.biz/faq/linux-find-memory-speed-dimm-command/
So far (Thanks John!): with it. Well, no go, as I got a blank screen. Much surfing the net later, I found that only the first two PCI-X slots (PCIX_SLOT5, PCIX_SLOT6) will allow a working video adapter. And so far, folks have only gotten the VisionTek X1550 Radeon Pci 256MB VGA Dvi-i Tv Out) to work on this box.
I have not tried the PCI Express slots as yet. Original pain listed here, but an interesting story with somewhat satisfactory conclusion:
http://forums.anandtech.com/messageview.aspx?catid=31&threadid=2080542
Last week, I bought the VisionTek; however, the ATI drivers have MANY issues on this box. Much more pain listed here:
http://forums.fedoraforum.org/showthread.php?p=878133#post878133
Update 10/23/2007:
I was successful in getting the BFG Geforce 8500 GT PCI Express 256MB to work in the box, with the caveat that a PCI Express 8x to 16x adapter (which raises the video card) must be used:
http://www.orbitmicro.com/global/pciexpressx8tox16adapter-p-755.html
http://crazedmuleproductions.blogspot.com/2007/10/nvidia-in-da-house-er-new-server.html
Update 8/6/2008
Good Tom's article on the performance impact of using reduced number of PCI Express lanes with a 16x card:
http://www.tomshardware.com/reviews/pci-express-2-0,1915-4.html
Update 11/10/2007
In the opposite vein, a couple of us have had success taking a dremel to the 8x PCIe slot to make room for 16x graphics adapters. MarioM had success getting the Sapphire x1950GT 512mb card to work with his newly dremeled slot! Bolstered by Mario's success, I also dremeled SLOT3_PCIE with success (video coming). But for God's sake, BE CAREFUL if you attempt this! You can easily damage and/or otherwise FRY your motherboard if you slip up. Click on the comments below for the success stories. Finally, the video below shows a successful dremel job on the SC1430.
Update 12/17/2007
Free2go had success using the PCI NVIDIA Quadio NVS vidso card in one of the PCI-X slots using 7.1.8.4 driver.
Update 1/19/2008
BFG 8800GT confirmed as working in an SC1430 modded to accept 16x PCI Express adapter cards. Or just use a PCI Express 8x to 16x adapter that raises the video card in the slot: http://www.orbitmicro.com/global/pciexpressx8tox16adapter-p-755.html
Update 2/13/2008
Pics of the BFG 8500GT in the box
with it. Well, no go, as I got a blank screen. Much surfing the net later, I found that only the first two PCI-X slots (PCIX_SLOT5, PCIX_SLOT6) will allow a working video adapter. And so far, folks have only gotten the VisionTek X1550 Radeon Pci 256MB VGA Dvi-i Tv Out) to work on this box.
I have not tried the PCI Express slots as yet. Original pain listed here, but an interesting story with somewhat satisfactory conclusion:
http://forums.anandtech.com/messageview.aspx?catid=31&threadid=2080542
Last week, I bought the VisionTek; however, the ATI drivers have MANY issues on this box. Much more pain listed here:
http://forums.fedoraforum.org/showthread.php?p=878133#post878133
Update 10/23/2007:
I was successful in getting the BFG Geforce 8500 GT PCI Express 256MB to work in the box, with the caveat that a PCI Express 8x to 16x adapter (which raises the video card) must be used:
http://www.orbitmicro.com/global/pciexpressx8tox16adapter-p-755.html
http://crazedmuleproductions.blogspot.com/2007/10/nvidia-in-da-house-er-new-server.html
Update 8/6/2008
Good Tom's article on the performance impact of using reduced number of PCI Express lanes with a 16x card:
http://www.tomshardware.com/reviews/pci-express-2-0,1915-4.html
Update 11/10/2007
In the opposite vein, a couple of us have had success taking a dremel to the 8x PCIe slot to make room for 16x graphics adapters. MarioM had success getting the Sapphire x1950GT 512mb card to work with his newly dremeled slot! Bolstered by Mario's success, I also dremeled SLOT3_PCIE with success (video coming). But for God's sake, BE CAREFUL if you attempt this! You can easily damage and/or otherwise FRY your motherboard if you slip up. Click on the comments below for the success stories. Finally, the video below shows a successful dremel job on the SC1430.
Update 12/17/2007
Free2go had success using the PCI NVIDIA Quadio NVS vidso card in one of the PCI-X slots using 7.1.8.4 driver.
Update 1/19/2008
BFG 8800GT confirmed as working in an SC1430 modded to accept 16x PCI Express adapter cards. Or just use a PCI Express 8x to 16x adapter that raises the video card in the slot: http://www.orbitmicro.com/global/pciexpressx8tox16adapter-p-755.html
Update 2/13/2008
Pics of the BFG 8500GT in the box


 Update 7/9/2008
Sapphire Radeon HD 4850 confirmed as working in the box. Thanks Subbu!
Update 2/9/2010
Ati hd4630 confirmed as working in the box. Thanks Daniele!
Linux on the Dell SC1430
Update 10/12/2007:
Fedora Core 6, x86_64 installed like a champ and is working well with the onboard video. Cinelerra is installed and running without issue. Love to see all eight cores busy through mpstat..yeah!
/2007/10/multithreading-in-ffmpeg-and-mpstat.html
Here's a link to compiling Cinelerra on FC6 X86_64:
/2007/09/building-cinelerra-on-fc6-64-bit.html
Fedora 7 also works in the box, but has the dreaded, Fedora 7 broken firewire stack. A workaround is listed at the bottom of the page here through the EZPlanetOne kernel patch:
http://www.physics.wustl.edu/~alford/thinkpad/T23_F7.html
This patch does work, as I've been running on Fedora 7 with the patch for about two months now.
Fans
The fans are somewhat loud on boot, but mellow to a comfortable, if not quiet, level after the system boots. Note that the fans will run high speed (ie, LOUD) if the case is open.
Fun
A little overclocker heaven:
http://www.xtremesystems.org/forums/showthread.php?p=2427225
Update 1/21/2008
Finally tried the above FSB overclock. Suh-WHEET!
Program to view temp/fan speed and to control at the bottom of this page:
http://diefer.de/i8kfan/index.html
Update 10/13/2007
As part of a longer tutorial on the layout of the SC1430 that I will release in the coming weeks, this is the goofy commercial that I made with Cinelerra about the SC1430:
Update 11/11/2007
New video describing the SC1430 with emphasis on features, video cards and shows an example of dremeling the end off a PCI Express slot:
Update 9/26/2009
Installed a 500GB SATA and Vista 64-bit Ultimate.
Update 2/17/2010
Installed a Fedora 12 64-bit on a 4.5TB RAID5 set, courtesy of 3ware 9650SE and Western Digital:
http://www.techanswerguy.com/2010/02/3ware-9650se-support-experience.html
http://www.techanswerguy.com/2010/02/fedora-12-x86-64-first-impressions.html
Update 7/9/2008
Sapphire Radeon HD 4850 confirmed as working in the box. Thanks Subbu!
Update 2/9/2010
Ati hd4630 confirmed as working in the box. Thanks Daniele!
Linux on the Dell SC1430
Update 10/12/2007:
Fedora Core 6, x86_64 installed like a champ and is working well with the onboard video. Cinelerra is installed and running without issue. Love to see all eight cores busy through mpstat..yeah!
/2007/10/multithreading-in-ffmpeg-and-mpstat.html
Here's a link to compiling Cinelerra on FC6 X86_64:
/2007/09/building-cinelerra-on-fc6-64-bit.html
Fedora 7 also works in the box, but has the dreaded, Fedora 7 broken firewire stack. A workaround is listed at the bottom of the page here through the EZPlanetOne kernel patch:
http://www.physics.wustl.edu/~alford/thinkpad/T23_F7.html
This patch does work, as I've been running on Fedora 7 with the patch for about two months now.
Fans
The fans are somewhat loud on boot, but mellow to a comfortable, if not quiet, level after the system boots. Note that the fans will run high speed (ie, LOUD) if the case is open.
Fun
A little overclocker heaven:
http://www.xtremesystems.org/forums/showthread.php?p=2427225
Update 1/21/2008
Finally tried the above FSB overclock. Suh-WHEET!
Program to view temp/fan speed and to control at the bottom of this page:
http://diefer.de/i8kfan/index.html
Update 10/13/2007
As part of a longer tutorial on the layout of the SC1430 that I will release in the coming weeks, this is the goofy commercial that I made with Cinelerra about the SC1430:
Update 11/11/2007
New video describing the SC1430 with emphasis on features, video cards and shows an example of dremeling the end off a PCI Express slot:
Update 9/26/2009
Installed a 500GB SATA and Vista 64-bit Ultimate.
Update 2/17/2010
Installed a Fedora 12 64-bit on a 4.5TB RAID5 set, courtesy of 3ware 9650SE and Western Digital:
http://www.techanswerguy.com/2010/02/3ware-9650se-support-experience.html
http://www.techanswerguy.com/2010/02/fedora-12-x86-64-first-impressions.html
- One PCI slot
- Two PCI Express slots have only 4x lanes, though the connectors on each are 8x
- Little support for high end graphics cards
- Only one primary IDE controller (to control two IDE CD/DVD or tape backup drives only)
- Can't boot from an IDE hard drive (See Dell community forum)
- Only four drive bays (two 5 1/4", two 3 1/2") and a two-drive SATA housing (six total drives)
- Spartan Dell BIOS does not allow for performance tweaks
- pre-Win2003 Microsoft OSs are not supported
 Networking
Broadcom 5751 NIC, BIOS default: PXE boot enabled
Wake On Lan
http://en.community.dell.com/forums/p/19278497/19500906.aspx#19500906
Update 2/24/2010
I spent about eight hours debugging why wake on lan wouldn't work on my newly built Fedora 12, x86-64 system. Went through a million threads, learned something about sleep states in Linux..finally got it by putting a line at the top of /etc/init.d/halt script (called by "shutdown -h now") to remove the kernel module (rmmod tg3) for the ethernet driver. Self-evident, right? NOT! What the F?
full story here
*** end update ***
Memory
As people add comments regarding memory that works in the SC1430, I will post updates to this section.
By the way, dmidecode and lshw can be used to determine the type of memory you have installed:
http://www.cyberciti.biz/faq/linux-find-memory-speed-dimm-command/
So far (Thanks John!):
Networking
Broadcom 5751 NIC, BIOS default: PXE boot enabled
Wake On Lan
http://en.community.dell.com/forums/p/19278497/19500906.aspx#19500906
Update 2/24/2010
I spent about eight hours debugging why wake on lan wouldn't work on my newly built Fedora 12, x86-64 system. Went through a million threads, learned something about sleep states in Linux..finally got it by putting a line at the top of /etc/init.d/halt script (called by "shutdown -h now") to remove the kernel module (rmmod tg3) for the ethernet driver. Self-evident, right? NOT! What the F?
full story here
*** end update ***
Memory
As people add comments regarding memory that works in the SC1430, I will post updates to this section.
By the way, dmidecode and lshw can be used to determine the type of memory you have installed:
http://www.cyberciti.biz/faq/linux-find-memory-speed-dimm-command/
So far (Thanks John!):manufacturer model part number Kingston DDR2 FB-DIMM ECC Fully Buffered KVR667D2D4F5K2/4GVideo Be warned that this server is very picky with video cards. So before you dremel any PCI Express video cards to get them working in the 8x slot, make sure you test them with an 8x-to-16x PCIe adapter in the box first! ;) (thanks John!) Update 2/28/2010 Video card roundup..cards known to work in the box (from the Comments section below) ATI-based cards ATI Radeon hd4630 ATI x300 ATI X1300 PCI ATI x1550 ATI X1900 All-In-Wonder VisionTek X1550 Radeon Pci 256MB VGA Sapphire x1950GT 512mb card Sapphire Radeon HD 4850 NVidia-based cards NVidia BFG 8800GT NVidia BFG 8500GT EVGA GeForce 9400GT 512MB PCI NVidia BFG 9600GT BFG Tech GeForce 9800GT 512MB Nvidia Quadro NVS 290 NVidia Quadro Fx 540 PCI NVIDIA Quadro NVS 400 Note: It would behoove one to read the full comments section for any gotchas. *** end update *** The first thing I wanted to do was use my ATI Tech Radeon 9200 128 MB PCI Video Adapter


 Update 7/9/2008
Sapphire Radeon HD 4850 confirmed as working in the box. Thanks Subbu!
Update 2/9/2010
Ati hd4630 confirmed as working in the box. Thanks Daniele!
Linux on the Dell SC1430
Update 10/12/2007:
Fedora Core 6, x86_64 installed like a champ and is working well with the onboard video. Cinelerra is installed and running without issue. Love to see all eight cores busy through mpstat..yeah!
/2007/10/multithreading-in-ffmpeg-and-mpstat.html
Here's a link to compiling Cinelerra on FC6 X86_64:
/2007/09/building-cinelerra-on-fc6-64-bit.html
Fedora 7 also works in the box, but has the dreaded, Fedora 7 broken firewire stack. A workaround is listed at the bottom of the page here through the EZPlanetOne kernel patch:
http://www.physics.wustl.edu/~alford/thinkpad/T23_F7.html
This patch does work, as I've been running on Fedora 7 with the patch for about two months now.
Fans
The fans are somewhat loud on boot, but mellow to a comfortable, if not quiet, level after the system boots. Note that the fans will run high speed (ie, LOUD) if the case is open.
Fun
A little overclocker heaven:
http://www.xtremesystems.org/forums/showthread.php?p=2427225
Update 1/21/2008
Finally tried the above FSB overclock. Suh-WHEET!
Program to view temp/fan speed and to control at the bottom of this page:
http://diefer.de/i8kfan/index.html
Update 10/13/2007
As part of a longer tutorial on the layout of the SC1430 that I will release in the coming weeks, this is the goofy commercial that I made with Cinelerra about the SC1430:
Update 11/11/2007
New video describing the SC1430 with emphasis on features, video cards and shows an example of dremeling the end off a PCI Express slot:
Update 9/26/2009
Installed a 500GB SATA and Vista 64-bit Ultimate.
Update 2/17/2010
Installed a Fedora 12 64-bit on a 4.5TB RAID5 set, courtesy of 3ware 9650SE and Western Digital:
http://www.techanswerguy.com/2010/02/3ware-9650se-support-experience.html
http://www.techanswerguy.com/2010/02/fedora-12-x86-64-first-impressions.html
Update 7/9/2008
Sapphire Radeon HD 4850 confirmed as working in the box. Thanks Subbu!
Update 2/9/2010
Ati hd4630 confirmed as working in the box. Thanks Daniele!
Linux on the Dell SC1430
Update 10/12/2007:
Fedora Core 6, x86_64 installed like a champ and is working well with the onboard video. Cinelerra is installed and running without issue. Love to see all eight cores busy through mpstat..yeah!
/2007/10/multithreading-in-ffmpeg-and-mpstat.html
Here's a link to compiling Cinelerra on FC6 X86_64:
/2007/09/building-cinelerra-on-fc6-64-bit.html
Fedora 7 also works in the box, but has the dreaded, Fedora 7 broken firewire stack. A workaround is listed at the bottom of the page here through the EZPlanetOne kernel patch:
http://www.physics.wustl.edu/~alford/thinkpad/T23_F7.html
This patch does work, as I've been running on Fedora 7 with the patch for about two months now.
Fans
The fans are somewhat loud on boot, but mellow to a comfortable, if not quiet, level after the system boots. Note that the fans will run high speed (ie, LOUD) if the case is open.
Fun
A little overclocker heaven:
http://www.xtremesystems.org/forums/showthread.php?p=2427225
Update 1/21/2008
Finally tried the above FSB overclock. Suh-WHEET!
Program to view temp/fan speed and to control at the bottom of this page:
http://diefer.de/i8kfan/index.html
Update 10/13/2007
As part of a longer tutorial on the layout of the SC1430 that I will release in the coming weeks, this is the goofy commercial that I made with Cinelerra about the SC1430:
Update 11/11/2007
New video describing the SC1430 with emphasis on features, video cards and shows an example of dremeling the end off a PCI Express slot:
Update 9/26/2009
Installed a 500GB SATA and Vista 64-bit Ultimate.
Update 2/17/2010
Installed a Fedora 12 64-bit on a 4.5TB RAID5 set, courtesy of 3ware 9650SE and Western Digital:
http://www.techanswerguy.com/2010/02/3ware-9650se-support-experience.html
http://www.techanswerguy.com/2010/02/fedora-12-x86-64-first-impressions.html
Update 1/15/2022 Alas, this will be my final post about the trusty old Dell SC1430, as it went to Goodwill to be bought or recycled today. Many a video was edited or blog entry created on it. May your eternal rest be sweet, fair Dell!
'sodoFriday, September 21, 2007
VMware Server: "You do not have permissions to perform this operation"
I was migrating an ESX VM back to VMserver and saw this error on startup:
"You do not have permissions to perform this operation"
The reason was because my .vmx config file for the VM was Read Only. You can change the attribute via Windows Explorer or the command line like so:
To show you the current attributes on the files, type:
attrib
To remove the read only attrib on a file, type:
attrib -r [filename]
Reading another post:
http://www.vmware.com/community/message.jspa?messageID=432486
I saw that other users saw the same message for a different reason. Their solution was to set the following parameters in the .vmx file for the VM:
> Enable "allVMMemoryLimit":
> prefvmx.useRecommendedLockedMemSize = "FALSE"
> Set to TRUE when value selected in UI matches
> prefered value. Set to FALSE otherwise.
>
> Set limit for all VMs to 1701MB:
> prefvmx.allVMMemoryLimit = "1701"
> Value selected in UI if it differs from prefered
> value.
>
> Allow most of memory to be swapped:
> prefvmx.minVmMemPct = "25"
> Set to 25, 50, or 100, depending on how much swapping
> you allow.
No promises on this one, but give those two options a try..
'sodo
Sunday, September 16, 2007
what's interesting about LinkedIn
This is a slightly different type of post that I normally write, as I've deviated from my normal specific technology rambling to give you my impressions of a social networking website called LinkedIn. The site is useful, as it may provide some direction for skilled individuals who want to reconnect with old work or school mates, beef up their resume in the hopes of getting new employment or just expand their horizons.
LinkedIn is exactly what the name implies: you create a user profile and based upon information you share, like education and jobs you've had, LinkedIn will find old friends and contacts for you. After entering your basic data, LI will pop up a list of possible contacts for you to invite to join your network. It was pretty amazing to see the vendor contacts I've worked with popup on the list of possible contacts list, simply because they had stated that they had worked for some of the same companies that I had. Or old friends who came up because they went to the same university during the same period I did and were also on LinkedIn.
This is the interesting thing about how LI creates your connections. LinkedIn matches people up by the firms they work(ed) for, the universities they attended and the companies they partnered with. It is the concept of six degrees of separation; ie, you are only six hops away from anyone in the world.
It is important to note that you can control who sees your info via the privacy settings, mainly by making your profile public or private.
If you've made your profile public, you can accept an invitation to link up from a person who has found you. Normally, the person who found you will have connections of their own. Going forward, you'll always see how a person on LinkedIn is connected to you by the degrees of separation that person is from you, as well as the total number of people in your extended network. Pretty cool.
Also, people who you are linked to can recommend you, thus adding value to your vita in case you're aiming to get a new job via LI. In addition, you can recommend service providers or be recommended as a service provider. Finally, you can add street cred for yourself by answering questions posed by other members on LinkedIn's Answers from Your Network section. The questions are generally related to the industry you're in.
As I'm exploring new opportunities in the NYC area that better suit my lifestyle (music/video/tech), I'm trying to beef up my own network in the next year. Good luck and see you on LinkedIn!
'sodo
Tuesday, September 11, 2007
capturing boot messages in Linux via serial console
Sometimes, messages scroll by the screen that are not captured in /var/log/messages. such as these ugly messages that appeared after I moved my FC6 installation over to a non-LVM partition:
[/sbin/fsck.vfat (1) -- /mnt/fat] fsck.vfat -a /dev/sda6
dosfsck 2.11, 12 Mar 2005, FAT32, LFN
Wrong checksum for long file name "".
(Short name FSCK0000.REN may have changed without updating the long name)
Not auto-correcting this.
/dev/sda6: 425 files, 3557906/3864252 clusters
Ugly! (But keep reading for the solution to that particular error). And it is especially bad when the messages scroll by so fast that you can't write them down and have to reboot multiple times just to get the gist.
There is a solution, however. The solution is to view these messages via a serial console. A serial console is like being right at the computer, only the viewing of the boot process takes place over your computers' serial port.
Your server or workstation is not configured to use a serial console by default. The console can be enabled by configuring a few files and attaching a serial cable (or null modem cable) from another PC to the PC you want to monitor. Finally, you'll use a terminal program like HyperTerminal or (Putty) to establish the connection and view the boot messages.
Here is the short list of steps to enable a serial console:
1) Find and attach a suitable RS-232 (serial or null modem) cable from the serial port of the PC that will do the monitoring to the serial port on the PC that you want monitored
2) Edit the following files:
- /boot/grub/grub.conf or /etc/lilo.conf
- /etc/inittab
- /etc/securetty
3) Reboot
As the steps have been documented everywhere on the web, I've provided a list of the most well-written, easiest to follow articles below with links to more detail if you need it.
This is a very nice brief article with everything you need to know:
http://www.cpqlinux.com/serialconsole.html
Here's a short article on the configuration steps and a couple new tricks necessary to enable a serial console access:
http://www.vanemery.com/Linux/Serial/serial-console.html
Here's a very helpful, in-depth article on the subject:
http://www.linuxjournal.com/article/7206
Here's the granddaddy of all serial console docs, the HowTo:
http://tldp.org/HOWTO/Remote-Serial-Console-HOWTO/
So..what was the solution to that ugly message I saw while booting:
[/sbin/fsck.vfat (1) -- /mnt/fat] fsck.vfat -a /dev/sda6
dosfsck 2.11, 12 Mar 2005, FAT32, LFN
Wrong checksum for long file name "".
(Short name FSCK0000.REN may have changed without updating the long name)
Not auto-correcting this.
/dev/sda6: 425 files, 3557906/3864252 clusters
Why, delete the file! Of course, you may have a file you can't delete. If so, since this is a FAT32 partition, I'd suggest you run chkdsk /f on the drive when in Windows. I'm not sure if you can do a chkdsk under Linux. I'll have to research this and get back to you.
Enjoy!
'sodo
[/sbin/fsck.vfat (1) -- /mnt/fat] fsck.vfat -a /dev/sda6
dosfsck 2.11, 12 Mar 2005, FAT32, LFN
Wrong checksum for long file name "".
(Short name FSCK0000.REN may have changed without updating the long name)
Not auto-correcting this.
/dev/sda6: 425 files, 3557906/3864252 clusters
Ugly! (But keep reading for the solution to that particular error). And it is especially bad when the messages scroll by so fast that you can't write them down and have to reboot multiple times just to get the gist.
There is a solution, however. The solution is to view these messages via a serial console. A serial console is like being right at the computer, only the viewing of the boot process takes place over your computers' serial port.
Your server or workstation is not configured to use a serial console by default. The console can be enabled by configuring a few files and attaching a serial cable (or null modem cable) from another PC to the PC you want to monitor. Finally, you'll use a terminal program like HyperTerminal or (Putty) to establish the connection and view the boot messages.
Here is the short list of steps to enable a serial console:
1) Find and attach a suitable RS-232 (serial or null modem) cable from the serial port of the PC that will do the monitoring to the serial port on the PC that you want monitored
2) Edit the following files:
- /boot/grub/grub.conf or /etc/lilo.conf
- /etc/inittab
- /etc/securetty
3) Reboot
As the steps have been documented everywhere on the web, I've provided a list of the most well-written, easiest to follow articles below with links to more detail if you need it.
This is a very nice brief article with everything you need to know:
http://www.cpqlinux.com/serialconsole.html
Here's a short article on the configuration steps and a couple new tricks necessary to enable a serial console access:
http://www.vanemery.com/Linux/Serial/serial-console.html
Here's a very helpful, in-depth article on the subject:
http://www.linuxjournal.com/article/7206
Here's the granddaddy of all serial console docs, the HowTo:
http://tldp.org/HOWTO/Remote-Serial-Console-HOWTO/
So..what was the solution to that ugly message I saw while booting:
[/sbin/fsck.vfat (1) -- /mnt/fat] fsck.vfat -a /dev/sda6
dosfsck 2.11, 12 Mar 2005, FAT32, LFN
Wrong checksum for long file name "".
(Short name FSCK0000.REN may have changed without updating the long name)
Not auto-correcting this.
/dev/sda6: 425 files, 3557906/3864252 clusters
Why, delete the file! Of course, you may have a file you can't delete. If so, since this is a FAT32 partition, I'd suggest you run chkdsk /f on the drive when in Windows. I'm not sure if you can do a chkdsk under Linux. I'll have to research this and get back to you.
Enjoy!
'sodo
Sunday, September 09, 2007
could not reliably determine server's fully qualified domain name
This is an error you may see from the Apache web server when the daemon starts up. To resolve this, you need to make sure that your server is assigned a fully qualified domain name [FQDN]. A fully qualified domain name is made up of the following parts:
[hostname].[domain].[top level domain]
Here's further explanation regarding FQDN's:
http://en.wikipedia.org/wiki/Fully_qualified_domain_name
On my home network, I insure this by doing the following:
1) instruct my firewall/router to assign a domain name to all of the hosts on my local network. In this way, my web server running Apache will then be assigned a domain.
2) make sure you have a full domain name for the server listed in /etc/hosts. Here is the generic form of a proper host entry in the hosts file:
[IP address] [hostname.domain name.top level domain] [hostname]
For example:
192.168.0.3 computer.network.com computer
That will do it.
If the IP of the server is statically assigned, alternate methods are:
1) assign a domain in /etc/resolv.conf
2) assign a hostname in /etc/sysconfig/network
The two examples mentioned above are for Fedora and Red Hat. The network files may differ if you use another Linux distribution.
Or
3) specify the ServerName parameter in Apache's httpd.conf file (usually located in /etc/httpd/conf/httpd.conf)
If interested, here's a recent thread with people talking about this subject:
http://www.linuxquestions.org/questions/showthread.php?t=280677
Hope this helps.
Thursday, September 06, 2007
iTunes can convert lossless WMAs
Along with a number of friends of mine, I am a bit of an audiophile. Therefore, when I convert music to digital format, I like to do the conversion losslessly. In like fashion, I don't want to lose the ability to play the files on both Windows and Mac. The good thing I found out today is that I can convert Microsoft lossless WMAs to Apple Lossless Encoding format via iTunes. Hooray!
The Process
When you drag and drop a WMA into iTunes, you'll see this:

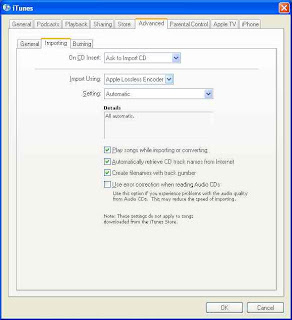
In order to keep the lossless format, make sure your Import settings in iTunes are set to Apple Lossless:
I've imported a file and you can check the format by right-clicking on the song and choose Get Info (don't right click if you're on a Mac..just click!):
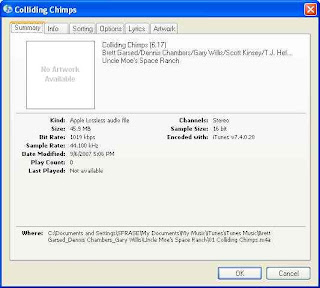
Note that "Kind:" says Apple Lossless audio file.
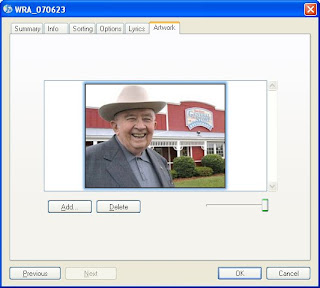
Album Art?
When you import the WMA, iTunes brings all your information will come over as well, except for the album art. But Steve Jobs has not left us in the lurch. There is a function to bring over the album art as well. You'll find "Get Album Artwork" under the Advanced tab:
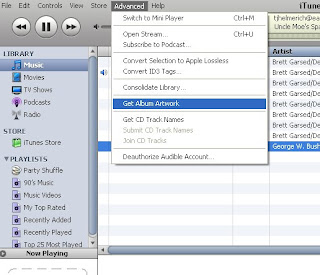
And look! My album now has this jocular octogenerian peeking back at us!
The Process
When you drag and drop a WMA into iTunes, you'll see this:

In order to keep the lossless format, make sure your Import settings in iTunes are set to Apple Lossless:

I've imported a file and you can check the format by right-clicking on the song and choose Get Info (don't right click if you're on a Mac..just click!):

Note that "Kind:" says Apple Lossless audio file.
Album Art?
When you import the WMA, iTunes brings all your information will come over as well, except for the album art. But Steve Jobs has not left us in the lurch. There is a function to bring over the album art as well. You'll find "Get Album Artwork" under the Advanced tab:

And look! My album now has this jocular octogenerian peeking back at us!

Wednesday, September 05, 2007
a damn nice rgb to hex converter (and hex to rgb)
Such trivial things make us happy..
Here is a very nice rgb-to-hex converter. And there are no popup ads on this one, either!
http://www.yellowpipe.com/yis/tools/hex-to-rgb/color-converter.php
Here is a very nice rgb-to-hex converter. And there are no popup ads on this one, either!
http://www.yellowpipe.com/yis/tools/hex-to-rgb/color-converter.php
Tuesday, September 04, 2007
creating a Google sitemap for your website
As I wanted Google to better index the website I administer, I needed to create a sitemap. Here is a nice description of the benefits of having a sitemap and the Sitemap XML-based protocol in general:
https://www.google.com/webmasters/tools/docs/en/protocol.html
You'd think creating a sitemap would be a fairly simple, mundane task. It is and it isn't. You need to know about how your website is organized on the webservers' file system. And, to do a sitemap correctly for a large site with more than 500 pages of web accessible content, you need to either spend a bit of money on some software to create a sitemap (see http://www.xml-sitemaps.com/ or http://www.auditmypc.com/free-sitemap-generator.asp) or get your hands dirty using Google's free Python script to generate a sitemap.
The second choice is the more complicated and time consuming, as it involves the following steps:
- install Python
- setup a config file to point at a log or your webroot to get a list of your content
- run a Python script to generate the sitemap
- tell Google you've got a new sitemap
Being the frugal masochist that I am, I chose the second option. The steps are described in great detail here:
https://www.google.com/webmasters/tools/docs/en/sitemap-generator.html
I will try to add value by reviewing the stumbling blocks I encountered along the way to building my first sitemap. Here are the general steps I performed:
1) downloaded the sitemap generator files from Sourceforge
2) created a configuration file for my website
3) downloaded and installed Python from the official website
4) ran sitemap_gen.py
5) added the sitemap I generated to Google Webmaster tools
I suggest you run these steps from a server with a development instance of your current website running.
1) download the sitemap generator files from Sourceforge
Since our website runs on Windows 2000 Server, I grabbed the ZIP version of the sitemap generator files from Sourceforge. I unzipped them to a temporary directory.
2) created a configuration file for my website
I chose access logs as the source
This was a time consuming one, as I first had to figure out whether I wanted to generate my sitemap based on URL or directory listings, access logs or another sitemap. As our website is made up of mostly dynamic pulls from our database via ASP/ASP.net page, I felt that using a sample access log from one of the servers in our farm would give me the most reliable source of data for the sitemap.
I reduced the size of my access log
This part ended up being the most time consuming, because our daily web logs are about 8GB each. Most of the requests for our website are images, so I wrote a simple AWK script to extract out only the 10-15% requests that are ASP related.
***
Be aware that you will get memory errors if you don't have enough RAM installed. I found that it took about 1.9GB of memory for the script to analyze a 1.3GB logfile. So you'll need about 1.5x GB RAM for a filesize of y. (1.9/1.3=1.5)
***
In my logfiles, the seventh column is the uri-stem:
#Fields: date time c-ip cs-username s-ip cs-method cs-uri-stem cs-uri-query sc-status sc-bytes cs-bytes time-taken cs-version cs(User-Agent) cs(Cookie) cs(Referer)
Here is the AWK command to pull the seventh column with the code file path:
awk '{if ($7 ~ /asp/) print $0}' access.log > access2.log
I use the Cygwin Unix tools for NT. These tools are invaluable for munging through large logfiles.
The sitemap_gen.py script is going to look for the #FIELD header in the log, so I modified my awk command to include it:
awk '{if ($7 ~ /asp/ ¦¦ $1 ~ /#Fields/) print $0}' access.log > access2.log
OK! So that trimmed my weblog down to about 1.5GB. This should be enough data to make a valid sitemap file!
I also used some filters to reduce the amount of redundant data in the logfile
My awk script should have removed any gif or jpeg requests, but if not, I went ahead and added those to the filter section in config.xml, in addition to any requests for our store locator:
In the end, here is what my config.xml file looked like:
<?xml version="1.0" encoding="UTF-8"?>
<site
base_url="http://www.mywebsite.com/"
store_into="/Inetpub/development/sitemap.xml.gz"
verbose="1"
suppress_search_engine_notify="1"
>
<accesslog path="/temp/access.log" encoding="UTF-8" />
<filter action="drop" type="wildcard" pattern="*.jpg" />
<filter action="drop" type="wildcard" pattern="*.gif" />
<filter action="drop" type="regexp" pattern="/storeLocator/" />
</site>
3) downloaded and installed Python from the official website
Since I didn't have Python installed on my development server, I went ahead and followed this nice little instructional video on Installing Python from ShowMeDo.com. The process was very easy..point and click and accept the defaults. But the video made it even easier.
The one other thing you should do is add the Python executable to your PATH. In Windows, I added C:\Python25\ to my PATH system variable. The PATH system variable is found in MyComputer -> Properties -> Advanced tab -> Environment Variables.
4) ran sitemap_gen.py
Alright! The moment of truth is upon me. I ran the python script from the command line:
bash-2.02$ python sitemap_gen.py --config=/temp/sitemap_gen-1.4/config.xml
Reading configuration file: /temp/sitemap_gen-1.4/config.xml
Opened ACCESSLOG file: /temp/access.log
[WARNING] Discarded URL for not starting with the base_url: http://ghome.asp?
Sorting and normalizing collected URLs.
Writing Sitemap file "\Inetpub\development\sitemap.xml.gz" with 50000 URLs
C:\Program Files\Python25\lib\urlparse.py:188: UnicodeWarning: Unicode equal comparison failed to convert both arguments to Unicode - interpreting them as being unequal cached = _parse_cache.get(key, None)
C:\Program Files\Python25\lib\urlparse.py:220: UnicodeWarning: Unicode equal comparison failed to convert both arguments to Unicode - interpreting them as being unequal
_parse_cache[key] = v
Sorting and normalizing collected URLs.
Writing Sitemap file "\Inetpub\development\sitemap1.xml.gz" with 50000 URLs
[WARNING] Discarded URL for not starting with the base_url: http://ghome.asp?
Sorting and normalizing collected URLs.
Writing Sitemap file "\Inetpub\development\sitemap2.xml.gz" with 10985 URLs
Writing index file "\Inetpub\development\sitemap_index.xml" with 3 Sitemaps
Search engine notification is suppressed.
Count of file extensions on URLs:
110962 .asp
23 .aspx
Number of errors: 0
Number of warnings: 525
Interpreting this output, we learn the following things:
1) there is a 50,000 URL limit to the sitemap files
2) some URLs will get bounced if they don't begin with your base_url
This is the "[WARNING] Discarded URL for not starting with the base_url" line.
3) some unicode parsing errors will occur
In terms of speed, here are the performance stats of sitemap_gen.py on my dual Xeon3.2 workstation with 3.2GB of RAM:
- 10 minutes to parse a 2,000,000 record logfile (about 1.9GB in size)
- 1.3GB of RAM used
***
Be aware that you will get memory errors if you don't have enough RAM installed. I found that it took about 1.9GB of memory for the script to analyze a 1.3GB logfile. So you'll need about 1.5x GB RAM for a filesize of y. (1.9/1.3=1.5)
***
Troubleshooting
Be prepared to encounter failures like the below if you don't have enough memory:
bash-2.02$ python sitemap_gen.py --config=/temp/sitemap_gen-1.4/config.xml
Reading configuration file: /temp/sitemap_gen-1.4/config.xml
Opened ACCESSLOG file: /temp/access.log
Traceback (most recent call last):
File "sitemap_gen.py", line 2203, in
sitemap.Generate()
File "sitemap_gen.py", line 1775, in Generate
input.ProduceURLs(self.ConsumeURL)
File "sitemap_gen.py", line 1115, in ProduceURLs
for line in file.readlines():
MemoryError
In case you do run out of memory, reduce the size of your logfile. As I stated above, a 2GB logfile will take up about 1.3GB of physical memory to process. So sitemap_gen.py needs physical memory equal to about 66% of the total size of the logfile you are analyzing. In other words, I found that it took about 1.9GB of memory for the script to analyze a 1.3GB logfile. So you'll need about 1.5x GB RAM for a filesize of y. (1.9/1.3=1.5)
Also, if you neglect to have a #Fields record header in your access log, you'll get a warning like this:
[WARNING] No URLs were recorded, writing an empty sitemap.
Finally, if you point to a missing logfile, you'll get an error like this:
[ERROR] Can not locate file: /temp/access.log
5) added the sitemap I generated to Google Webmaster tools
OK. This is the last step and a fairly simple one:
1) Upload the sitemap(s) to your website and
2) Point the Google Webmaster tools at it:

Update 2009/11/17
Actually, the best workaround for memory errors is to limit each logfile to 50,000 lines long by using the Unix "split" command:
http://www.worldwidecreations.com/google_sitemap_generator_memoryerror_workaround_fix.htm
This is the best solution because the python script can accept the "*" wildcard for multiple file inputs.
That's it!
'sodo
Sunday, September 02, 2007
setting the screen resolution in Fedora under VMware Fusion
I was having trouble locking the screen resolution of Fedora as it ran under VMware Fusion on my MacBook Pro 2.33Ghz Intel Core 2 Duo. Initially, I set the screen resolution using Administration -> Display. For a reason unknown to me, setting the resolution of 1440x900 always reverted to 1680x1000. Playing around for a half an hour, I finally figured out that Display was not going to work. I then used Preferences -> Screen Resolution:

This widget successfully set my Fedora Core 6 desktop resolution to the exact screen size of my MacBook, a lovely widescreen 1440x900.
Nice!
'sodo

This widget successfully set my Fedora Core 6 desktop resolution to the exact screen size of my MacBook, a lovely widescreen 1440x900.
Nice!
'sodo
mounting a windows file share in Fedora using mount -t cifs switch
I was rebuilding my main webserver and needed to copy the webroot to a temporary server. My main webserver is a Fedora Core 6 box and the temporary is a Win2K server (no laughs, please). As I started the job, I noticed that smbmount was missing from the command set found in my path:
COMPUTER:~ cacasodo$ smbmount
-bash: smbmount: command not found
If you need to recall smbmount command syntax, here's a link to an old post about it:
/2007/03/always-tricky-smb-mount-syntax.html
Thinking smbmount was in samba-client, I installed the samba client package (yum install samba-client*). Unfortunately, smbmount was not included. Next, I could have researched where smbmount was packaged and rpm could give me that answer, if I wanted to muddle through its cryptic command-line argument structure. Instead though, I recalled in my foggy memory that mount had a new filetype switch, -t cifs, that will allows one to mount a Windows file share. CIFS stands for Common Internet File System and essentially, supercedes Windows Server Message Blocks (SMB) as a file sharing technology. Here's a quick description of CIFS:
http://linux-cifs.samba.org/
How to Mount Using CIFS
The command line parameters to mount using CIFS are similar to smbmount. Here is the general format of the command:
mount -t cifs //servername/sharename /mountpoint -o username=username,password=password,mounttype
For example:
mount -t cifs //computer/temp /windowsshare -o username=cacasodo,password=mypassword,rw
A second example, different syntax:
[sodo@computer mnt]$ sudo mount -t cifs //wl03/C$ /mnt/wl -o user=sodo2%pass -rw
A third example using a domain:
[sodo@computer mnt]$ sudo mount -t cifs //wsunoula/Windows\ Server\ 2008\ R2\ x64 /mnt/windows -o username=sodo,password=gabbagabba,domain=gabba.corp
An error, resolved by using IP instead of hostname:
[sudo] password for sodo:
mount error(5): Input/output error
[sodo@computer mnt]$ sudo mount -t cifs //192.168.101.23/C$ /mnt/wl -o user=sodo2%pass -rw
So, the -t cifs switch to mount solved my problem.
Update 2013/03/09
Latest update to Fedora 17 broke CIFS mounts. Had to use a credentials file, comme ca:
sudo mount -t cifs //drobo/Linux /mnt/drobo -o credentials=/home/sodo/smb.credentials
Credentials file is just:
username=[user]
password=[password]
You'd probably want to encrypt this file, but it got me past the problem.
*** end update ***
And there you have it!
'sodo
Samba Troubleshooting Reference
The Best Samba Troubleshooting Guide:
http://www.linuxhomenetworking.com/wiki/index.php/Quick_HOWTO_:_Ch12_:_Samba_Security_and_Troubleshooting
http://www.server-world.info/en/note?os=Fedora_15&p=samba
https://www.linux.com/learn/tutorials/296391-easy-samba-setup
http://vijayk.blogspot.com/2008/09/cifs-mount-error-13-permission-denied.html
https://www.linux.com/learn/tutorials/305771-quick-and-dirty-samba-setup
http://opensuse.swerdna.org/susesambacifs.html
Friday, August 31, 2007
Sun JRE install in Linux (Fedora Core 6) for Firefox
The JRE install is something I always forget and it's always a pain in the ass. I wanted it to be able to view some videos within Firefox from my friends at http://www.kiberpipa.org
Choose a Version 5 or Version 6 JRE install
Here is a quick link to the latest JRE (Version 6 Update 2):
http://java.com/en/download/index.jsp
Here is the link to the full Sun Java download page (
Java Runtime Environment (JRE) 5.0 Update 12):
http://java.sun.com/javase/downloads/index_jdk5.jsp
From the displayed list of downloadable softwares, I suggest you install the latest Java Runtime Environment (JRE) 5.0 Update.
Here are the install notes:
http://java.sun.com/j2se/1.5.0/jre/install-linux.html
The install notes are straight forward. Follow them. However, the one instruction the install notes leave out is to create a symbolic link to the Java plugin shared object from the Firefox plugins directory. Your paths may vary slightly if you've installed a different version of the JRE (either Version 6 Update 2 or
Java Runtime Environment (JRE) 5.0 Update 12).
Here is that command for a JRE 5.0 Update 12 install:
ln -s /usr/java/jre1.5.0_12/plugin/i386/ns7/libjavaplugin_oji.so /usr/lib/mozilla/plugins
Here is the command for a JRE 6.0 Update 2 install:
ln -s /usr/java/jre1.6.0_02/plugin/i386/ns7/libjavaplugin_oji.so /usr/lib/mozilla/plugins
After that, restart your browser. You can then verify the test content on Sun's site:
http://java.com/en/download/installed.jsp
good luck!
Monday, August 27, 2007
be aware that ODBC tracing grinds your web server to a halt
In relation to the recent ODBC to Oracle problem we've been having (/2007/08/high-number-of-db-connections-to-oracle.html), I wanted to make you aware that enabling ODBC Tracing on your web server will cripple the performance of that server.
I enabled ODBC tracing this morning on one of my four load balanced Win2K servers. You can configure this under Control Panel -> Administrative Tools -> Data Sources (ODBC) Administrator:
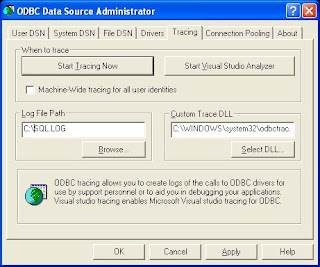
I needed to reboot after doing this to start the trace log file. Once the box came back up, I tested a page that had a dynamic connection to our database. As opposed to the usual 2 seconds, the response took about 90 seconds to complete! So BE VERY CAREFUL when using ODBC tracing, as it will kill performance on your web server.
If you absolutely have to have tracing on, run it from only one of the web servers in your farm and only for a short time..hopefully, only during the duration of the ODBC problem you are experiencing.
live and learn, as always!
'sodo
Wednesday, August 22, 2007
high number of db connections to Oracle from bad Microsoft ODBC driver
In the past week, we've seen a very natty problem between our ASP-based website and our Oracle database that was difficult to troubleshoot. As I'm still on vacation, this problem is even more frustrating!
We have a website that is powered by an Oracle database. Our web application is traditional ASP. We were running Oracle 9i on the server; specifically, 9.2.0.7. In the webserver code, we connect to the database via an ODBC system DSN. The Oracle client version was 8.1.7.
We saw that when we used the older Microsoft ODBC for Oracle driver (version 2.573.7400.00):

we'd occasionally see huge spikes in connections and database deadlocks. The side effect of the deadlocks was that connections from the web servers to the database would increase from 5-10 to 50-100! In turn, this spike in connections made the website slow down to a crawl for the users. Ugly!
We were only able to identify the problem by doing memory dumps on both the web servers and database server simultaneously. We then sent the dumps and SQLnet logs to Oracle and Microsoft. It was a Microsoft engineer who identified the lock condition. In this condition, ASP requests for data sent through the Microsoft ODBC driver waited for database responses that were never returned from the database. On the database side, the database was waiting for CLOSE acknowledgements that never came back from the ODBC driver. Nightmare!
The Microsoft engineer told us that the specific Microsoft for Oracle ODBC driver was no longer supported. Oracle technicians stated that they had seen problems with high database connections and ODBC with Oracle driver versions 9.1 and below. Through a series of successful and unsuccessful driver installations, we finally had a working system without the connection hangs using the Oracle for Ora9i driver version 9.02.00.07 and the latest hotfix patches:
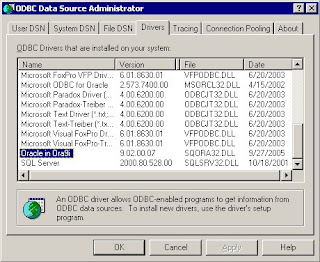
Here is a list of the patches to get to 9.2.0.7:
1) Oracle 9207 patch set (#4163445)
2) Oracle Data Access Software for Windows patch (#4622091)
3) ODBC supplementary patch to the above #4622091 patch (#4640047)
Eeesh!
For those of you wishing to see all the ugly install steps, here they are:
1) Download patches at https://metalink.oracle.com/ or more specifically:
http://www.oracle.com/technology/software/tech/windows/odbc/index.html
Install Oracle 9207 patch set (#4163445)
2) shutdown iis, set startup to manual
3) shutdown Distributed Transaction Coordinator and Oracle MTS Recovery Service
4) reboot in order to clear any connections to Oracle DLLs
5) expand the Oracle 9207 patch set (p4163445_92070_WINNT.zip) to a temp dir (view README.html for general install info)
6) The installer uses the Oracle 10i installer that comes with the patch set. So run the installer from the temp directory ->
../Disk1/setup.exe.
7) Click Next on Welcome screen
8) The patchset directory should automatically be filled in as "Source." For Destination, select "OraHome9i". Click Next.
9) You'll get a summary of the files that the Oracle Installer is going to update. Click Install.
10) If all goes well, the Oracle patch set will be installed successfully.
Install Oracle Data Access Software for Windows patch (#4622091)
11) expand the Oracle Data Access Software for Windows patch (p4622091_92070_MSWIN.zip)
12) Run the installer in the expanded directory ..\ODAC9.2.0.7\Disk1\setup.exe
13) The patchset directory should automatically be filled in as "Source."
For Destination, select "OraHome9i". Click Next.
14) Select Oracle ODBC Driver 9.2.0.7.0 and click Next
15) You'll get a Summary screen to review. Click Install. You should get a successful message. Click Next Install.
16) Keep the same Source/Destination as you started with
17) Select Oracle Data Provider for .NET 9.2.0.7.0 and click Next
18) You'll get a Summary screen to review. Click Install. You should get a successful message. Click Exit and Yes to confirm.
Install one-off, ODBC supplementary patch to the above #4622091 patch (#4640047)
19) expand the Oracle Data Access Software for Windows patch (p4640047_92070_MSWIN.zip)
20) copy sqora32.dll, sqoras32.dll, sqresus.dll into the bin folder of Oracle home (should be D:\Oracle9i\bin)
21) reenable iis startup as automatic
22) reboot for good measure
That is the whole enchilada. Yuck!
Tuesday, August 21, 2007
Saturday, August 18, 2007
mount a windows share under mac
Pretty easy, but I don't do this very often, so I forget.
1) open Finder
2) press the Apple-K key combination:
3) enter your Windows share path like so
smb://serverIp/shareName
For example, if your serverIp is 192.168.62.56 and your share name is temp, you'll enter:
smb://192.168.62.56/temp
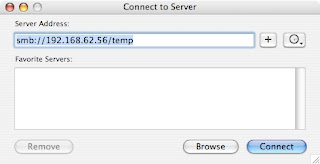
4) enter your credentials if necessary:
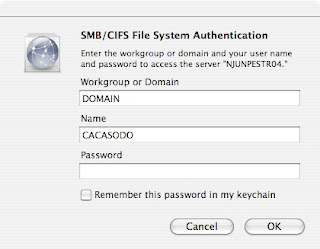
that's it!
1) open Finder
2) press the Apple-K key combination:
3) enter your Windows share path like so
smb://serverIp/shareName
For example, if your serverIp is 192.168.62.56 and your share name is temp, you'll enter:
smb://192.168.62.56/temp

4) enter your credentials if necessary:

that's it!
Tuesday, August 14, 2007
eliminating the need to enter your password via SSH or SCP
Everybody and their mother who is a Unix or Windows admin writes shell scripts to perform mundane but necessary work. This work is usually accomplished via SSH, as it is a secure method to transfer information between servers. This is especially true on Unix system, where ssh and scp (Secure Copy) are the hammer and screwdriver of a Unix admins' toolset.
SSH and SCP are great, but one of the pains of using these programs is the constant need to type in a password to logon to different servers. Wouldn't it be nice to not have to enter a password everytime you logged onto a server or had a script run? As well, wouldn't it be even better to have those processes still be secure? Of course! So in order to free your life of passwords, I will now show you pubkey authentication.
In the interest of full disclosure, I got a good bit of the information for this post from Security Focus, but I felt that the way they organized the details was a bit confusing. Hence, I've reworked their original example to something a more understandable. Here is the link to that original article:
http://www.securityfocus.com/infocus/1810
Added 3/1/2008
For a more general understanding of how SSH works with public key encryption, read the following article:
http://www.securityfocus.com/infocus/1806
In order for pubkey authentication to work, you will need to create a public key on your source machine and setup an authorized_keys file on the destination server. The source machine will be the server where you are logging in FROM. The destination server is where you are logging in TO. For instance, I like to run a script on my Fedora desktop that gathers network information FROM my RHEL3 server. So my source is the Fedora desktop and the destination is my RHEL3 server.
Here's the picture:
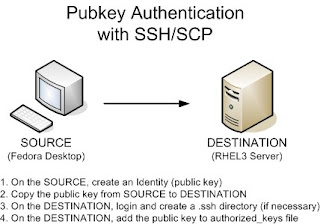
There are four steps to setting up pubkey authentication:
1. On the source, create an Identity (a public key)
2. Copy the public key from the source to the destination
3. On the destination, login and create a .ssh directory (if necessary)
4. On the destination, add the public key to authorized_keys file
So let's begin.
1. On the source machine, create an Identity (a public key)
a. Type ssh-keygen -t rsa as below. You can choose to enter a passphrase or not:
FedoraDesktop$ ssh-keygen -t rsa
Generating public/private rsa key pair.
Enter file in which to save the key (/home/cacasodo/.ssh/id_rsa):
Enter passphrase (empty for no passphrase): (enter passphrase)
Enter same passphrase again: (enter passphrase)
Your identification has been saved in /home/cacasodo/.ssh/id_rsa.
Your public key has been saved in /home/cacasodo/.ssh/id_rsa.pub.
The key fingerprint is:
74:9b:69:24:4a:44:3f:a4:be:46:23:47:19:f7:dc cacasodo@FedoraDesktop
b. Verify that one public (*.pub) and one private file exists by changing to your users's .ssh directory and listing out the files:
FedoraDesktop$ cd $HOME/.ssh
FedoraDesktop$ ls -l
-rw------- 1 cacasodo cacasodo 883 Jan 21 11:52 id_rsa
-rw-r--r-- 1 cacasodo cacasodo 223 Jan 21 11:52 id_rsa.pub
c. Finally, check the contents of both files:
FedoraDesktop$ cat id_rsa
-----BEGIN RSA PRIVATE KEY----- jK2TIwbHtE7GoP/Za3NTZJm2Ozviz8+PHPIEyyt9/kzT0+yo3KmgsstlqwIBIwKB XdBh42izEWsWpXf9t4So0upV1DEcjq8CQQDEKGAzNdgzOoIozE3Z3thIjrmkimXM J/Y3xQJBAMEqZ6syYX/+uRt+any1LADRebCq6UA076Sv1dmQ5HMfPbPuU9d3yOqV j0Fn2H68bX8KkGBzGhhuLmbrgRqr3+SPM/frUj3UyYxns5rnGspRkGB3AkALCbzH 9EAV8Uxn+Jhe5cgAC/hTPPdiwTJD7MpkNCpPuKRwrohytmNAmtIpKipAf0LS61np MIICWgIBAAKBgQCc+1oixZ/g84gpZH0NeI+CvVoY5O0FOCSpFCbhUGJigQ6VeKI5 gpOlDztpJ1Rc+KmfZ2qMaftwwnLmefhk1wPcvfZvvLjfdmHY5/LFgDujLuL2Pv+F 7tBjlyX9e9JfXZau2o8uhBkMbb3ZqYlbUuuoCAnUtL5uZUiiHM0BAtnGAd6epAYE gBHw1xnqsy+mzbuWdLEVF7crlUSsctwGapb6/SEQgEXFm0RITQ3jCY808NjRS3hW Z+uCCO8GGUsn2bZpcGXa5vZzACvZL8epJoMgQ4D0T50rAkEA0AvK4PsMF02Rzi4E mXgzd1yCa030LYR/AkApG1KT//9gju6QCXlWL6ckZg/QoyglW5myHmfPR8tbz+54
/lj06BtBA9iag5+x+caV7qKth1NPBbbUF8Sbs/WI5NYweNoG8dNY2e0JRzLamAUk
59ssjBG/a4ZXNn32n78DO0i6zVV5vwf8rv2sf
-----END RSA PRIVATE KEY-----
FedoraDesktop$ cat id_rsa.pub
ssh-rsa aIsWf4POIKWR9DXiPgr1aGOTtBTgkqRQm4VBiYoEOlXiiOYKTpQ87aSd
B3NzaC1yc2EAAAABIwAAAcMJy5nn4ZNcD3L32b7y433Zh2IEAnPtAAAAUXPipn
2dqjGn7OfyxYA7oy7i9j7/hYytkyMGx7ROxqD/2WtzU2SZtjs74s/PjxzyBMsr ff5M09PsqNypoLLLZas= cacasodo@FedoraDesktop
2. Copy the public key from the source to the destination
a. This one is fairly easy. We'll go ahead and scp the public key file from the source to the destination as below:
FedoraDesktop$ cd $HOME/.ssh
FedoraDesktop$ scp id_rsa.pub rhel3server:id_rsa_FedoraDesktop.pub
cacasodo@rhel3server's password: (enter password)
The scp command above copies the public key to the destination server with a new filename, id_rsa_FedoraDesktop.pub
3. On the destination, login and create a .ssh directory (if necessary)
a. Login via ssh
FedoraDesktop$ ssh rhel3server
cacasodo@rhel3server's password: (enter password)
b. If it does not exist, follow the commands below to make a .ssh directory. Oh, don't forget the "." in front of the ssh!
rhel3server$ mkdir .ssh
rhel3server$ chmod 700 .ssh
rhel3server$ cd .ssh
4. On the destination, add the public key to authorized_keys file
a. We will use the concatenate (>>) redirector to add our source machine's public key to the authorized_keys file on the destination server.
rhel3server$ cat ../id_rsa_FedoraDesktop.pub >> authorized_keys
b. Let's verify the file:
rhel3server$ cat authorized_keys
ssh-rsa n7OfyxYA7oy7i9j7/hYytkyMGx7ROxqD/2WtzU2SZtjs74s/PjxzyBMsr 3NzaC1yc2EAAAABIwAAAcMJy5nn4ZNcD3L32b7y433Zh2IEAnPt f4POIKWR9DXiPgr1aGOTtBTgkqRQm4VBiYoEOlXiiOYKTpQ87aSdUXPipn
M09PsqNypoLLLZas= cacasodo@FedoraDesktop
c. And make sure to lock down the file with tighter permissions:
rhel3server$ chmod 600 authorized_keys
d. OK! So now, the big test is to try and login from your source server to the destination server. You should no longer need to enter a password!
FedoraDesktop$ ssh rhel3server
rhel3server$
We're in! Now you don't have to enter your ssh password at the prompt any longer! Hoo-ah!
attaching a binary file to command line email
In yesterday's post (/2007/08/scripted-gnuplot-graphs.html), I created a chart of the previous days' web server connections. Today, I'd like to expand the functionality of the script by having the script automatically email me the previous days' connections plot. Unfortunately, because mail servers strip out line feeds and other control characters from emails, I can't simply attach a binary file to an email. I must first uuencode the binary file that I wish to send.
Uuencode translates binary code into text, in order that email servers can send along a binary file without garbling it. Fedora Core does not have uuencode installed by default. It is packaged within the sharutils rpm. I can go ahead and install this using yum:
[root@computer ~]# yum install sharutils
*Loading "installonlyn" plugin
Setting up Install Process
Setting up repositories
Reading repository metadata in from local files
Parsing package install arguments
Resolving Dependencies
--> Populating transaction set with selected packages. Please wait.
---> Downloading header for sharutils to pack into transaction set.
sharutils-4.6.1-2.i386.rp 100% ========================= 12 kB 00:00
---> Package sharutils.i386 0:4.6.1-2 set to be updated
--> Running transaction check
Dependencies Resolved
=============================================================================
Package Arch Version Repository Size =============================================================================
Installing: sharutils i386 4.6.1-2 core 201 k
Transaction Summary
=============================================================================
Install 1 Package(s) Update 0 Package(s) Remove 0 Package(s)
Total download size: 201 k
Is this ok [y/N]: y
Downloading Packages:
(1/1): sharutils-4.6.1-2. 100% ========================= 201 kB 00:02
Running Transaction Test
Finished Transaction Test
Transaction Test Succeeded
Running Transaction
Installing: sharutils ######################### [1/1]
Installed: sharutils.i386 0:4.6.1-2
Complete!
Once I've installed uuencode, I can test uuencoding a binary file and emailing it via the command line:
uuencode webconn.png webconn.png mail -s 'Web connections for yesterday'
The syntax of the command is relatively simple. The first argument to uuencode is the file to encode. The second argument is the remote file extraction name; ie, the name of the file that your email client will display.
Cool! This worked! So now, I can simply add a few lines of code to yesterday's script:
if [ -s webconn.png ]
then
uuencode webconn.png webconn.png mail -s 'Web connections for yesterday' admin@techanswerguy.com
fi
This is a simple IF-THEN statement to check that the file exists. If the file exists, I will go ahead, uuencode the file and email it.
You can also use other email programs like nail or mutt to email the file. Here are two examples:
mutt -a webconn.png -s "web conns" admin@site.com < /dev/null
echo ¦ nail -H -a webconn.png -s "web conns" admin@site.com
Wonder of wonders, it works! What will they think of next?! :) Reference: http://www.shelldorado.com/articles/mailattachments.html
Monday, August 13, 2007
scripted gnuplot graphs
One of my many tasks as a webmaster is to monitor the traffic to and from our web servers. As a follow up to my quick start guide to gnuplot: /2007/07/quick-start-guide-to-gnuplot-plotting.html
I will expand upon that posts' themes and give you a simple script that will output a nice PNG graphic of a data set without having to use gnuplot interactively.
As in the previous post, my goal is to plot HTTP connections. I want the script to generate the graph for the previous days' activity. Should be simple enough!
As review, my data file looks like this:
20070727151200 215 210 5
20070727151259 191 186 5
20070727151401 207 201 6
20070727151500 186 180 6
20070727151600 165 156 9
20070727151700 167 161 6
20070727151801 182 174 8
20070727151900 197 190 7
20070727152001 197 191 6
20070727152100 187 181 6
* The first column is date/time stamp.
* The second column is total HTTP connections.
* The third column is HTTP connections from the client browser to the cache.
* The last column is HTTP connections back to the origin server.
Here is the script:
!#/bin/bash
TITLE="Caching server HTTP connections"
TODAY="`date +%Y%m%d`000000"
YESTERDAY="`date +%Y%m%d --date="-1 day"`000000"
YMAX=350
gnuplot -noraise <<-finis
set xdata time
set timefmt "%Y%m%d%H%M%S"
set yrange [0:$YMAX]
set ytics 50
set bmargin 3
set grid xtics mxtics ytics
set title "$TITLE"
set xrange ["$YESTERDAY":"$TODAY"]
set term png medium
set output "webconn.png"
plot 'webconn.txt' using 1:3 title "HTTP_WEB" with lines,\
'webconn.txt' using 1:4 title "HTTP_OWS" with lines
finis
You can see I have a few constants up top that set a title and the date range. Note the neat little "date -1" trick in the date command for the YESTERDAY constant. That has come in handy more than once!
I then set a maximum value for the Y axis.
Using the -noraise switch tells gnuplot to not raise the graph window. Next, I use the input redirector (<<) to feed in parameters to gnuplot. The "-finis" is simply a label to the input that I call at the beginning and the end of my input. I then feed in as many parameters as I need. When I am done, I just call "finis" without the hyphen and this turns off the input.
You can see I feed in a lot of the parameters that I had to manually enter during the last post regarding interactive gnuplot. I've thrown a few more in with this example:
set yrange sets the maximum range of the y axis
set ytics sets the spacing of the bars in the y axis
set bmargin sets the spacing of the bottom margin in pixels
set grid xtics mxtics ytics sets your grid preferences
set term sets the output type; in this case, a medium sized png graphic
set output specifies the name of the file
The rest of the commands you already know from my first post on the subject. At the end of all the parameters I set, I make sure to close the input by entering the keyword "finis" that I defined at the beginning of the input redirection. You can use any non-shell script word for the keyword. I just chose "finis" because it means "The End" and has no other special meaning to the Unix shell.
Finally, here is the lovely output:
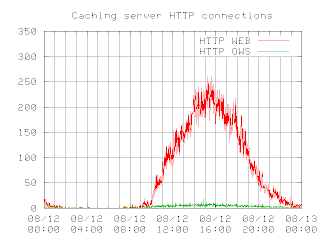
Hope you liked it!
'sodo
Subscribe to:
Posts (Atom)