Tuesday, February 01, 2011

projectM visualizer

I've been looking for a decent visualization software for Linux for quite some time. In my search, I stumbled upon this neat gadget, essentially a visualizer in a box:
http://www.milkymist.org/

I didn't really need all that. But further reading and a hop onto the forums of the Milkymist site gave me a lead. One of the folks on the user boards kindly turned me onto projectM, a visualizer modeled off of MilkDrop.

The good news is that I got projectM running and it seems to work very well:

Of course, the install wasn't without its difficulties. I had a few hurdles, the primary one self-imposed because I didn't want to spend time building from source. I was in luck: my current version of Fedora (12, x86-64) had the projectM libs in the updates repo:
[sodo@ogre ~]$ rpm -qa | grep projectM*
projectM-jack-2.0.1-2.fc12.x86_64
libprojectM-2.0.1-7.fc12.x86_64
libprojectM-qt-2.0.1-2.fc12.x86_64
projectM-pulseaudio-2.0.1-3.fc12.x86_64
projectM-libvisual-2.0.1-2.fc12.x86_64


The next limitation was that the audio apps that projectM works with that utilize libvisual were limited in my repository: XMMS and Amarok only. And the XMMS in my repo did not have the projectM-xmms build. Thus Amarok was my only choice.

Once I got Amarok installed, I needed to reconfigure it to send its audio through Pulse and not plain ALSA. I already had alsa-plugins-pulseaudio installed, but I had no way to control Pulseaudio, so I had to install pavucontrol. Once that was done, good to go man! Running my favorite tunes with visuals! I have yet to customize it, but some nice features seem to be possible:
http://ubuntuforums.org/showthread.php?t=749793

And I am impressed with Amarok. Really fast search, easy to create and navigate playlists, search playlists and configurable interface:


Start projectM
projectM-pulseaudio

Controls for projectM
m - brings up a menu
f - toggles fullscreen on/off
l - "locks" to a particular preset
y - toggles shuffle mode
n - next preset
p - previous preset
r - selects random preset

F1 - Help menu
F2 - Toggles song title on/off (doesn't work in libvisual or pulseaudio as far as I can tell)
F3 - Toggle preset name on/off
F4 - Toggel rendering info on/off
F5 - Shows fps


Hooray!

Monday, January 24, 2011

installing flash 10.2 preview 3 64-bit on Fedora 14 x86-64

This is a quick tech note for myself.

1) download the flash 10.2 preview 3 build from here:
http://labs.adobe.com/downloads/flashplayer10_square.html

2) follow install instructions from here:
http://fedoraproject.org/wiki/Flash

3) watch out for MP3 audio bug (usually seen with YouTube vids)
http://fedoraproject.org/wiki/Common_F14_bugs#flash-64-sound

Workaround (thanks Linus!) here: https://bugzilla.redhat.com/show_bug.cgi?id=638477#c55

These install instructions work. Happily, they also get Flash to work in Chrome on Fedora 14.

TAG

Wednesday, January 19, 2011

ubuntu vm networking weirdness

Over the past week, I've been working quite a bit with Ubuntu 10.04 and VMware. Two problems confronted me:
1) /etc/resolv.conf was getting overwritten
2) /etc/network/interfaces was missing my eth0 network interface

Number One
The first problem was more easily solved than the second issue. What I did to resolve this issue was to edit /etc/dhcp3/dhclient.conf and add the following line:
supersede domain-name-servers [server1],[server2],etc;
(yes, supersede is misspelled)

Number Two
The second problem was a little more esoteric. What I found was that the network interface of my Ubuntu VM kept getting renamed (from eth0 to eth1 and then eth2). The cycling interface names may be caused by moving the VM to different machines. This is because Ubuntu will remember the MAC address of the first machine it was installed on. Ifconfig can see the newly named interfaces, but the ifup and ifdown commands to start and stop the network interfaces cannot see the new names. Ifup and ifdown rely upon entries in /etc/network/interfaces.

In order for ifup and ifdown to see eth0, I added the interface back into /etc/network/interfaces with the following lines:
auto eth0
iface eth0 inet dhcp


By the way, you can use a second command to restart a network interface:
sudo invoke-rc.d networking restart

Back to the original problem, that of the switching network interface names. Ubuntu uses the udev service to detect hardware. So, the solution was to either edit /etc/udev/rules.d/70-persistent-net.rules or delete it and have udev the system regenerate the file. As deleting the file was easier, I opted for that method. After deleting the file, I reboot the vm and voila, my eth0 interface was back.

all in a good days work,
TAG

Reference
http://serverfault.com/questions/63103/newsid-program-for-linux
http://en.wikipedia.org/wiki/Udev

Tuesday, January 18, 2011

fun with nmap

I left a Linux virtual machine on at work, but forgot to write down the IP address. So I thought I'd use nmap to figure out what IP the machine had based upon the services running on it. First though, I wanted to familiarize myself with the basic nmap commands.

The -A option seemed the best choice for a first time user. -A enables host operating system and version detection, script scanning and a traceroute. For my local machine, the output looks like this:
[sodo@ogre ~]$ nmap -A localhost

Starting Nmap 5.21 ( http://nmap.org ) at 2011-01-18 18:23 EST
Nmap scan report for localhost (127.0.0.1)
Host is up (0.00053s latency).
rDNS record for 127.0.0.1: ogre
Not shown: 993 closed ports
PORT STATE SERVICE VERSION
22/tcp open ssh OpenSSH 5.3 (protocol 2.0)
ssh-hostkey: 1024 a3:bd:bf:bd:bd:6a:64:1a:f8:2d:11:56 (DSA)
_2048 77:8d:ab:86:98:30:05:28:41:53:30:78:db:a2:f7:9c (RSA)
80/tcp open http Apache httpd 2.2.15 ((Fedora))
_html-title: Test Page for the Apache HTTP Server on Fedora
111/tcp open rpcbind
rpcinfo:
100000 2,3,4 111/udp rpcbind
100024 1 34022/udp status
100000 2,3,4 111/tcp rpcbind
_100024 1 58402/tcp status
443/tcp open ssl/http Apache httpd 2.2.15 ((Fedora))
_html-title: Test Page for the Apache HTTP Server on Fedora
631/tcp open ipp CUPS 1.4
888/tcp open ssl/http 3ware 3DM2 Serial RAID http config 2.0
_sslv2: server still supports SSLv2
_html-title: 3ware 3DM2 - ogre - Summary
3306/tcp open mysql MySQL 5.1.47
mysql-info: Protocol: 10
Version: 5.1.47
Thread ID: 16
Some Capabilities: Long Passwords, Connect with DB, Compress, ODBC, Transactions, Secure Connection
Status: Autocommit
_Salt: i:$CfYg}]azzsSZ1(;1#
Service Info: Device: storage-misc


Not that I didn't know this information, but it is interesting that you can find out quite a bit about a machine just by doing a portscan with nmap. In the example above, I can see that I have the following ports open and available (at least to the localhost):
-port 22 (SSH)
-port 80 (HTTP or the apache daemon)
-port 111 (RPC)
-port 443 (HTTPS via apache again)
-port 631 (CUPS, the linux printing system)
-port 888 (3Ware RAID web configuration tool)
-port 3306 (mysql web-based configuration utility)


Cool. Now if I change nmap to use the IP of my workstation instead of the loopback (localhost) address, you'll see that some of the information that was available at the localhost is not available at the proper IP of the box:
[sodo@ogre ~]$ nmap -A 192.168.1.8

Starting Nmap 5.21 ( http://nmap.org ) at 2011-01-18 18:49 EST
Nmap scan report for ogre (192.168.1.8)
Host is up (0.00055s latency).
Not shown: 994 closed ports
PORT STATE SERVICE VERSION
22/tcp open ssh OpenSSH 5.3 (protocol 2.0)
ssh-hostkey: 1024 a3:d6bf:bd:bd:6a:64:1a:f8:2d:11:56 (DSA)
2048 77:8d:ab:86:98:30:05:28:41:53:30:78:db:a2:f7:9c (RSA)
80/tcp open http Apache httpd 2.2.15 ((Fedora))
_html-title: Test Page for the Apache HTTP Server on Fedora
111/tcp open rpcbind
rpcinfo:
100000 2,3,4 111/udp rpcbind
100024 1 34022/udp status
100000 2,3,4 111/tcp rpcbind
_100024 1 58402/tcp status
443/tcp open ssl/http Apache httpd 2.2.15 ((Fedora))
_html-title: Test Page for the Apache HTTP Server on Fedora
888/tcp open ssl/http 3ware 3DM2 Serial RAID http config 2.0
_html-title: 3ware 3DM2 - ogre - Summary
_sslv2: server still supports SSLv2
3306/tcp open mysql MySQL (Host blocked because of too many connections)
Service Info: Device: storage-misc


Service detection performed. Please report any incorrect results at http://nmap.org/submit/ .
Nmap done: 1 IP address (1 host up) scanned in 26.12 seconds


Here is another device on my network, a Motorola NIM 100 ethernet over cable bridge that actually has telnet and a web service up and available:
[sodo@ogre ~]$ nmap -A 192.168.1.3

Starting Nmap 5.21 ( http://nmap.org ) at 2011-01-18 18:00 EST
Nmap scan report for 192.168.1.3
Host is up (0.00070s latency).
Not shown: 998 closed ports
PORT STATE SERVICE VERSION
23/tcp open telnet Linux telnetd
80/tcp open http Boa httpd
robots.txt: has 1 disallowed entry
_/
_html-title: Ethernet Coax Bridge - Login
Service Info: OS: Linux

Service detection performed. Please report any incorrect results at http://nmap.org/submit/ .
Nmap done: 1 IP address (1 host up) scanned in 7.39 seconds


Note that only two ports are open and available on the real IP of the box. Also, it is interesting that nmap shows "Service Info: OS: Linux" on the real IP address. You can use the -p switch to scan for a particular port on a device:
[sodo@ogre ~]$ nmap -p 80 -A 192.168.1.3

Starting Nmap 5.21 ( http://nmap.org ) at 2011-01-18 19:12 EST
Nmap scan report for 192.168.1.3
Host is up (0.0015s latency).
PORT STATE SERVICE VERSION
80/tcp open http Boa httpd
robots.txt: has 1 disallowed entry
_/
_html-title: Ethernet Coax Bridge - Login


The verbose (-v) switch to that last command will display exactly what nmap is doing..ping, DNS lookup, port connections, service scanning, script scanning, latency, count of closed ports and a summary of how many hosts nmap scanned and how long the scan took:
[sodo@ogre ~]$ nmap -v -A 192.168.1.3

Starting Nmap 5.21 ( http://nmap.org ) at 2011-01-18 18:00 EST
NSE: Loaded 36 scripts for scanning.
Initiating Ping Scan at 18:00
Scanning 192.168.1.3 [2 ports]
Completed Ping Scan at 18:00, 0.00s elapsed (1 total hosts)
Initiating Parallel DNS resolution of 1 host. at 18:00
Completed Parallel DNS resolution of 1 host. at 18:00, 0.03s elapsed
Initiating Connect Scan at 18:00
Scanning 192.168.1.3 [1000 ports]
Discovered open port 80/tcp on 192.168.1.3
Discovered open port 23/tcp on 192.168.1.3
Completed Connect Scan at 18:00, 1.11s elapsed (1000 total ports)
Initiating Service scan at 18:00
Scanning 2 services on 192.168.1.3
Completed Service scan at 18:00, 6.06s elapsed (2 services on 1 host)
NSE: Script scanning 192.168.1.3.
NSE: Starting runlevel 1 (of 1) scan.
Initiating NSE at 18:00
Completed NSE at 18:00, 0.04s elapsed
NSE: Script Scanning completed.
Nmap scan report for 192.168.1.3
Host is up (0.00098s latency).
Not shown: 998 closed ports
PORT STATE SERVICE VERSION
23/tcp open telnet Linux telnetd
80/tcp open http Boa httpd
robots.txt: has 1 disallowed entry
_/
_html-title: Ethernet Coax Bridge - Login
Service Info: OS: Linux

Read data files from: /usr/share/nmap
Service detection performed. Please report any incorrect results at http://nmap.org/submit/ .
Nmap done: 1 IP address (1 host up) scanned in 7.88 seconds


With this basic information about a single host, I graduated to scanning the network using the CIDR notation for network subnetting. I left out the above machines in the output below. Also, before I did the nmap, I started a Mac and an old XP box that I had in the environment, just to see what a really insecure Windows machine looks like.
[sodo@ogre ~]$ nmap -A 192.168.1.0/24

Starting Nmap 5.21 ( http://nmap.org ) at 2011-01-18 18:46 EST
Nmap scan report for mac (192.168.1.12)
Host is up (0.0085s latency).
Not shown: 500 closed ports, 494 filtered ports
PORT STATE SERVICE VERSION
22/tcp open ssh OpenSSH 5.2 (protocol 1.99)
_sshv1: Server supports SSHv1
ssh-hostkey: 2048 c:c4:b6:69:6c:4e:27:5c:5a:fe:fe:09 (RSA1)
2048 f1:ce:c0:3c:a0:83:db:24:0c:7d:8a:ca:48:41:ea:44 (DSA)
_2048 db:20:90:c5:5a:bc:3d:ea:cd:12:7b:17:03:79:6b:ad (RSA)
88/tcp open kerberos-sec Mac OS X kerberos-sec
548/tcp open afp Apple AFP (name: MACLTSODO; protocol 3.3; Mac OS X 10.5)
2170/tcp open tcpwrapped
49152/tcp open tcpwrapped
Service Info: OS: Mac OS X

Nmap scan report for xp (192.168.1.89)
Host is up (0.050s latency).
Not shown: 990 closed ports
PORT STATE SERVICE VERSION
25/tcp open smtp Microsoft ESMTP 6.0.2600.2180
80/tcp open http Microsoft IIS webserver 5.1
_html-title: Site doesn't have a title (text/html).
_http-favicon:
135/tcp open msrpc Microsoft Windows RPC
139/tcp open netbios-ssn
443/tcp open https?
445/tcp open microsoft-ds Microsoft Windows XP microsoft-ds
1025/tcp open msrpc Microsoft Windows RPC
1026/tcp open msrpc Microsoft Windows RPC
1027/tcp open msrpc Microsoft Windows RPC
3389/tcp open microsoft-rdp Microsoft Terminal Service
Service Info: Host: computer; OS: Windows

Host script results:
smb-os-discovery:
OS: Windows XP (Windows 2000 LAN Manager)
Name: WORKGROUP\COMPUTER
_ System time: 2011-01-18 18:43:07 UTC-5
_nbstat: NetBIOS name: COMPUTER, NetBIOS user: , NetBIOS MAC: 0d:0c:11:a4:23:4a
_smbv2-enabled: Server doesn't support SMBv2 protocol

You can see that the XP box has its pants down, so to speak. Lots of insecure services running..even the MAC address..eesh. (The names have been changed to protect the innocent.) Better turn that puppy off. So, you can see that we can gather quite a bit of information just by doing a portscan using nmap. Beware, people!

Rounding out the post, I was able to discover my new server at work using the -O switch. Not surprisingly, my Linux box at work was the most secure among all the Windows boxes nmap found with only one port open. Though, nmap did a good job at guessing the OS.

[sodo@computer ~]$ nmap -A 192.168.113.0/24
Interesting ports on 192.168.113.25:
Not shown: 999 filtered ports
PORT STATE SERVICE
22/tcp open ssh
MAC Address: D8:CA:2F:8E:FB:26 (Unknown)
Warning: OSScan results may be unreliable because we could not find at least 1 open and 1 closed port
Device type: general purposefirewallWAProuter
Running (JUST GUESSING) : Linux 2.6.X (94%), Check Point Linux 2.4.X (87%), D-Link embedded (87%), Linksys embedded (87%), Peplink embedded (87%), Linksys Linux 2.4.X (86%)
Aggressive OS guesses: Linux 2.6.9 - 2.6.18 (94%), Linux 2.6.9 - 2.6.26 (94%), Linux 2.6.22 (Fedora Core 6) (92%), Linux 2.6.18 (CentOS 5, x86_64, SMP) (90%), Linux 2.6.17 - 2.6.28 (89%), Linux 2.6.18 (CentOS 5) (89%), Linux 2.6.18 (Centos 5.3) (89%), Linux 2.6.23 (89%), Linux 2.6.24 - 2.6.28 (89%), Linux 2.6.9 - 2.6.27 (89%)
No exact OS matches for host (test conditions non-ideal).
Network Distance: 1 hop


Compare those results to the very revealing XP box:
[sodo@computer ~]$ nmap -A 192.168.113.2
Starting Nmap 5.21 ( http://nmap.org ) at 2011-01-19 10:12 EST
Nmap scan report for SODOWORK (192.168.113.2)
Host is up (0.0016s latency).
Not shown: 984 closed ports
PORT STATE SERVICE VERSION
21/tcp open ftp Microsoft ftpd
_ftp-anon: Anonymous FTP login allowed
22/tcp open ssh SCS sshd 5.3.2.10 (protocol 2.0)
_ssh-hostkey: 1536 cc:f7:a1:be:d8:c8:ed:f0:08:c0:3d:fc:bc (RSA)
25/tcp open smtp Microsoft ESMTP 6.0.2600.5512
80/tcp open http Microsoft IIS webserver 5.1
_html-title: Under Construction
135/tcp open msrpc Microsoft Windows RPC
139/tcp open netbios-ssn
443/tcp open https?
445/tcp open microsoft-ds Microsoft Windows XP microsoft-ds
1074/tcp open msrpc Microsoft Windows RPC
2030/tcp open oracle-mts Oracle MTS Recovery Service
3389/tcp open microsoft-rdp Microsoft Terminal Service
5000/tcp open tcpwrapped
5631/tcp open pcanywheredata?
8009/tcp open ajp13 Apache Jserv (Protocol v1.3)
8222/tcp open http VMware Server 2 http config
_html-title: VMware Server 2
8333/tcp open ssl/http VMware Server 2 http config
_html-title: VMware Server 2
Service Info: OS: Windows

Host script results:
_nbstat: NetBIOS name: SODOWORK, NetBIOS user: , NetBIOS MAC: 0d:0e:9c:96:96:29
smb-os-discovery:
OS: Windows XP (Windows 2000 LAN Manager)
Name: CORP\SODOWORK
_ System time: 2011-01-19 10:12:35 UTC-5
_smbv2-enabled: Server doesn't support SMBv2 protocol


Hope you enjoyed this exploration of nmap basics. It certainly was revealing for me!
TAG

Reference
http://nmap.org/

digging down into a linux process

So I inadvertantly exited out of my Fedora X server without saving or exiting my VMware Player's open virtual machine:

This left my vm in an unknown state. You could still see the lock files in the Virtual Machine's directory:
[sodo@ogre ~]$ ll Virtual\ Machines/Windows\ 7\ x64/
total 10976188
drwxrwxr-x 3 sodo 4096 2011-01-07 12:53 caches
-rw-r--r-- 1 sodo 320659 2011-01-18 14:41 vmware-0.log
-rw-r--r-- 1 sodo 359599 2011-01-18 14:14 vmware-1.log
-rw-r--r-- 1 sodo 565465 2011-01-08 00:14 vmware-2.log
-rw-r--r-- 1 sodo 317488 2011-01-18 17:33 vmware.log
-rw-rw---- 1 sodo 8684 2011-01-18 14:42 Windows 7 x64.nvram
-rw------- 1 sodo 2103836672 2011-01-18 17:35 Windows 7 x64-s001.vmdk
-rw------- 1 sodo 2121203712 2011-01-18 17:35 Windows 7 x64-s002.vmdk
-rw------- 1 sodo 2145255424 2011-01-18 17:35 Windows 7 x64-s003.vmdk
-rw------- 1 sodo 2145976320 2011-01-18 14:49 Windows 7 x64-s004.vmdk
-rw------- 1 sodo 955 2011-01-18 14:41 Windows 7 x64.vmdk
drwxrwxrwx 2 sodo 4096 2011-01-18 14:41 Windows 7 x64.vmdk.lck
-rw-rw---- 1 sodo 1073741824 2011-01-08 00:14 Windows 7 x64.vmem
-rw-rw---- 1 sodo 0 2011-01-07 12:37 Windows 7 x64.vmsd
-rw-rw---- 1 sodo 182610705 2011-01-18 10:18 Windows 7 x64.vmss
-rwxrwxr-x 1 sodo 2477 2011-01-18 14:42 Windows 7 x64.vmx
-rw-rw-r-- 1 sodo 1645 2011-01-07 12:53 Windows 7 x64.vmxf
drwxrwxrwx 2 sodo 4096 2011-01-18 14:41 Windows 7 x64.vmx.lck


But after some Googling, there seemed to be no way to restart the orphaned vm without killing the process that was hanging out there. Before I killed the vm process, I researched it to find out more about it. First, I did a search on the process:
[sodo@ogre ~]$ ps -ef | grep vmx
sodo 4629 1 13 10:18 ? 00:31:48 /usr/lib/vmware/bin/vmware-vmx -ssnapshot.numRollingTiers=0 -sRemoteDisplay.vnc.enabled=FALSE -s vmx.stdio.keep=TRUE -# product=8;name=VMware Player;version=3.1.3;buildnumber=324285;licensename=VMware Player;licenseversion=6.0; -@ pipe=/tmp/vmware-sodo/vmxb90ce351150180d7;readyEvent=90 /home/sodo/Virtual Machines/Windows 7 x64/Windows 7 x64.vmx


I saw that the process number was 4629. The command that started the process was vmware-vmx:
[sodo@ogre ~]$ ps -p 4629
PID TTY TIME CMD
4629 ? 00:31:48 vmware-vmx


Digging into the process directory, I saw the status of the process was sleeping:
[sodo@ogre ~]$ cat /proc/4629/task/4629/status
Name: vmware-vmx
State: S (sleeping)
Tgid: 4629
Pid: 4629
PPid: 1
TracerPid: 0
Uid: 500 500 0 500
Gid: 500 500 500 500
Utrace: 0
FDSize: 256
Groups: 500
VmPeak: 3281396 kB
VmSize: 3131036 kB
VmLck: 0 kB
VmHWM: 1409588 kB
VmRSS: 1343972 kB
VmData: 2727812 kB
VmStk: 288 kB
VmExe: 6784 kB
VmLib: 134888 kB
VmPTE: 3212 kB
Threads: 1
SigQ: 0/80092
SigPnd: 0000000000000000
ShdPnd: 0000000000000000
SigBlk: fffffffe7ffbfeff
SigIgn: 0000000000301000
SigCgt: 0000000193c9eeef
CapInh: 0000000000000000
CapPrm: ffffffffffffffff
CapEff: 0000000000000000
CapBnd: ffffffffffffffff
Cpus_allowed: ff
Cpus_allowed_list: 0-7
Mems_allowed: 00000000,00000000,00000000,00000000,00000000,00000000,00000000,00000000,00000000,00000000,00000000,00000000,00000000,00000000,00000000,00000001
Mems_allowed_list: 0
voluntary_ctxt_switches: 4744582
nonvoluntary_ctxt_switches: 7620


Alas, the vmware service offered no consolation..I could not shutdown the daemon gracefully:
[sodo@ogre ~]$ sudo /etc/init.d/vmware restart
Stopping VMware services:
VMware USB Arbitrator [ OK ]
At least one instance of VMware Player is still running.
Please stop all running instances of VMware Player first.


VMware Authentication Daemon [FAILED]


And so, good readers, I was forced to kill the process. And hard, as I had to add the -9 switch to kill, which effectively says "kill the process and don't do any cleanup". "Kill that sucker, but good!"
[sodo@ogre Windows 7 x64]$ kill 4629
[sodo@ogre Windows 7 x64]$ ps -ef | grep 4629
[sodo@ogre Windows 7 x64]$

Yes, this harsh kill command did the trick. And then I had to explain to my poor Win7 vm why I had pulled the plug so harshly:


Oh cruel fate, why dost thou mock me?
TAG

Reference
http://aplawrence.com/SCOFAQ/FAQ_scotec6killminus9.html

Friday, January 07, 2011

creating ISO file from bootable install media

As our company's secure VPN software doesn't work on my Linux box, I decided to install an XP VM to use as a launchpad to my corporate network. Unfortunately, VMware Player failed to install my XP with the message:
An error has been encountered that prevents Setup from continuing
One of the components that Windows needs to continue setup could not be installed.
The parameter is incorrect.
Press OK to view the Setup log file


The Main Issue
This indicated that either my media or the DVD drive was bad. To find out which one was the true culprit, I used my Macbook's Disk Utility to convert the XP installer CD to an ISO. You want to select an Image Format of "DVD/CD master", as shown in the graphic below:


As is my open source bent, I'd rather be using mkisofs, but I was under some time pressure to get some videos out the door. In any case, I scp'd the ISO version of the install CD over to my main box with VMware Player and low and behold, the ISO version worked just fine. So it looks like my bloody DVD drive is going! Off to Newegg..

In retrospect, the occasional problems I've been experiencing over the last two years with my bootable installs were now probably due to the DVD drive having trouble reading ISOs! Argh. I tell you, its tough being an idiot. Still odd, as the DVD burner works fine for recording and reading DVDs. It just doesn't seem to like booting install media. Ah well.

Another Problem Creeps Up on The Guy
While I was successful in installing the XP OS into a VM, once I started the VM and used it for its intended purpose, that of logging into my corporate network, up crops a problem with the Juniper client:
dshostchecker.exe has exited unexpectedly
logged to eacHttpNar.dmp


Double Yarg! This time, in order to resolve the issue, I decided to use a new OS as basis for a VM: Win7. I should have used in the first place, but the Win7 install takes 7GB and the XP install only takes 1.5GB, so I opted for the lighter XP.

Win7 to the Rescue!
As before, I converted the Win7 install media (a DVD) to ISO file using the Mac's Disk Utility. I copied the ISO to my main rig and lo and behold, the ISO installed perfectly into VMware Player. Lastly, I had no issues with my secure VPN installation.

Moral of the story: don't disregard a problem! It will bite you in the rear later!

Things I learned along the way
1) mounting a UDF disk
mount -t udf /dev/dvd /mnt/dvd
2) interesting scheme to use VMware as a host for Windows XP Linux Application
http://www.stat.ufl.edu/system/vmware.html
3) haven't tried this, but this link has a way to create a Windows bootable CD/DVD using mkisofs
http://hints.macworld.com/article.php?story=20080416134218704
4) Windows System Assessment Tool for Win7 comes on when the box is idle and consumes a shitload of CPU
- disable that f*ckr by following these directions


Tally Ho!
TAG

Wednesday, November 17, 2010

setting up IIS to use shell scripts as CGI scripts

Because I'm old school and love shell scripts, I wanted to kick off a shell script from my web browser. In this case, my shell script would sort through a text file, use gnuplot to output a graphic as a png and then display the script in the browser.

Setup IIS to execute shell scripts
I won't belabor how to setup your web server to execute shell scripts, as the link below Installing CGI Applications in IIS 6.0 explains most of the steps. However, I will call out one caveat that was tricky to setup. I use Cygwin to write my shell scripts, so I wanted IIS to use Cygwin's sh.exe as the shell script command interpreter. The nut here is that I needed to add a special configuration in order to have IIS execute Cygwin's script interpreter. Here's how to do this.
  • right-click on the cgi folder
  • click Properties
  • select the Virtual Directory tab
  • click Configuration
  • click Add and type the following:
C:\cygwin\bin\sh.exe "%s" "%s"

Create a Simple Shell Script as a CGI
It is useful to setup a simple script in order to test that IIS is calling sh.exe properly. Here is mine:
#!/bin/sh
echo "HTTP/1.0 200 OK"
echo "Content-type: text/html"
echo
echo "<HTML><HEAD><TITLE>environment variables test</TITLE></HEAD>"
echo "<BODY>"
/usr/bin/env ¦ /usr/bin/sort
echo "</BODY></HTML>"
exit


Remember that this script is essentially hand-rolling an HTTP response. Breaking it down:
1. Send the header:
echo "HTTP/1.0 200 OK"
echo "Content-type: text/html"


2. Make sure you send a blank line (\n\r )
echo

3. After the header and the blank line, send out well-formed HTML
echo "<HTML><HEAD><TITLE>environment variables test</TITLE></HEAD>"

4. Plop some shell functions in there to verify that sh.exe is interpreting commands correctly. In this example, I am printing out and sorting the results of the "env" command. The "env" command prints out the IIS working set of environment variables. Make sure to put the full path in your command string:
/usr/bin/env ¦ /usr/bin/sort

5. Close your HTML
echo "</BODY></HTML>"

6. Exit the script
exit

Reference the script in the HTML of a test page:
<a href="/cgi-bin/env.sh">click me</a>

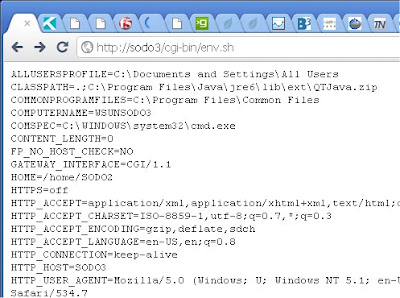
Here is the output of the script


This is a very simple script, but you can see that the sucker works. As it took a good two hours of finagling, I thought it worthwhile to post these instructions and links to further reading.

My gnuplot script is much more involved. If interested, drop me a line and I can send you that script or maybe post another blog article about how to create it.

Good luck!
TAG

References
Common Gateway Interface (CGI)
Short list of HTTP status codes
Installing CGI Applications in IIS 6.0
Writing CGI Scripts for a Web Server

Saturday, October 30, 2010

quick LAMP install in fedora

I wanted to create a database of songs for my band, the stormpigs, and figured I use the Linux Apache Mysql Php (LAMP) stack to do it. Having this goal in mind, here are a few notes on installing apache, mysql, php, phpmyadmin in fedora.

1) install apache
yum install httpd


2) start apache
[root@box /]# service httpd start
Starting httpd: httpd: Could not reliably determine the server's fully qualified domain name, using ::1 for ServerName [ OK ]


3) install mysql and mysql-server
[root@ogre /]# yum install mysql mysql-server
Loaded plugins: presto, refresh-packagekit
Setting up Install Process
Resolving Dependencies
--> Running transaction check
---> Package mysql.x86_64 0:5.1.47-2.fc12 set to be installed
---> Package mysql-server.x86_64 0:5.1.47-2.fc12 set to be installed
--> Processing Dependency: perl-DBD-MySQL for package: mysql-server-5.1.47-2.fc12.x86_64
--> Processing Dependency: perl-DBI for package: mysql-server-5.1.47-2.fc12.x86_64
--> Processing Dependency: perl(DBI) for package: mysql-server-5.1.47-2.fc12.x86_64
--> Running transaction check
---> Package perl-DBD-MySQL.x86_64 0:4.017-1.fc12 set to be installed
---> Package perl-DBI.x86_64 0:1.609-3.fc12 set to be installed
--> Finished Dependency Resolution

Dependencies Resolved

====================================================================================================================================================================================
Package Arch Version Repository Size
====================================================================================================================================================================================
Installing:
mysql x86_64 5.1.47-2.fc12
mysql-server x86_64 5.1.47-2.fc12 updates 9.4 M
Installing for dependencies:
perl-DBD-MySQL x86_64 4.017-1.fc12 updates 161 k
perl-DBI x86_64 1.609-3.fc12 fedora 695 k

Transaction Summary
====================================================================================================================================================================================
Install 3 Package(s)

Total download size: 9.3 M
Installed size: 27 M
Is this ok [y/N]: y


4) start your mysql server
[root@box /]# /etc/init.d/mysql start
or
[root@box /]# service mysqld start
Initializing MySQL database: Installing MySQL system tables...
OK
Filling help tables...
OK

To start mysqld at boot time you have to copy
support-files/mysql.server to the right place for your system

PLEASE REMEMBER TO SET A PASSWORD FOR THE MySQL root USER !
To do so, start the server, then issue the following commands:

/usr/bin/mysqladmin -u root password 'new-password'
/usr/bin/mysqladmin -u root -h ogre password 'new-password'

Alternatively you can run:
/usr/bin/mysql_secure_installation

which will also give you the option of removing the test
databases and anonymous user created by default. This is
strongly recommended for production servers.

See the manual for more instructions.

You can start the MySQL daemon with:
cd /usr ; /usr/bin/mysqld_safe &

You can test the MySQL daemon with mysql-test-run.pl
cd /usr/mysql-test ; perl mysql-test-run.pl

Please report any problems with the /usr/bin/mysqlbug script!

[ OK ]
Starting MySQL: [ OK ]


5) setup mysql database root password
[root@box /]# mysqladmin -u root password 'password'

Sample login:
ip-10-203-5-13:~ # mysql -u root -p
Enter password:
Welcome to the MariaDB monitor. Commands end with ; or \g.
Your MariaDB connection id is 17
Server version: 5.1.44b-MariaDB-log SUSE MariaDB RPM

Type 'help;' or '\h' for help. Type '\c' to clear the current input statement.

MariaDB [(none)]>


6) install php and phpmyadmin
(installing phpmyadmin installs all you'll need)
[root@box ~]$ sudo yum install phpmyadmin Loaded plugins: presto, refresh-packagekit Setting up Install Process Resolving Dependencies --> Running transaction check ---> Package phpMyAdmin.noarch 0:3.3.7-1.fc12 set to be installed --> Processing Dependency: php-gd >= 5.2.0 for package: phpMyAdmin-3.3.7-1.fc12.noarch --> Processing Dependency: php-mbstring >= 5.2.0 for package: phpMyAdmin-3.3.7-1.fc12.noarch --> Processing Dependency: php-mysql >= 5.2.0 for package: phpMyAdmin-3.3.7-1.fc12.noarch --> Processing Dependency: php >= 5.2.0 for package: phpMyAdmin-3.3.7-1.fc12.noarch --> Processing Dependency: php-mcrypt >= 5.2.0 for package: phpMyAdmin-3.3.7-1.fc12.noarch --> Running transaction check ---> Package php.x86_64 0:5.3.3-1.fc12 set to be installed --> Processing Dependency: php-common = 5.3.3-1.fc12 for package: php-5.3.3-1.fc12.x86_64 --> Processing Dependency: php-cli = 5.3.3-1.fc12 for package: php-5.3.3-1.fc12.x86_64 ---> Package php-gd.x86_64 0:5.3.3-1.fc12 set to be installed --> Processing Dependency: libt1.so.5()(64bit) for package: php-gd-5.3.3-1.fc12.x86_64 ---> Package php-mbstring.x86_64 0:5.3.3-1.fc12 set to be installed ---> Package php-mcrypt.x86_64 0:5.3.3-1.fc12 set to be installed --> Processing Dependency: libmcrypt.so.4()(64bit) for package: php-mcrypt-5.3.3-1.fc12.x86_64 ---> Package php-mysql.x86_64 0:5.3.3-1.fc12 set to be installed --> Processing Dependency: php-pdo for package: php-mysql-5.3.3-1.fc12.x86_64 --> Running transaction check ---> Package libmcrypt.x86_64 0:2.5.8-9.fc12 set to be installed ---> Package php-cli.x86_64 0:5.3.3-1.fc12 set to be installed ---> Package php-common.x86_64 0:5.3.3-1.fc12 set to be installed ---> Package php-pdo.x86_64 0:5.3.3-1.fc12 set to be installed ---> Package t1lib.x86_64 0:5.1.2-5.fc12 set to be installed --> Finished Dependency Resolution Dependencies Resolved ==================================================================================================================================================================================== Package Arch Version Repository Size ==================================================================================================================================================================================== Installing: phpMyAdmin noarch 3.3.7-1.fc12 updates 3.6 M Installing for dependencies: libmcrypt x86_64 2.5.8-9.fc12 fedora 92 k php x86_64 5.3.3-1.fc12 updates 1.1 M php-cli x86_64 5.3.3-1.fc12 updates 2.2 M php-common x86_64 5.3.3-1.fc12 updates 521 k php-gd x86_64 5.3.3-1.fc12 updates 105 k php-mbstring x86_64 5.3.3-1.fc12 updates 452 k php-mcrypt x86_64 5.3.3-1.fc12 updates 30 k php-mysql x86_64 5.3.3-1.fc12 updates 77 k php-pdo x86_64 5.3.3-1.fc12 updates 71 k t1lib x86_64 5.1.2-5.fc12 fedora 153 k Transaction Summary ==================================================================================================================================================================================== Install 11 Package(s) Total download size: 8.3 M Installed size: 31 M Is this ok [y/N]: y

8) inspect the environment
Create a file called phpinfo.php and place it in the webroot of apache, usually /var/www/html
[root@box /]# cat /var/www/html/phpinfo.php
< ? phpinfo();
?>

This is a very nice utility that inspects your php and apache environment showing headers, modules, etc.


9) login to phpMyAdmin
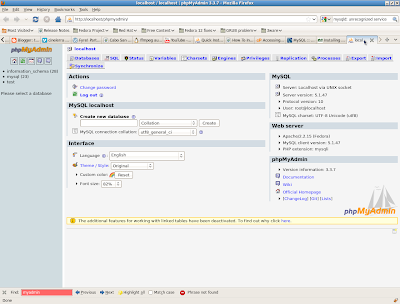
Visit http://localhost/phpmyadmin. You will be prompted to enter the username and password of an authorized user (root, usually).


Those are the basics of a LAMP install. More to come.
TAG

Troubleshooting
If you setup mysql, but not the server component, you'll get this error
ERROR 2002 (HY000): Can't connect to local MySQL server through socket '/var/lib/mysql/mysql.sock'

References
http://www.flmnh.ufl.edu/linux/install_apache.htm
http://wiki.phpmyadmin.net/pma/Welcome_to_phpMyAdmin_Wiki

MySQL Tutorial

Thursday, September 09, 2010

DHCP renewals interrupt shell script

I was running a script to convert a bunch of Canon 5D photos from high res to HD resolution and noticed the script would die after 15-30 minutes.

It didn't seem likely that "convert" would die, as the script logged into the server that I was using to execute convert and I only executed convert once on that server:
for FILE in $(cat $FILES)
do
COUNT=$(expr $COUNT + 1)
NEWFILE=$(echo $FILE | sed 's/Remote\(.*\)/new\/\1/g')
echo "FILE $COUNT of $NUMFILES is $FILE, NEWFILE is $NEWFILE"
echo "converting $FILE to $NEWFILE"
ssh $CRED "/opt/local/bin/convert -verbose -resize 1920x1280 $FILE $NEWFILE"
echo
#break
done


Snooping in /var/log/syslog, I found that the DHCP server was renewing my IP address every 28 minutes or so:
Sep 8 07:47:52 ubuntu NetworkManager: address 192.168.0.95
Sep 8 05:02:22 ubuntu NetworkManager: address 192.168.0.95
Sep 8 05:26:27 ubuntu NetworkManager: DHCP: device eth0 state changed bound -> expire
Sep 8 05:26:27 ubuntu NetworkManager: DHCP: device eth0 state changed expire -> preinit
Sep 8 05:26:28 ubuntu NetworkManager: address 192.168.0.96
Sep 8 05:53:04 ubuntu NetworkManager: DHCP: device eth0 state changed bound -> expire
Sep 8 05:53:04 ubuntu NetworkManager: DHCP: device eth0 state changed expire -> preinit
Sep 8 05:53:08 ubuntu NetworkManager: address 192.168.0.97
Sep 8 06:21:25 ubuntu NetworkManager: DHCP: device eth0 state changed bound -> expire
Sep 8 06:21:25 ubuntu NetworkManager: DHCP: device eth0 state changed expire -> preinit
Sep 8 06:21:26 ubuntu NetworkManager: address 192.168.0.98
Sep 8 06:50:47 ubuntu NetworkManager: DHCP: device eth0 state changed bound -> expire
Sep 8 06:50:47 ubuntu NetworkManager: DHCP: device eth0 state changed expire -> preinit


What the hell? So I manually set the IP address of the box using these instructions from Jonathan Moeller:

The comment from Anurag fit my bill the best; ie, giving the complete network info to the /etc/network/interfaces files, including network and broadcast IPs.
ubuntu:~$ cat /etc/network/interfaces
auto eth0
iface eth0 inet static
address 192.168.0.98
netmask 255.255.255.0
gateway 192.168.0.1
network 192.168.0.0
broadcast 192.168.0.255


cheers,
sodo

Update 2010/09/13
Here's an example of a simple interfaces file with dynamic setting:
auto lo
iface lo inet loopback
auto eth0
iface eth0 inet dhcp

Wednesday, August 25, 2010

irssi behind proxy (via ssh port forwarding)

A Problem
To get natty technical questions answered, sometimes you hafta go to the source and drop a line to the mavens on IRC (Internet Relay Chat). But IRC uses a specific port (6667) denied by the average corporate firewall. Unfortunately, I could not get irssi functioning through my http proxy at work. What to do? Well..secure SSH tunneling and port forwarding to the rescue!
ssh -p 443 -L 1234:irc.freenode.net:6667 user@homemachine

But what the heck is all that stuff? I will explain.

The Solution
Like most companies, my company allows port 443 traffic through their firewall. I decided to use this open access to create a secure tunnel from my workstation in the office to a machine in my home network that has a running SSH server. I then use a very nice feature of SSH to forward traffic through the tunnel to my machine at home and onto a specific server out in the internet. This *should* be as easy as 1 - 2 - 3 (shown below), though to me, it's a bit mindbending. Read on..

1 - Configure the Home Router/Firewall
In order to get the above solution working, I needed to configure my home firewall to forward requests for port 443 to the SSH server (port 22) at home. Most home routers/firewalls have the ability to setup this hardware-based port forwarding.

2 - SSH Tunnel and Forward
After making sure that the port forwarding described in Step 1 is setup, I then use SSH on my machine at work to:
1) create a secure tunnel to my home machine over port 443 (ssh -p 443 user@homemachine)
2) create a listener on my local machine on port 1234 (-L 1234:)
3) forward requests to a specific IRC server on a specific port via that secure tunnel. In this case, port 6667 on irc.freenode.net , like so (:irc.freenode.net:6667)

The whole shebang is efficiently handled with that one ssh command string:
ssh -p 443 -L 1234:irc.freenode.net:6667 user@homemachine

On the host at work
After making sure Step 1 was completed, I received a "Password:" prompt after hitting "enter" on the above SSH command line:
$ ssh -p 443 -L 1234:irc.freenode.net:6667 user@homemachine
Password:
Last login: Wed Aug 25 11:20:09 2010 from 26.176.213.71


Now that I'm properly authenticated, I checked to see that the local machine is listening on port 1234. I did this by opening a second command prompt on the machine at work and looking at the output of "netstat -na":
$ netstat -na grep LISTEN
..
TCP 127.0.0.1:1234 0.0.0.0:0 LISTENING
TCP 127.0.0.1:5152 0.0.0.0:0 LISTENING
TCP 127.0.0.1:8198 0.0.0.0:0 LISTENING

SSH has opened that local port and will forward traffic bound for it to the remote SSH server. But I'm not done yet. IRSSI needs to point to that local port in order to use my home machine to connect to the IRC server. Much like a frog uses one lily pad to hop to another.

3 - IRSSI config change
To point IRSSI to utilize that SSH tunnel, I made two minor tweaks to IRSSI's configuration: proxy_address and proxy_port via the /SET command:
[(status)] /set proxy_address 127.0.0.1
[(status)] /set proxy_port 1234
[(status)] /set use_proxy ON

[(status)] /set 
15:33 [proxy]
15:33 proxy_address = 127.0.0.1
15:33 [proxy]
15:33 proxy_port = 1234
15:33 [proxy]
15:33 use_proxy = ON

Note the localhost IP address in "proxy_address" and, of course, the appropriate port that I've opened.

With these tweaks in place and the secure tunnel created, I can then startup IRSSI and successfully connect to the IRC node via the local port, 1234:
11:35 -!- Irssi: Looking up irc.freenode.net
11:35 -!- Irssi: Connecting to irc.freenode.net [127.0.0.1] port 6667
11:35 -!- Irssi: Connection to irc.freenode.net established
11:35 !gibson.freenode.net *** Looking up your hostname...
11:35 !gibson.freenode.net *** Checking Ident
11:35 !gibson.freenode.net *** Found your hostname
11:35 !gibson.freenode.net *** No Ident response
11:35 -!- You have not registered
11:35 -!- Welcome to the freenode Internet Relay Chat Network user
11:35 -!- Your host is gibson.freenode.net[213.179.58.83/6667], running version ircd-seven-1.0.0
11:35 -!- This server was created Sat Jan 30 2010 at 01:13:47 CET
11:35 -!- Highest connection count: 6923 (6922 clients) (3140303 connections received)
11:35 -!- - gibson.freenode.net Message of the Day -
11:35 -!- - Welcome to gibson.freenode.net in Norway, EU! Thanks to
11:35 -!- - SSC Networks (www.ssc.no) for sponsoring this server!

Yahoo!

Conclusion
In the fashion of port forwarding, SSH works its magic to create a listener on the local machine, forward the packets destined for it through an SSH tunnel to my home server and onto somewhere else. In my case, I use my machine at home to forward my IRC requests onto irc.freenode.net. Very cool! Don't forget this same port forwarding feature of SSH can be applied to other TCP applications, such as VLC running on that same remote machine:
ssh -p 443 -L 1234:localhost:5900 user@homemachine

Have a good one,
TAG

Reference
http://www.techanswerguy.com/2006/09/irssi-chat-client.html
http://blag.andrewyates.net/2008/06/17/dynamic-port-forwarding-with-ssh-ssh-d/

Monday, August 02, 2010

drobo fs install, review

If all computer technology was like the Drobo, there would be less people complaining that their tech is difficult to use or doesn't work. I've had my Drobo FS for three days, but man, I love the thing. It is such a pleasure to not have to worry about RAID arcana just to have your systems safely backed up.

Got It!
I bought the Drobo FS from Amazon (about $694 with free shipping) and set it up between yesterday and today. I installed the Drobo Dashboard, the utility program for the Drobo, on my MacBook Pro, rebooted the Mac, popped a combination of five 250GB and 500GB drives in, hooked up the power and the ethernet cables and fired it up. Drobo Dashboard saw the unit as it sat attached to my router.

The Basics
Dashboard asked me if I wanted to upgrade the firmware..so I did. There was a small hiccup with Dashboard not seeing the Drobo after doing the firmware, so I had to hard power it down. But second time around, the firmware update worked. Dashboard then asked me if I wanted to upgrade the Dashboard software, which I did. I restarted the Mac. I then went into Advanced Settings -> Tools and configured email alerts to send me an email if Drobo becomes too full or has problems.

Create Shares
Back in Dashboard, I created a couple of shares, one as backup for my main Linux video editing workstation and the other for my MacBook and TimeMachine. I setup my MacBook to use 500GB of storage as a TimeMachine backup. The TimeMachine hook up worked like a charm and started backing up.

Stress Test Drobo!
I decided to test it hard out of the box and ran that TimeMachine backup from the mac (connected wirelessly) coincident with a big copy from my Linux video editing box. On my Linux box, I mounted the Drobo via SMB/CIFS and copied over my 460GB archive. The backup of the Linux archive took about 3.5 hours at about 25MiB/s over wired ethernet. Not bad for over gigE and with contention from the Time Machine backup.

The next morning, I got tired of waiting for the wireless TM backup of 130GB to finish, so I stopped the TM backup and then hooked up the Mac to a hard wired ethernet connection. Still took about five hours to copy over the remaining 80GB.

Update
I recently created a 760GB archive of my video workstation using fsarchiver. Copying the one file from my workstation to the Drobo took about 10 hours (8pm to 6am). That was with contention from a 40GB Time Machine backup that was running at the same time.
***end update***

Drobo Apps
Today I installed a few Drobo Apps (apache/droboutils/dropbear). DroboUtils is an easier way to manage Drobo Apps and as a prerequisite, it requires Apache to be installed. I used Apache for another function, setup of my personal website. I haven't cutover to using the apache web server as my main webserver yet because I need to tweak the apache config to hide some of the directory structures.

There is no telnet client for DroboApps, but DropBear is the SSH server for the Drobo. After installing, it was pretty cool to be able to logon to the device.

syslog entries
Sep 13 17:40:23 MAC sudo[57338]: root : TTY=unknown ; PWD=/ ; USER=newuser ; COMMAND=/sbin/mount_afp afp://user:pass@192.168.1.87/DroboApps /Volumes/DroboFS/0db102670141/1/DroboApps
Sep 13 17:40:24 MAC kernel[0]: AFP_VFS afpfs_mount: /Volumes/DroboFS/0db112312341/1/DroboApps, pid 57338
Sep 13 17:44:09 MAC /System/Library/CoreServices/backupd[57359]: Backup requested by user
Sep 13 17:44:09 MAC /System/Library/CoreServices/backupd[57359]: Starting standard backup
Sep 13 17:44:24 MAC kernel[0]: AFP_VFS afpfs_mount: /Volumes/MacTimeMachine, pid 57360
Sep 13 17:44:24 MAC /System/Library/CoreServices/backupd[57359]: Mounted network destination using URL: afp://user@Drobo.local/MacTimeMachine
Sep 13 17:44:24 MAC /System/Library/CoreServices/backupd[57359]: Backup destination mounted at path: /Volumes/MacTimeMachine
Sep 13 17:44:30 MAC /System/Library/CoreServices/backupd[57359]: Disk image /Volumes/MacTimeMachine/MAC_0017f2ca5f8b.sparsebundle mounted at: /Volumes/Backup of MAC
Sep 13 17:44:30 MAC /System/Library/CoreServices/backupd[57359]: Backing up to: /Volumes/Backup of MAC/Backups.backupdb

Summary
All-in-all, the process was super smooth and the device is everything I hoped for. With the ability to expand drive space at will, I shouldn't outgrow the FS very soon. I'm also looking forward to using more Drobo Apps and letting that be my server, instead of my XP VM on my Mac!

Long live Drobo!

Some Pics of the Process
drobo formatting my stack of drives


updating the firmware on the drobo


drobo temporarily loses its mind during firmware update


don't touch drobo while firmware is being updated!


drobo starting up after successful firmware update


drobo successfully updates its firmware


drobo dashboard download for update


time machine backup using drobo!


25MiBps (Mebibytes per second) network copy speed (with two backups to Drobo running..Time Machine and a backup of a 438GB archive)


Update 2010/08/14
Drobo shell commands

Found some good links on cross-compiling packages for the Drobo:

Ethtool specific links

Drobo Forums

Thursday, July 01, 2010

X server in cygwin

Start an X server locally
Install Cygwin
http://x.cygwin.com/docs/ug/setup.html

Identify X Displays
Start by identifying your X displays.  Xrandr is good for this:

$ xrandr 
Screen 0: minimum 2560 x 1024, current 2560 x 1024, maximum 2560 x 1024
default connected 2560x1024+0+0 0mm x 0mm
   2560x1024      50.0* 

For cygwin, start X:
$ startxwin &
[1] 3528

Make sure you have a DISPLAY environment variable set locally:
$ export DISPLAY=:0.0

To verify, echo it out:
$ echo $DISPLAY
:0.0

This is important because a properly working X server will export the DISPLAY environment variable to the remote server.

You can discover the process id of the X server by looking at the lock file:
$ ll /tmp/.X0-lock 
-r--r--r-- 1 root root 11 Sep 13 11:26 /tmp/.X0-lock

$ cat /tmp/.X0-lock 
      5647

$ ps -ef | grep 5647
root      5647  5645  5 Sep13 tty7     1-00:16:30 /usr/bin/Xorg :0 -br -verbose -auth /var/run/gdm/auth-for-gdm-SWEiqo/database -nolisten tcp

X servers will listen on port 6000 by default:
$ netstat -na | grep LISTENING
  TCP    0.0.0.0:6000           0.0.0.0:0              LISTENING

The first digit of the port will change based on the display number (0, 1, 2 etc).  So the default port of 6000 may change to 6001 if you've started an X server on display 1:
$ startxwin -- :1

$ netstat -na | grep LISTENING
  TCP    0.0.0.0:6001           0.0.0.0:0              LISTENING

Test by opening an xterm locally:
$ /usr/X11R6/bin xterm -display 127.0.0.1:0.0 -ls

Running remote X commands
Once I've verified that my X server is running properly, I will test running an X program remotely.  In this example, I needed to kick off a script on my Mac that depends on X.  My Macbook Pro (downstairs) is remote to my main Linux box which is upstairs.  I needed to startup an X session on the remote Mac.

From my local Linux box, I start a secure X session on my remote Mac:
$ ssh -Y sodo@192.168.110.177
Password:
Warning: No xauth data; using fake authentication data for X11 forwarding.
Last login: Fri Sep 30 14:23:09 2011 from computer
Have a lot of fun...
sodo@remote:~>

This sets up a secure X windows communication, the DISPLAY environment variable, the X authentication and starts up the local X terminal application logged on to the remote server.

I verify that the Mac's X server has a DISPLAY environment variable set.  This variable was properly forwarded by my Linux box and translated by the Mac:
sodo@remote:~> echo $DISPLAY
localhost:10.0

Once these settings were confirmed, I started an xterm
sodo@remote:~> xterm

Note that the above steps could have been accomplished with a one liner:
$ ssh -Y sodo@192.168.110.177 xterm

Cool.

Troubleshooting
1) I first got this error:
Warning: No xauth data; using fake authentication data for x11 forwarding

From this thread:
http://www.cygwin.com/ml/cygwin-xfree/2004-10/msg00236.html

I choose to ignore!

2) This is very important. The remote server's SSH daemon must be configured to forward X11 requests.  From http://x.cygwin.com/docs/ug/using-remote-apps.html#using-remote-apps-ssh:
Note: By default, the OpenSSH server does not allow forwarded X connections. This must be configured on the remote host by adding X11Forwarding yes to the sshd_config configuration file. The OpenSSH server must be restarted or SIGHUP'ed to re-read the configuration file after it is changed.

Note: The OpenSSH server requires the xauth command to be available to forward X connections. Consequently, it must be installed on the remote host.

3) .Xauthority does not exist
$ ssh -X liveuser@192.168.x.x
liveuser@192.168.x.x's password:
Last login: Thu Oct  4 16:59:48 2012 from 192.168.x.y
/usr/bin/xauth:  file /home/liveuser/.Xauthority does not exist
 

Well..create it then, fah Gawd's sake!
[liveuser@localhost ~]$ touch .Xauthority
[liveuser@localhost ~]$ chmod 755 .Xauthority
[liveuser@localhost ~]$ exit
logout
Connection to 192.168.x.x closed.

$ ssh -X liveuser@192.168.x.x
liveuser@192.168.x.x's password:
Last login: Thu Oct  4 17:02:13 2012 from 192.168.x.y
[liveuser@localhost ~]$ cat .Xauthority
localhost.localdomain10MIT-MAGIC-COOKIE-165??


About .Xauthority
http://en.wikipedia.org/wiki/X_Window_authorization#Cookie-based_access

ReferenceUsing Cygwin/X
Cygwin X FAQ
Using Cygwin/XUsing Cygwin/X
http://www.int.gu.edu.au/~anthony/info/X/Display.needs

Feel free to drop me a line or ask me a question.