Filters
With Filters, you can perform data transformations on the information that Analytics gathers. You can use filters to do a number of things:
* exclude or include data matching certain criterion
* do lowercase or uppercase transformations of data
* search and replace data matching expressions
* do table lookups to transform lists of meaningless codes to something that actually might mean something to a human being
More detail about filters is available here on Google's site. Also, here is detail on how to create a basic filter.
Advanced Filter
An Advanced Filter does a little something different than a normal filter. For instance, using an Advanced Filter, you can match a generic text string and write that data to an empty, user defined field. For instance, if I want to find the value of a specific query parameter in a URL, I can use an Advanced Filter to pull the values from each URL and store them in a separate data field.
Real World Example
Our product search page allows users to enter in a keyword phrase to search on. After the customer submits the form, a list of matching products will be returned. The FORM element of the web page uses a GET request that is made from the browser to the server for the list of matching products. When the GET request is made, the query parameter in the URL is exposed in the Address bar of the browser:
http://ecommercewebsite/search.asp?SSTR=radio&go=1
Therefore, the SSTR parameter in our product search page determines the keyword search that is performed. One of the excellent reports GA gives you is the Top Content report. However, looking at the Top Content report for our search page, we see that a lot of data repeats and it is not easy to pick out the product that the customer wanted to find:

Defining the Advanced Filter
In this case, I want to pluck out only the value of the SSTR parameter and store it in another field. To do this, I will use an Advanced Filter. This filter will have an input value (the URL of the customer request), a match criterion (the value of SSTR) and a place to store the output (an empty column named User Defined in the Visitors report).
Creating the Advanced Filter
Here are the steps we need to perform in Google Analytics to create our Advanced Filter:
1 - Click on "Analytics Settings" in the upper-left of GA.
2 - Click on "Filter Manager"
3 - Click "Add Filter"
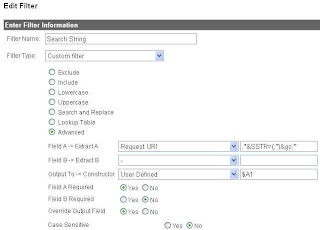
4 - In Filter type, select "Custom Filter" and choose "Advanced" from the selection of radio buttons.
5 - Since we need to select the URL of the customer request, select the Request URI as the input field. This input field is listed as Field A.
6 - We will need to define a regular expression as the match criterion. Here is a quick tutorial on using regular expressions. In this case, the verbal description of our match criterion is "pull the words after the "SSTR=" and before the first ampersand, the "&" character. So our match criterion, transformed into a regular expression, becomes this:
.*&SSTR=(.*)&go.*
As noted in the tutorial, the parentheses capture one or more parts of the input field. The text between the parentheses is captured and can then be referenced and stored. We reference the value captured between the parentheses in Field A later by using the shorthand $A1. $A1 translates to "what was in the first set of parentheses in Field A".
7 - Select "User Defined" as the Output Field.
8 - Since we want the values captured between the parentheses, our Constructor will be $A1.
9 - Select a value for "Yes" for "Override Output Field"
Here is how our Advanced Filter should look:

10 - To make the filter active for your specific website, from the "Available Website Profiles", add your website to the "Selected Website Profiles"
11 - Save the filter by clicking Finish
After Google has caught up(probably four to five hours from now), check the data by going back to View Reports -> Visitors -> User Defined report:

Eh Voila! Our report is there! I hope you enjoyed this discussion of Google Analytics Advanced Filtering and it will help you make new, easy-to-read reports for you and your team.
'sodo
No comments:
Post a Comment