After a mishap with some Steam drivers that caused me to reinstall Pop-OS, I decided to make my box a bit more resilient. I noticed that my Pop-OS install didn't have a recovery drive. This is a very nice feature if you don't want to go hunting for a USB if your root filesystem ever got corrupted.
Normally you get the Recovery partition out of the box with Pop-OS. But I had done a custom install. You don't get a Recovery partition if you don't specifically add it. So I had to jump through a few hoops listed in this article here. But that article needed a decent example of a two things:
- running the pop-os upgrade tool
- mapping the correct UUIDs in the recovery.conf and boot loader entry
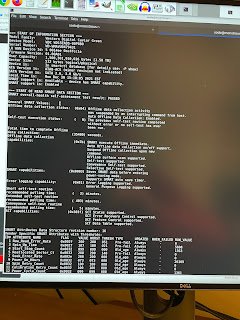
Here are the mappings, shown here with colors to help identify what goes where:


Here is the upgrade command:
pop-upgrade recovery upgrade from-release 22.04
Took about a minute to refresh the /recovery filesystem. Here is the output from the journal. You can see this interactively if you open a terminal with the command "journalctl -flu pop-upgrade":
sodo@pop-os:~$ journalctl -b0 | grep pop-upgrade
Dec 25 12:03:52 pop-os com.system76.PopUpgrade.Notify.desktop[3621]: checking if pop-upgrade requires an update
Dec 25 12:03:52 pop-os pop-upgrade[3762]: [INFO ] daemon/mod.rs:389: initializing daemon
Dec 25 12:03:52 pop-os pop-upgrade[3762]: [INFO ] daemon/mod.rs:749: daemon registered -- listening for new events
Dec 25 12:03:52 pop-os pop-upgrade[3794]: pop-upgrade was already not on hold.
Dec 25 12:03:52 pop-os pop-upgrade[3762]: [INFO ] daemon/mod.rs:1099: updating apt sources
Dec 25 12:03:52 pop-os pop-upgrade[3856]: Hit:1 https://dl.google.com/linux/chrome/deb stable InRelease
Dec 25 12:03:52 pop-os pop-upgrade[3856]: Hit:2 http://apt.pop-os.org/proprietary jammy InRelease
Dec 25 12:03:52 pop-os pop-upgrade[3856]: Hit:3 http://apt.pop-os.org/release jammy InRelease
Dec 25 12:03:52 pop-os pop-upgrade[3856]: Hit:4 http://apt.pop-os.org/ubuntu jammy InRelease
Dec 25 12:03:52 pop-os pop-upgrade[3856]: Hit:5 http://apt.pop-os.org/ubuntu jammy-security InRelease
Dec 25 12:03:52 pop-os pop-upgrade[3856]: Hit:6 http://apt.pop-os.org/ubuntu jammy-updates InRelease
Dec 25 12:03:52 pop-os pop-upgrade[3856]: Hit:7 http://apt.pop-os.org/ubuntu jammy-backports InRelease
Dec 25 12:03:53 pop-os pop-upgrade[3856]: Reading package lists...
Dec 25 12:03:53 pop-os pop-upgrade[3762]: [INFO ] daemon/mod.rs:1010: performing a release check
Dec 25 12:03:53 pop-os pop-upgrade[3762]: [INFO ] daemon/mod.rs:1017: Release { current: "22.04", lts: "true", next: "22.10", available: false }
Dec 25 12:03:53 pop-os pop-upgrade[3762]: [INFO ] release_api.rs:58: checking for build 22.04 in channel nvidia
Dec 25 12:03:54 pop-os systemd[1]: pop-upgrade.service: Deactivated successfully.
Dec 25 12:03:54 pop-os systemd[1]: pop-upgrade.service: Consumed 1.066s CPU time.
Dec 25 12:04:03 pop-os systemd[1225]: pop-upgrade-notify.service: Control process exited, code=killed, status=15/TERM
Dec 25 12:04:03 pop-os systemd[1225]: pop-upgrade-notify.service: Failed with result 'signal'.
Dec 25 12:04:48 pop-os pop-upgrade[5183]: checking if pop-upgrade requires an update
Dec 25 12:04:48 pop-os pop-upgrade[5200]: [INFO ] daemon/mod.rs:389: initializing daemon
Dec 25 12:04:48 pop-os pop-upgrade[5200]: [INFO ] daemon/mod.rs:749: daemon registered -- listening for new events
Dec 25 12:04:48 pop-os pop-upgrade[5218]: pop-upgrade was already not on hold.
Dec 25 12:04:48 pop-os pop-upgrade[5200]: [INFO ] daemon/mod.rs:1099: updating apt sources
Dec 25 12:04:49 pop-os pop-upgrade[5221]: Hit:1 https://dl.google.com/linux/chrome/deb stable InRelease
Dec 25 12:04:49 pop-os pop-upgrade[5221]: Hit:2 http://apt.pop-os.org/proprietary jammy InRelease
Dec 25 12:04:49 pop-os pop-upgrade[5221]: Hit:3 http://apt.pop-os.org/release jammy InRelease
Dec 25 12:04:49 pop-os pop-upgrade[5221]: Hit:4 http://apt.pop-os.org/ubuntu jammy InRelease
Dec 25 12:04:49 pop-os pop-upgrade[5221]: Hit:5 http://apt.pop-os.org/ubuntu jammy-security InRelease
Dec 25 12:04:49 pop-os pop-upgrade[5221]: Hit:6 http://apt.pop-os.org/ubuntu jammy-updates InRelease
Dec 25 12:04:49 pop-os pop-upgrade[5221]: Hit:7 http://apt.pop-os.org/ubuntu jammy-backports InRelease
Dec 25 12:04:50 pop-os pop-upgrade[5221]: Reading package lists...
Dec 25 12:04:50 pop-os pop-upgrade[5200]: [INFO ] daemon/mod.rs:1010: performing a release check
Dec 25 12:04:50 pop-os pop-upgrade[5200]: [INFO ] daemon/mod.rs:1017: Release { current: "22.04", lts: "true", next: "22.10", available: false }
Dec 25 12:04:50 pop-os pop-upgrade[5200]: [INFO ] release_api.rs:58: checking for build 22.04 in channel nvidia
Dec 25 12:04:50 pop-os systemd[1]: pop-upgrade.service: Deactivated successfully.
Dec 25 12:04:50 pop-os systemd[1]: pop-upgrade.service: Consumed 1.000s CPU time.
Just wanted to highlight those two things. Best of luck if you try creating the Recovery partition. It was a bit of a challenge!
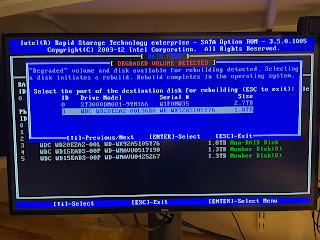
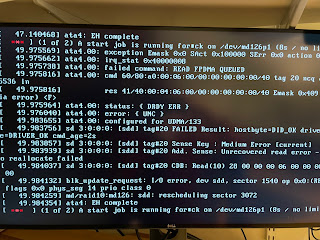
Just remember: DON'T PUT YOUR RECOVERY PARTITION ON A FILESYSTEM ALONGSIDE ANY OF THE OTHERS YOU EXPECT TO WIPE CLEAN!! What happened to me was that I initially put the recovery partition on a RAID 0 set, /dev/md0 as the third partition (/dev/md0p3). The problem was, when I went to recover, because that third partition was along side my /root partition (/dev/md0p2), the installer couldn't lock the entire filesystem, as /dev/md0p3 was in use. So I couldn't see the /dev/md0 raid set at all in the installer. I could only see the underlying physical partitions (not the mdadm RAID partitions). This happened to be installed on NVMe drives, so all I saw was "/dev/nvme2n1p2" and NOT /dev/md0. So beware! To resolve, I just put the recovery drive on a second hard drive that I use for my backup. This drive is not / (root), /boot, /boot/efi or swap. It's just a Seagate Ironwolf disk that I occasionally mount to do backups (/dev/sda).
Oh and I also made a RAID5 set on a second PC and added an rsync to the cron for that guy. This is in case my main box gets blown up for whatever reason:
rsync -avxHAXP --info=progress2 --exclude='Downloads' --delete /mnt/sodofiles/* sodo@secondbox:/sodoFiles
Yay for resiliency!
Next stop will be creating some Ansible scripts to configure a newly spun up box with all the core softwares that run my editing rig.
'sodo
References
R